Borderlands 3 – The Handsome Jackpot Echo Log Locations

Grand Opening
The Saga of Salty Jerms (Part 1)
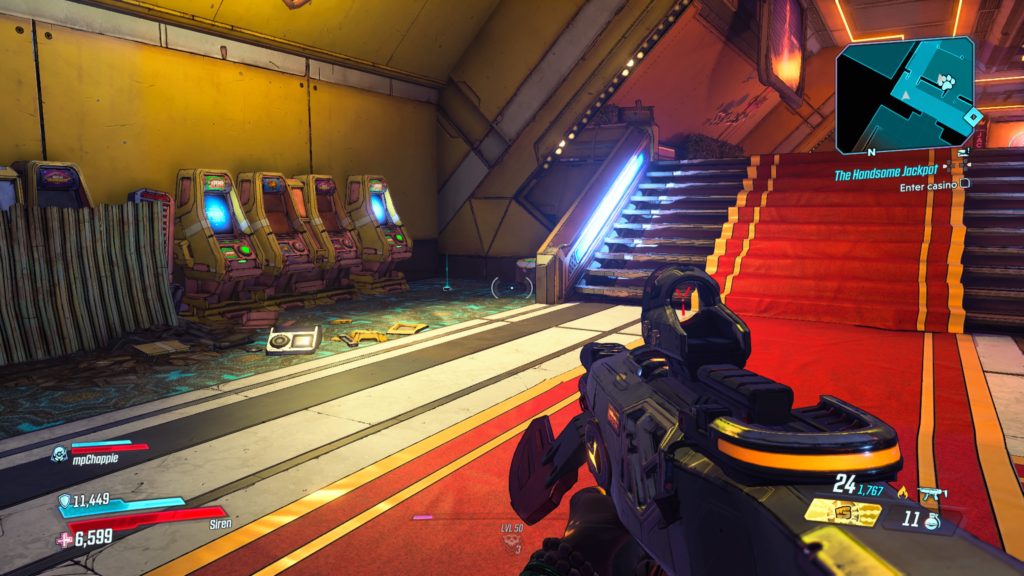
This log is located in The Chump Slots area just past the entrance of the casino following the fight with the robots. Head through the doorway between two large Handsome Jack statues underneath the Hyperial lettering. Drop down to the casino floor and take a right heading north to find the Echo Log on the ground near a slot machine under a flashing yellow neon sign of cards.
The Saga of Salty Jerms (Part 2)
This log is located on a chair in front of a slot machine in Windfall Way just before Grand Opening Station.
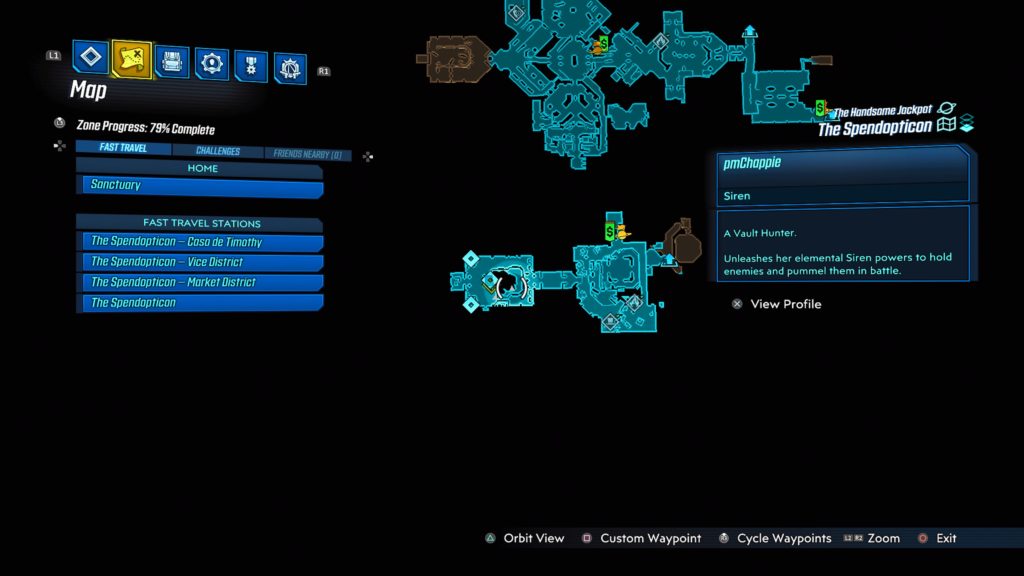
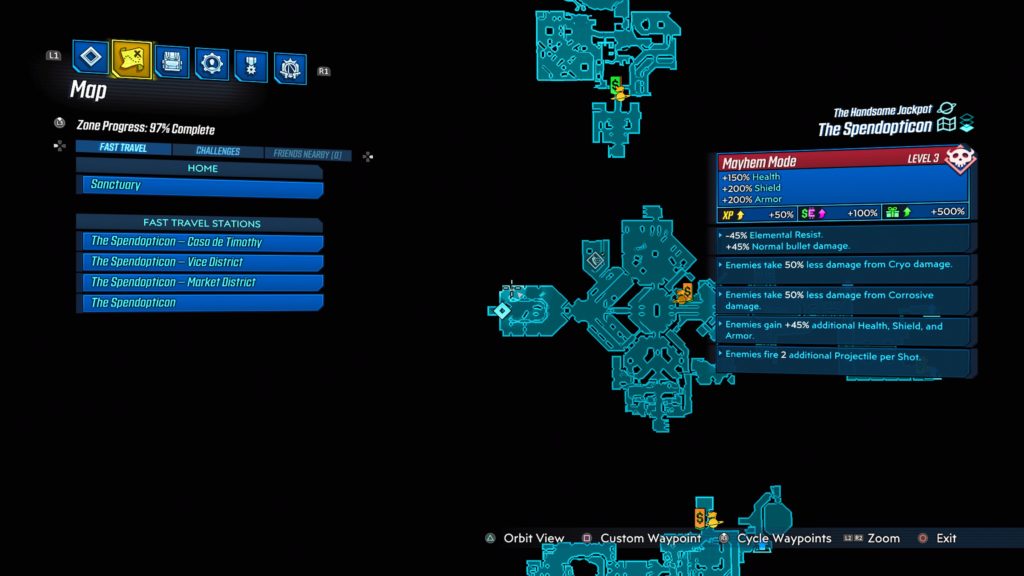
The Spendopticon
High Roller (Part 1)
Located in Casa de Timothy underneath the platform where Timothy is standing.
High Roller (Part 2)
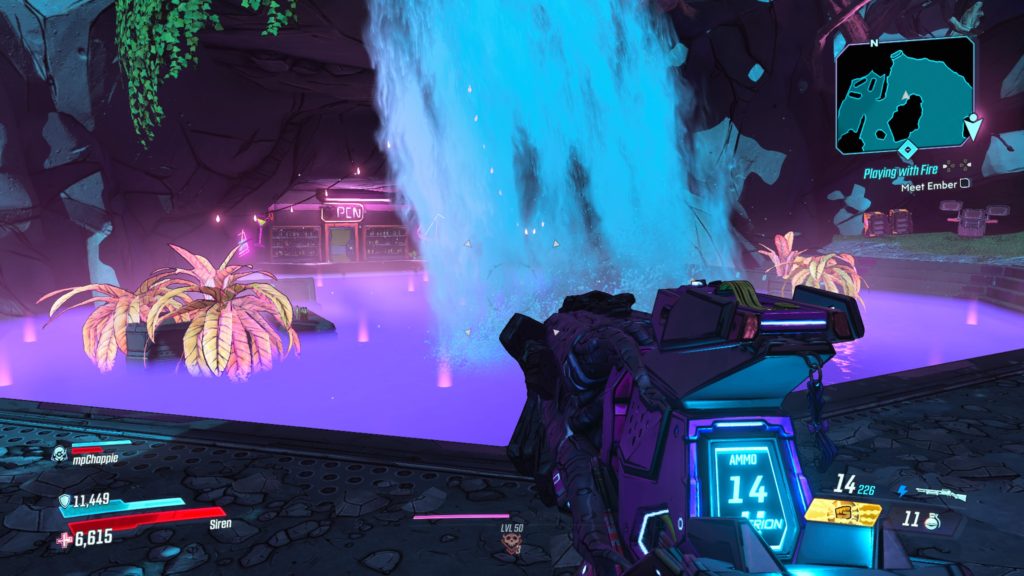
This log is located in Silky’s Soak (area with all the purple water) on a bar behind a waterfall.
This log is located on a small stool in the karaoke section (northwestern corner) of Foxxxi’s Cabaret.
High Roller (Part 3)
This log is located in the J-Spot under the skag sculpture.
This log is located in the Welcome Turrents area (accessible during the All Bets Off main story mission) on the right side at the base of a wall support.
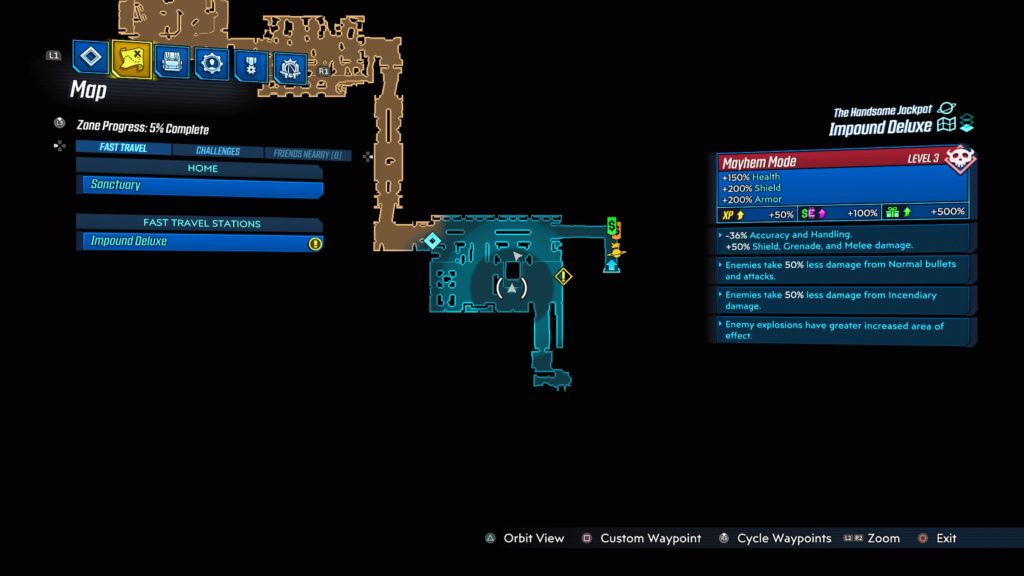
Impound Deluxe
The Last Doppelganger (Part 1)
This log is on a bench on the south side of Customer Care.
Loader Buds (Part 1)

This log is located in the ventilation shaft just before the Grav Locks.
Loader Buds (Part 2)
This log is located in a room on the second level in the hanger containing the La Femme Brulee Fast Travel Station on a desk.
The Last Doppelganger (Part 2)
This log is located on a desk in front of a toilet in the lower section just after the long bridge leading to Drifting Larboard.
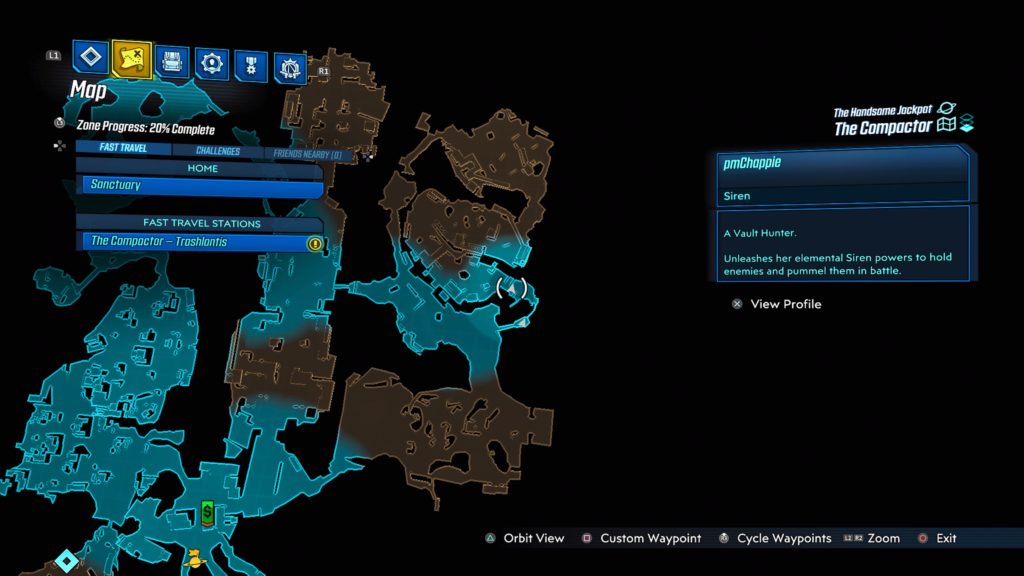
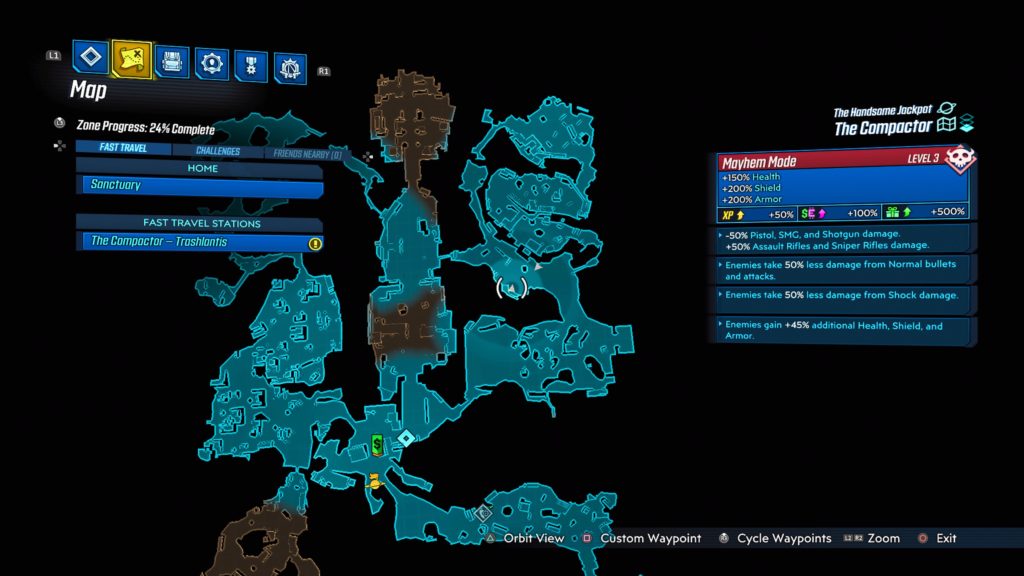
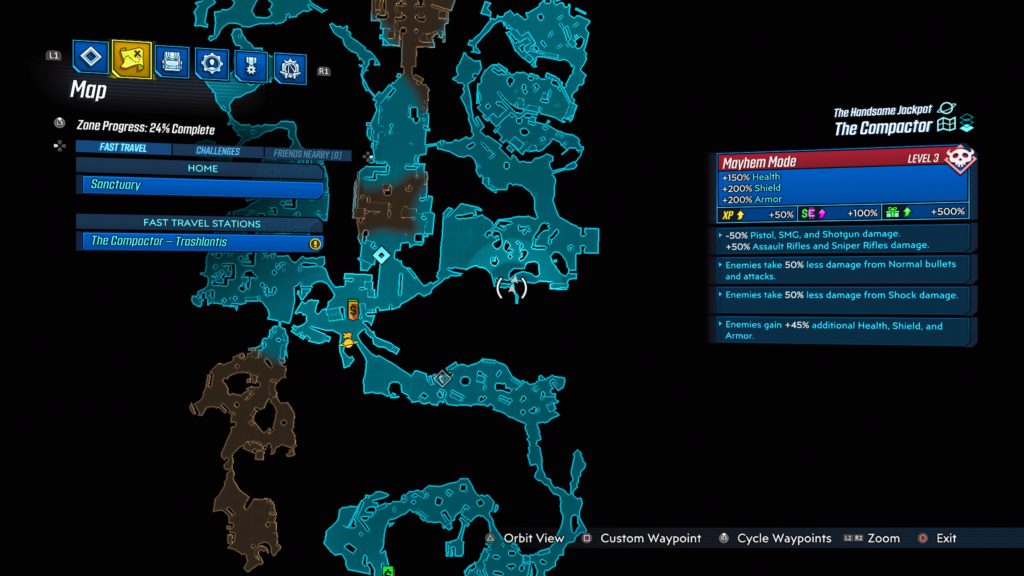
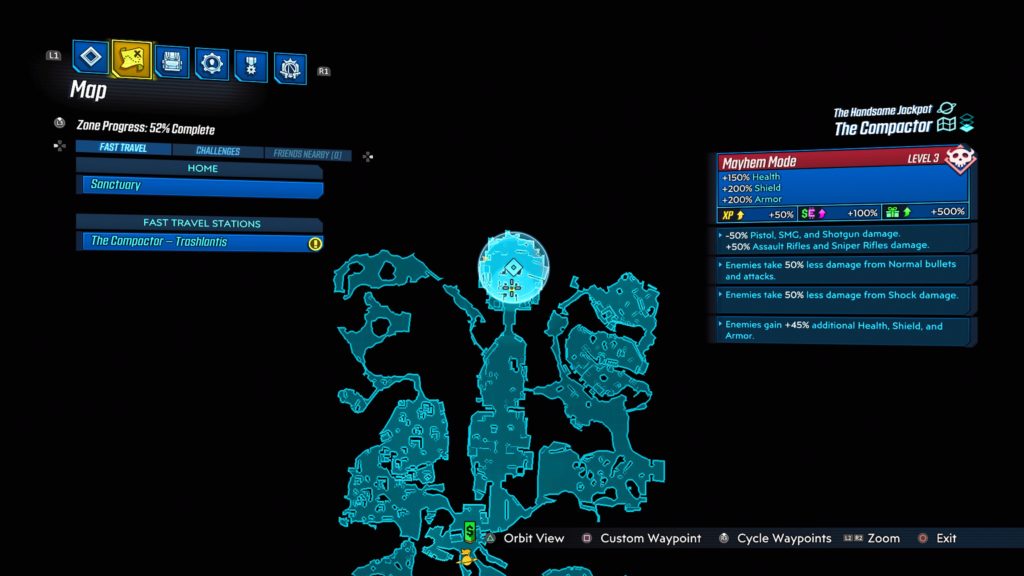
The Compactor
Lover, Not a Fighter (Part 1)
This log is located in a VIP room in Garbage Gorge on the counter near a cash register.
Refuge in the Refuse
When you first enter Trashlantis by passing through the short tunnel, take an immediate right and swing around to find the log at then end of the narrow path on a bed.
Incorporated (Part 2)
This log is located in a broken metal pipe just before the entrance to Trash-Co. LLC which can be found to the eastern central part of the map.
What’s in a Name?

This log is resting on a chair under an umbrella in the northeastern part of the map.
Lost and Found (Part 4)
This log is located on a bench across from the entrance to Trash-Co. LLC.
Lost and Found (Part 3)
This log is on a couch located in Onfireton.
Lost and Found (Part 2)
This log is located at the base of a pipe in Stenching Meadows.
This log is located in The Beam (north central part of the map) where you escort Clapstructor during the One Man’s Treasure main story mission. The log is underneath the metal ground and can be reachable by a ladder lit by a light (blue glow) in the image above.
Jack’s Secret
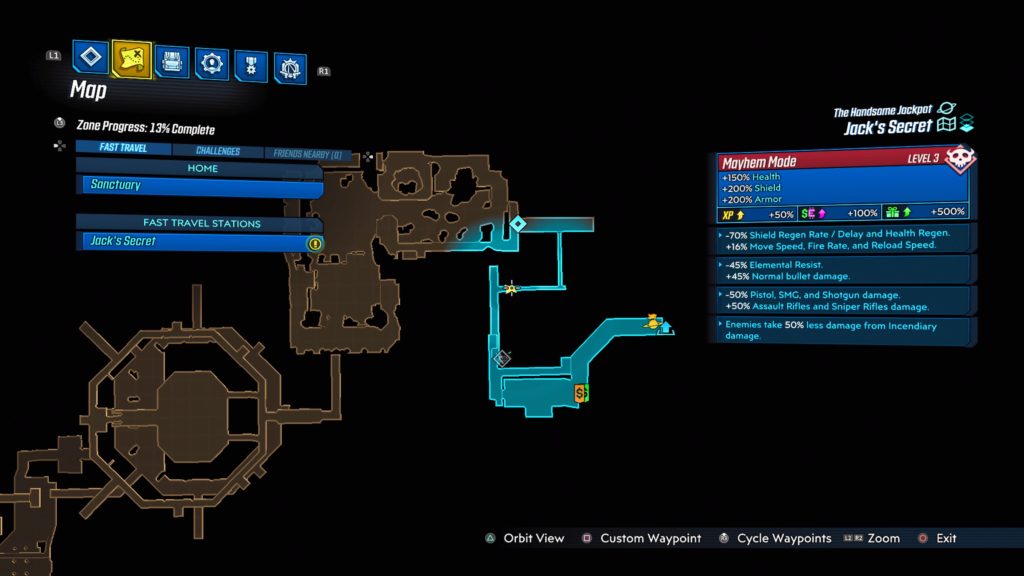
From the beginning area of Jack’s Secret, you will drop down into a vent. When you drop down a second time into the vent, turn around to find the log on the ground.
Say Something Funny
This log is located near the VIP Tower Entrance fast travel station in the center of the room behind the counter to the left of the Hyperion sign.
Related Posts
Dragon's Dogma 2 - Tolled to Rest Quest
Soul Hackers 2 - Mad Dog
- Borderlands 3
Borderlands 3 Jack’s Secret Challenges Guide: All Crew Challenges

Borderlands 3 has plenty of challenges that you can complete in order to get rewards such as EP, Eririum and loot. In this Borderlands 3 guide, we are going to go over how you can complete all the Jack’s Secret Crew Challenges.
Borderlands 3 Jack’s Secret Crew Challenges
Torgue’s Marketing Mistake
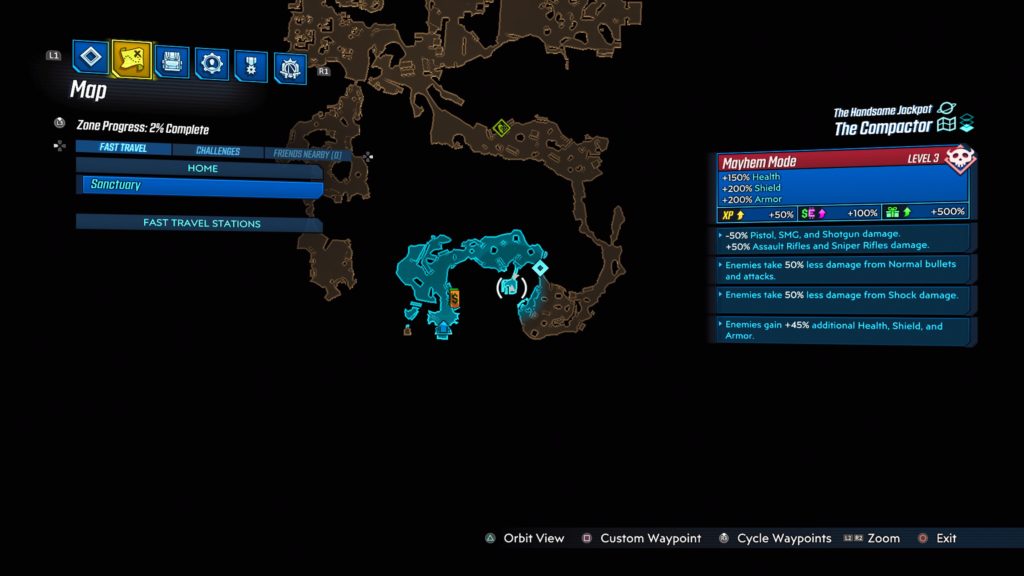
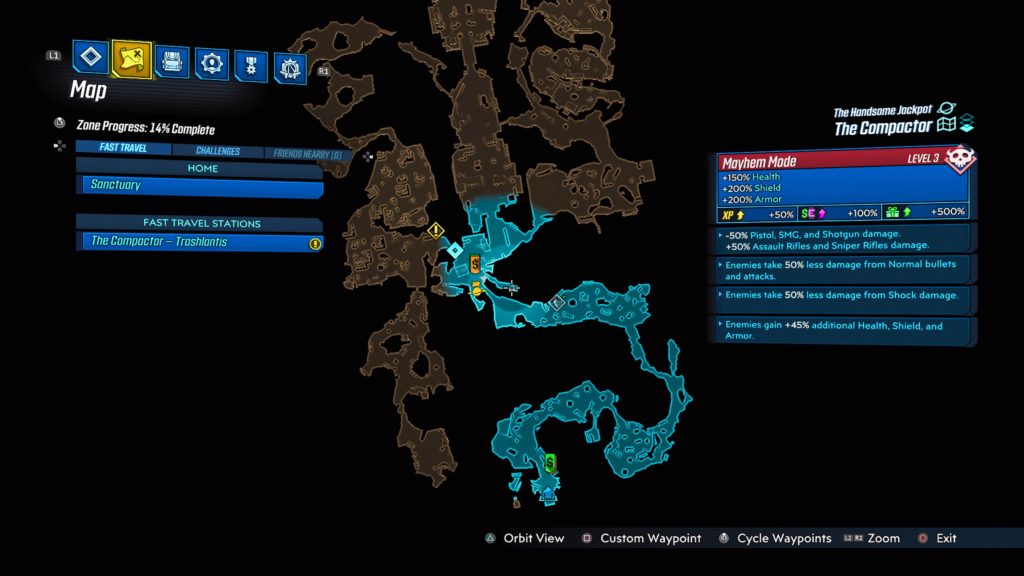
In order to complete this challenge, head over to the marker on the map shown below:

You can find the battle that you need to destroy shown in the image below:

Destroy the bottle to complete the challenge.
Pieces Of Resistance
In order to complete the mission you need to head over to the location marked on the map below:

Fast travel to the area and get to the location. You need to place the bomb at the spot shown in the image below:

Once you have placed the bomb, step back and wait a few seconds. When it goes off, the challenge will be completed.
This is how you can complete all the Borderlands 3 Jack’s Secret Crew Challenges. If you are interested in learning more about these challenges then you can check out our guide on the VIP Tower challenges as well.
If you want to learn more about the game then you can check out our guide on what Anointed Gear is and how you can get it. If you need to learn about the different weapons in the game then you can check out our Legendary weapons guide .

Related Goodies

Leave a Reply Cancel Reply
Your email address will not be published. Required fields are marked *
You may use these HTML tags and attributes: <a href="" title=""> <abbr title=""> <acronym title=""> <b> <blockquote cite=""> <cite> <code> <del datetime=""> <em> <i> <q cite=""> <s> <strike> <strong>
- Borderlands 3 Achievements
- Borderlands 3 News
- Walkthrough *
5. Borderlands 3 Moxxi's Heist of the Handsome Jackpot
Welcome to the first DLC for Borderlands 3. It takes us to a casino and is a pretty short completion. Whenever you're ready...
Head over to Moxxi's and find the quest marker (this one is inside a box, rather than just being a standalone !) and pick up The Handsome Jackpot . Moxxi will speak to you over the echo and, once she's done, head to the bridge and set the ship to head to The Handsome Jackpot. Then head for the drop pod to head down to The Grand Opening.
The Grand Opening

As usual, we start at 1 and there will be a robot offering the V.I.Pay experience. Buy it and the bot will open the door; head through and go to 2 where you can pull a lever and try to spin to win. Of course, you lose and some Loaders come after you. Take them out and when the door opens up, head on through here. Once you reach the stairs at 3 head up the first section and go left and find your first sidequest of the DLC, Regaining One's Feet . The sidequests in the DLC don't actually count towards any achievements so if you want to skip out on them you can, but I'm going to include them in the guide. Make this one active and head to the quest marker and pick up the horseshoe. Head back up the stairs but this time going right to find another good luck charm and then to the bottom left corner below the stairs for the last charm. Return the charms to Allan and take the money and place the charms and then talk to Allan again. Head over to 4 and into the side room and kill all of the enemies and then grab the foot before heading back to Allan. Place the foot and watch Allan win before the quest completes.
Now head back to 3 and through the door straight on at the stairs. Head forwards until you reach a blackjack chest right in front of a statue at 5 . This is where we're going to get our first achievement. Interact with the chest and every time you don't get 21 save and quit. Load back in and you'll be right by the chest so play again, and keep doing this until you get 21 and unlock:
Got a 21 in the blackjack minigame.
You don't need to get 21 in one hit, as long as when you finish, you're on the magic number. It took me 11 tries to get it so it can take a while, but if you're lucky you won't need to try too many times.
Carry on to 6 to get through to the next section and kill enemies as you find them until Third Rail spawns somewhere around 7 . Finally, go to 8 to find the transition to The Spendopticon.
The Spendopticon

From 1 head straight to 2 where you will need to clear the area of Loaders. Once the area is cleared you'll meet Timothy, who you'll find kind of familiar. Talk to him and he'll open a door to a room that contains the area's red chest. Continue following Tim until he hands you a gun and opens yet another door for you at 3 . As you head in Torgue will talk at you so look up and notice a bottle of hot sauce sat on one of the light fixtures. Shoot this for the first of Torgues Hot Sauce Bottles, one of the collectibles for an achievement. Head further into the room and smash some glass to grab an object and then go back to Tim and place the teleporter and melee it.
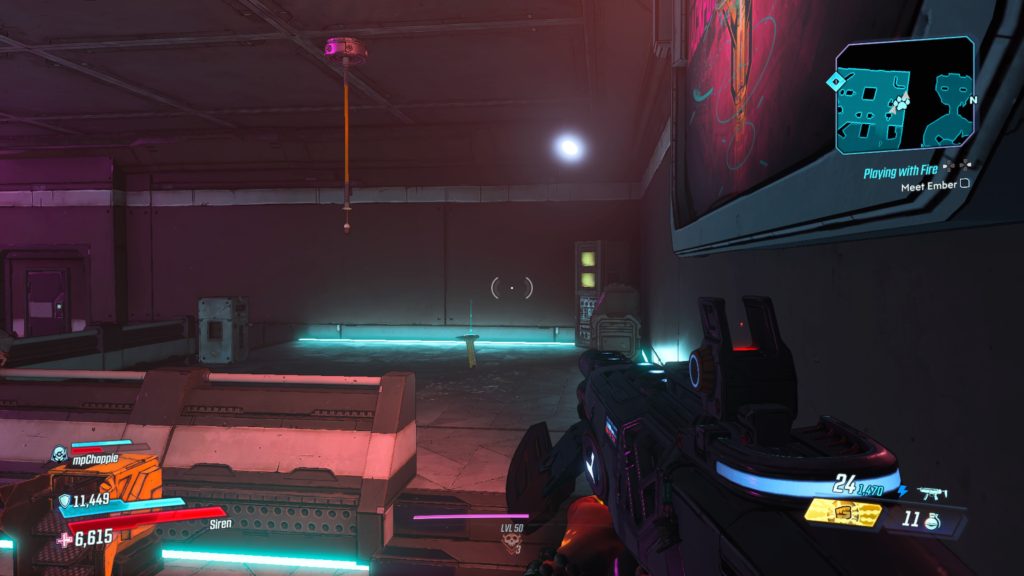
Head back to 4 and enter a door behind a waterfall. You'll find Sisterly Love on a wall, grab this but don't make it active yet. As Tim does some more talking interact with the holostructor button and watch the scene unfold. This will complete The Handsome Jackpot and start Playing with Fire but now is the time to make Sisterly Love active. There's a waterfall you need to throw a grenade at 5 so do this and grab the dead fish. Go to 6 and place the 3 fish. Go to 7 to grab the Shady Cartridge and head to 8 to install the algorithm. Next, you'll find the Debt Collector somewhere around 9 . Once the Debt Collector is dead the mission will complete.
Now fast travel into the Grand Opening, and then save and quit. Load back in and fast travel back into the Spendopticon and run back to 9 . If the Debt Collector has spawned again kill him, if not repeat the fast travel stuff, save and quit, and then go back to 9 again. It can take a while but once he does spawn in and you kill him you'll unlock:
Defeated the wandering Debt Collector.
Once this pops, head up to 10 and press the button to open the door and head inside. Clear the loaders and head wait for Timothy to catch up, and then press the button at 11 to travel to 11 on the right-hand section of the map. Work your way over to 12 and kill the two bandits and talk to the dancer. Just to the left is Trent, so talk to him and then left again to talk to Shiny Hunk and then head to 13 to grab the package. Go to 14 and place the explosive. This is technically the first of six statues needed for an achievement, the rest of which will act as crew challenges. We ran by where one is earlier in the middle section but we'll be going back for it at some point. For now, follow the quest markers to 15 and clear out the enemies. Ember will introduce herself, talk to her and Playing with Fire will complete and Winners and Losers will start.
Go to 16 and get activate the information board and then go grab Do it for Digby (Part1) and make it active. Melee him and then travel to each of the objective markers in turn before returning to Digby and using the blender. Give the blender to Digby and wait for him to do his thing for Part 1 to complete and then grab Part 2 from him. He'll send you to the Vice District so fast travel to Casa de Timothy at 4 . Before heading to the quest marker go left and head to 16 and climb along the hedge and archway to jump to the Piece of Resistance. I found it pretty awkward going, but be careful and remember to spring jump and mantle and you should be okay.
Follow Digby over to Foxxi's, kill the enemies and head into the corner with Digby at 18 to start recording, and then head out front to destroy the speakers and kill the enemies. Then head back into 18 and interact with the console here. Part 3 will complete now.
We'll be left with Winners and Losers so follow the quest markers until you get to 19 which is a button that will open the way through to the transition to Impound Deluxe.
Impound Deluxe

The Impound Deluxe is another area that was awful to get a map for, but it's pretty straight forwards for getting around.
Starting at 1 head around to 2 and grab The Great Escape and but don't make it active yet. Head to the door at 3 and interact with the button and then up to 4 to do the next couple points on the quest. After a bit of back and forth, you'll be able to head through the door to 5 where you will need to try to take someone else's ticket, have a fight, and then head through another door. Follow the quest markers, dropping through the holes in the floor as needed to move on until you reach 6 . Look to the right to see a load of yellow containers. Climb as high as you can on these go to find the first red chest. Jump down and head to 7 . Once here make The Great Escape active and head to 8 .
The next section is on the lower section of the map so be careful with any custom markers you lay down, but it's easy enough and can be done just following the quest markers. Speak with Max Sky and interact with the countdown button. He'll send you off to another area that you have to jump along a series of platforms to get to but none of the jumps are particularly challenging. Destroy his rival's ship which will be around 9 , and then the rival himself. Head back to Max Sky and do the next couple of objectives to launch him. The quest will complete and a storage container nearby will also open, giving access to the last red chest.
Head back up to 7 and follow the quest marker until you reach 10 where you'll find this area's sole Resistance piece. Now go to 11 and kill all the enemies. Once the last one is dead, you'll meet Freddie. Talk to him and go all the way to 12 and clear the enemies from this area. Move on to 13 and again, clear out the enemies. Once they're disposed of, press the button on the wall and head back to Freddie via the levitating pathway he will set up for you. Once they appear, grab Ember's tools. You'll then be ordered to head back to Timothy's place so fast travel there now.
The Spendopticonhttps

Spawn in at 1 and head straight to 2 and press the button to open the way towards the Market District. Fight your way over to 3 and interact with the travel station to get to 3 over on the left section. Follow the quest markers until you reach 4 on the lowest level. You'll be tasked with grabbing 15 different pieces of trash, so head around to the different quest markers and grab these by from any lootable such as trash piles and bins. As you're working your way around this courtyard make sure to go to 5 and get the piece of resistance here. I found the best way to get to it was to stand on the railing and jump and mantle on to the sloped roof. Once you have this and the trash go to 4 again and place the trash. Ember will join you and give you a bomb. Place this and shoot it to summon Stanley the trash bot. Once he's dead grab the keys and head to the transition at 6 .
The Compactor

This is a pretty straight forwards area with just 2 Crew Challenges and no red chests. We will be getting an achievement in this visit though, towards the end.
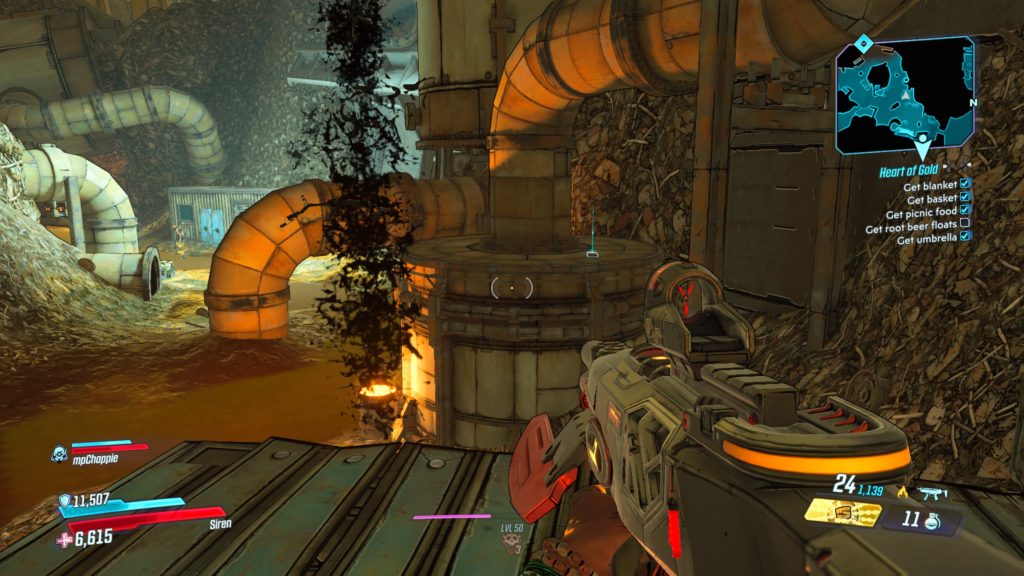
Start at 1 and head through the quest markers until you reach 2, where you'll find one of Torgue's Hot Sauces. Look towards the challenge marker and up and you'll see the bottle inside a container. Carry on again to meet the Mayor of Trashlantis and, once he's done talking and sent you to get the AI chip and power cells, go to 3 to pick up Heart of Gold .
Make this active and head to 4 and 5 in turn to grab the first two items, then backtrack a little and head around to 6 where you'll find the third item. While you're here, make sure you pick up any power cells that the loaders you kill drop. You should be able to get the 5 needed for the main quest easily. Go around to 7 next and grab the basket. Make your way to 8 and, as you pass by, take note of a VIP door. We aren't coming here yet but this is the location of the last crew challenge when we unlock those. Once you're at 8 grab the last item and make One Man's Treasure active again.
Head to 9 and drop down into an arena to fight a boss, or rather a swarm of minibosses that, as each one dies, will chip away at an overall health bar. Once these are taken care of a larger form will appear, but shouldn't give you any trouble. Grab the AI chip and then follow the quest markers again and once you have an area waypoint to find a way in, go to 10 and shoot the explosive barrels. You'll find the constructor eye at 11 . Now head back to Trashlantis and at 12 find the Constructor and give the power cores to Freddie before placing the other items. Open the door and then make Heart of Gold active.
As the Clapstructor moves off, go back to Joy. Talk to him, and follow him to the picnic area. Place the items and wait for him to finish talking. Once done Heart of Gold will complete, leaving you with just the main quest.
Head back to catch up with the Clapstructor at 13 and once all the enemies are dead talk to the Clapstrictor again and once the door has been opened head through to kill more enemies. Eventually, you'll reach 14 and while the beam is reinforced you'll have to fight even more enemies. Once everyone is dead you'll see the Clapstructor weld himself to the beam. When your objective updates to Talk to the Mayor go talk to the Clapstructor and you'll unlock:
Returned for a chat with the Clapstructor.
Now head back to 12 to talk to the Mayor to complete One Man's Treasure and start The Plan . Before we head back to the Spendopticon head to 15 and take out the first of the Mayor's Killer Look targets. They work the same as Zero's Targets and shouldn't give you any problems.

Once you spawn in at 1 head to the quest marker around the corner and talk to Timothy to get a little cutscene. You'll then be transported to 2 . Head through the door to 3 and do your thing to get the plan. You'll then be transported to 4 but before following the objective marker turn left and go pick up Too Much of a Good Thing at 5 .
Make this active and head downstairs to grab the three items you need, all very close by. Go back to 5 and put the items in the slot and then go to 6 to grab the ice cream before going back to 5 again. Go to 6 to fight the fat guy and grab his spleen once he's dead and finally back to 5 again to complete the quest.
We're back on with The Plan so head back past 6 and in front of you, you'll see a tiger statue. Climb the rocks behind this statue to get to the Torgue's Hot Sauce at 7 . You then need to activate a series of switches in the correct order. Facing the forcefield you need to get through the correct order is left, centre, right. Shoot the forcefield and then grab the compound at 8 before being transported to 9 . Head forwards and once the enemies are dead, don't pick up the items. Hop over the fence to get to 5 , on the level above the door we were at before. Fight the Killer Look target, and then jump back over the fence to grab the clothes. Once you have these you'll be transported back to 1 . This will complete The Plan and start Jack's Wild but before we do any of this we're going to do a little bit of mop-up.
Travel to 10 in the top right of the map to get the last of the Crew Challenges for this area, a Killer Look target. From here we want to fast travel to the Impound Deluxe to get the Crew Challenge we had to miss there.

Spawn in at 1 which is Beggar's Berth and head straight for 2 . You will need to press the button on the door to spawn the Killer Look target. Once we have this head back to the Spendopticon to continue on with the story.

Spawn in at Casa de Timothy and grab Acid Trip at 1 and then head to the Market District and get Raging Bot at 2 . Make Raging Bot active and knock on the door just by you. Interact with the button in the toilet to activate the lift and then bet on two fights. You then need to travel back to Casa De Timothy to take out three enemies, each one is marked on the map as 3 . Take them out in any order and then head back to 2 and down into 4 . You're told to go down in the third round, but I won the third round because of my digiclone and Yvan attacked me. Killing him completed the quest.
Make Jack's Wild active and follow the quest marker to 5 . I fast travelled to the Spendopticon at the bottom of the map for this. Fight the bots that come at you and then head through to Jack's Secret.
Jack's Secret

Starting at 1 head around to 2 where you'll find a hole you can drop through. Before you do look up and you'll see a bottle of Torgue's Hot Sauce to destroy, very hard to miss. Head the 3 and clear the area of Ratch. Grab the chemicals when prompted to, place them and shoot them to move on. Once you've seen the next bit of story wait for the force field to lower and head through to 4 and clear out the enemies. When they're all dead head to 5 to go down on an elevator.
As you get to 6 make Acid Trip active and look for a yellow container on the left wall. Jump up on to here and on to the walkway and follow this around to 7 . Clear out the enemies and interact with the computer at the centre of the room and then press the two buttons just behind this computer, and then clear out more enemies. Once the last enemy, Facemelt, has been killed Acid Trip will complete and leave you with just the main quest.
Head back the way you came and follow the path onwards until you get to 8 . On the right-hand side, there will be a Piece of Resistance to destroy, you can get to it by jumping from the platform you're stood on as you enter to get to a metal walkway on the right, and then over to the sloped platform the statue is on. Follow the linear way through until you get to 9 where you're met with a force field, head up to 10 to shut it off. You can now work your way over to 11 to drop down into an arena for the area's boss fight.
The boss here is against the Fabricator and the name of the game here is distance. At the level cap, it took my health down to almost nothing instantly when i was up close. I strafed around the edge of the arena after this and had absolutely no trouble from it though. Once the Fabricator has been destroyed there will be a large tube on the opposite side of where you entered. Shoot this to destroy it. Jack's Wild will complete and then the final mission All Bets Off will commence. With this area taken care of head to the Spendopticon
I haven't done a map for the area as you're purely following the quest markers. Go to Ember, kill enemies, take the thermite and place it, and kill more enemies. Once the termite has made a way through the blast door head through the transition to the VIP Tower.

We're in the final area of the game and for how small it is there is a lot of stuff to grab! We'll be getting the last of each type of Crew challenge, each of which gets us an achievement. There are also two red chests in the area. There's also the main mission to do here, of course.
Starting at 1 head to the right towards 2 and take out the last Killer Look target, unlocking:
Completed the Mayor's outfit.
From here go to 3 and clear the area of enemies. Once this is done, Freddie will come to attack you, spawning in at 4 , flanked by 2 named robots and a horde of normal loaders. It's a pretty tough fight, but definitely doable. Once he's dead, go to 5 and open the VIP door to find the last Torgue Hot Sauce bottle, which will unlock:
Destroyed all of Mr. Torgue's hot sauces.
Now head to the corner at 6 and run along the hedge and jump over to the hedge towards the Crew Challenge marker. You need to mantle up here and can then get to the last statue. This will unlock:
Sabotaged all statues for Ember.
Now head back to 4 and head up the elevator. Dropdown into the arena at 7 to fight the boss, which is the Jackpot. He doesn't have much health, and even his long-distance attacks are pretty accurate and do decent damage. When you get his health down to 0 he'll repair himself, and repeat this three times.
Once he's finally dead instead of going to the objective marker turn around and go into the vault to find two red chests. Now head to 8 and go through the next few moments of the story to eventually get the credits, and you'll unlock:
Completed mission All Bets Off.
There's one last side quest to complete now that the final mission has been completed. It's picked up in the Spendopticon and it's called Double Down . I won't map it out as it's just following the quest markers.
I'll see you in the next DLC!
Follow Polygon online:
- Follow Polygon on Facebook
- Follow Polygon on Youtube
- Follow Polygon on Instagram
Site search
- Manor Lords
- Dragon’s Dogma 2
- FF7 Rebirth
- Zelda: Tears of the Kingdom
- Baldur’s Gate 3
- GTA 5 cheats
- PlayStation
- Dungeons & Dragons
- Magic: The Gathering
- Board Games
- All Tabletop
- All Entertainment
- What to Watch
- What to Play
- Buyer’s Guides
- Really Bad Chess
- All Puzzles
Filed under:
Borderlands 3 guide: Impound Deluxe challenges
Complete the Impound Deluxe challenges in Moxxi’s Heist of the Handsome Jackpot with our maps
Share this story
- Share this on Facebook
- Share this on Reddit
- Share All sharing options
Share All sharing options for: Borderlands 3 guide: Impound Deluxe challenges
/cdn.vox-cdn.com/uploads/chorus_image/image/65961792/Borderlands_3_Screenshot_2019.12.17___10.38.56.59.0.png "borderlands 3 jack's secret fast travel locations")
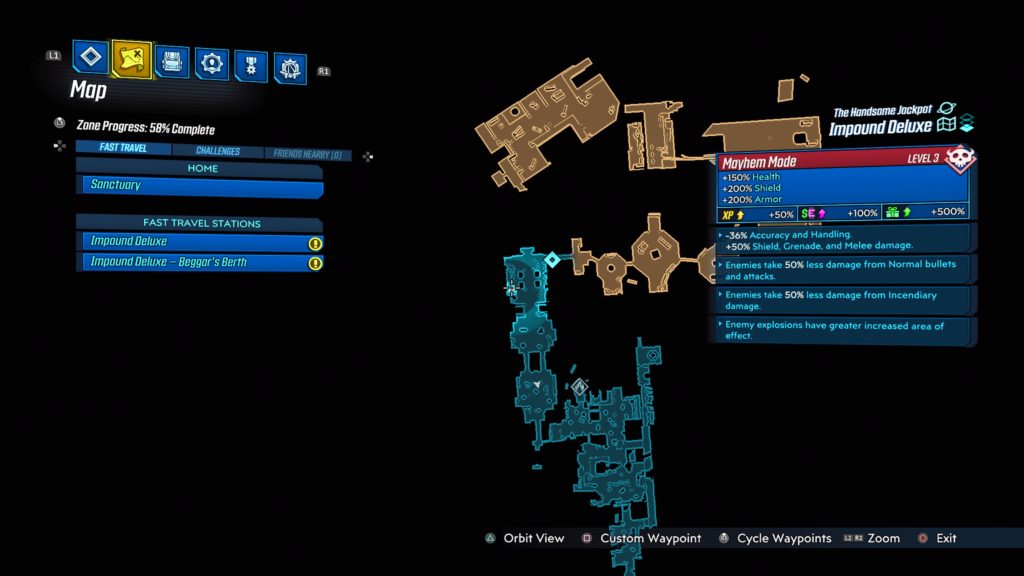
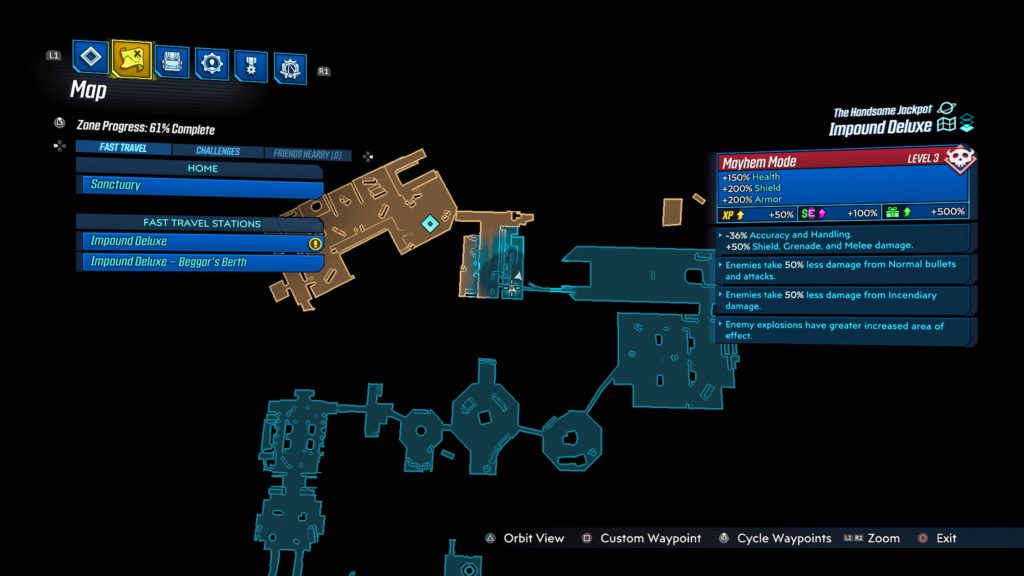
Here are all of the Borderlands 3: Moxxi’s Heist of the Handsome Jackpot challenge locations in Impound Deluxe. Check out the completed area map below, as well as individual images for each challenge location.
There are several challenges in most of Borderlands 3 ’s maps. These challenges reward great experience and sometimes even enhance your vehicles. Picking them up is always worthwhile, but some of them can be a real pain to find. And that’s why we found them for you.
Impound Deluxe challenge map locations
:no_upscale()/cdn.vox-cdn.com/uploads/chorus_asset/file/19545146/Impound_Deluxe.png "borderlands 3 jack's secret fast travel locations")
Look for the icons on the map above to find the challenges in Impound Deluxe. This map has a few twists and turns to it, but both challenges are easy to reach.
You won’t be able to complete the Mayor’s Killer Look challenge your first time through this area. Play further in the main story to unlock the challenge and come back.
Mayor’s Killer Look
For the Mayor’s Killer Look challenge, go to the end of the level, on the giant floating ship. When you go up the ramp, turn right and interact with a green door to summon the boss. Kill Degen-3 to complete the challenge.
Pieces of Resistance

A little over halfway into the Impound Deluxe area, you’ll find a small dock in front of a big VIP walkway. Clear the enemies out, and look for a small boat floating off the dock. Jump onto the roof of the boat, near the pink umbrella. Place a bomb under the Pieces of Resistance statue and walk away.
The next level of puzzles.
Take a break from your day by playing a puzzle or two! We’ve got SpellTower, Typeshift, crosswords, and more.
Sign up for the newsletter Patch Notes
A weekly roundup of the best things from Polygon
Just one more thing!
Please check your email to find a confirmation email, and follow the steps to confirm your humanity.
Oops. Something went wrong. Please enter a valid email and try again.

Can Clefairy be shiny in Pokémon Go?

Vocaloid queen Hatsune Miku is coming to Magic: The Gathering

How to make ale in Manor Lords

Palworld is getting a frog with a stick (and 3 other new Pals)

Get every graphic novel and art book published for The Witcher and Cyberpunk 2077 for just $18.

Give your handheld a little extra space with these SSD deals

Please disable your ad blocker to support our website.
Fabricator - Borderlands 3 Farming Guides

Location: Jack's Secret Part of: Jack's Wild Story Mission (DLC) Drops: ION CANNON (Vladof RPG)
Fabricator is one of the bosses you fight during the Jack's Wild Story Mission which is part of the Moxxi's Heist DLC storyline. You can find the Fabricator boss at the end of the Jack's Secret zone; the closest fast travel terminal is at the start of the zone which means you'll have to run through the entirety of the zone to get to this boss.
Tip: For running through this zone and other zones like it I strongly recommend you turn down/off your Mayhem difficulty then turn it back up when you reach the boss at the end. When you change Mayhem difficulty and it resets the zone, you're put at the same location you would be if you quit and entered again. This means that if you grab the save/respawn terminal just before the Fabricator boss you'll be placed right back here when the zone resets.
As far as loot goes, ION CANNON (Vladof RPG) is the only item on Fabricator's dedicated loot list. This item is also unique to the Fabricator and doesn't drop (or is extremely rare) elsewhere in the world, if you're looking to get an ION CANNON you'll have to farm this boss for it.
Long read: How TikTok's most intriguing geolocator makes a story out of a game
Where in the world is Josemonkey?
Borderlands 3 Ember's Purge challenge steps: All Pieces of Résistance locations explained
Ring of fire. (Kind of.)
In Borderlands 3 Moxxi's Heist of the Handsome Jackpot DLC , Ember has had enough of the statues Pretty Boy has placed of himself around the casino. She wants you to use her Pieces of Résistance to blow them up.
In return, she'll send you her gun - Ember's Purge .
Pretty Boy, however, has made sure that his statues are quite hard to reach, so you're going to have to practice your climbing skills if you want to destroy them all.
There are five Pieces of Résistance for you to find and explode throughout the Handsome Jackpot. You'll also receive XP, Eridium and money for each Piece of Résistance you deliver.
Alongside the Scoville , Ember's Purge is one of two legendary guns in Moxxi's Heist of the Handsome Jackpot that can only be found by completing a challenge.
On this page:
The Spendopticon Pieces of Résistance locations in Borderlands 3
Impound deluxe pieces of résistance location in borderlands 3, jack's secret pieces of résistance location in borderlands 3, vip tower pieces of résistance location in borderlands 3, how to collect the ember's purge in borderlands 3, how useful is the ember's purge in borderlands 3.

There are two Pretty Boy statues for you to destroy in The Spendopticon.
The first is located just south of Timothy's hideout.

The quickest way to reach it is to fast-travel to The Spendopticon - Casa de Timothy. Once you're there, leave the hideout and head south, up the stairs, until you reach an entrance for a casino. If you look up, you'll be able to see the Pretty Boy statue standing on a ledge above you.

To reach this statue head around to the right-hand side of this area. There you'll find a collection of metal sheeting near a container that will allow you to see climb up the hedge to the top of the gateway.

You'll want to climb on top of the piece of foliage with the dollar sign placed upon it; standing there will give you enough height, so that you can easily run and drop over to the area with the Pretty Boy statue.

The second Pretty Boy in The Spendopticon is located in the Market District, near to where you defeat Handsome Jacket and Handsome Slacks during the fifth mission, The Plan.

To reach this area fast-travel to The Spendopticon - Market District and then follow the pathway around to your left.
When you enter this area climb on top of the little shack on your left-hand side. From here you can jump directly across to the roof opposite you.

Carefully walk around this roof, until you can see an entrance to the little platform above the walkway you used to enter the square. Jump down onto this walkway.

Once there, you can now climb up the wall to reach the platform with the Pretty Boy statue. Now all you have to do is place the Pieces of Résistance and watch sparks fly.

There's one Pretty Boy located in the Impound Deluxe. It's a good idea to complete this challenge as you venture through the Impound Deluxe in the third mission, Winners and Losers.

Once you've ignored the Bureaucracy Bot and entered the Impound Deluxe, head to the area where you fight the second wave of human attackers. It's the location before you climb and cross the bridge that eventually brings you to the location where you meet Freddie.
Before you climb up to the bridge, look to your right and you'll find a broken engine turbine.

You can easily climb onto the ledge next to this engine and, from there, on top of the engine itself.

Now you just have to climb over to the back of the engine to discover a small ledge containing an umbrella, chair and the statue that you need to destroy.

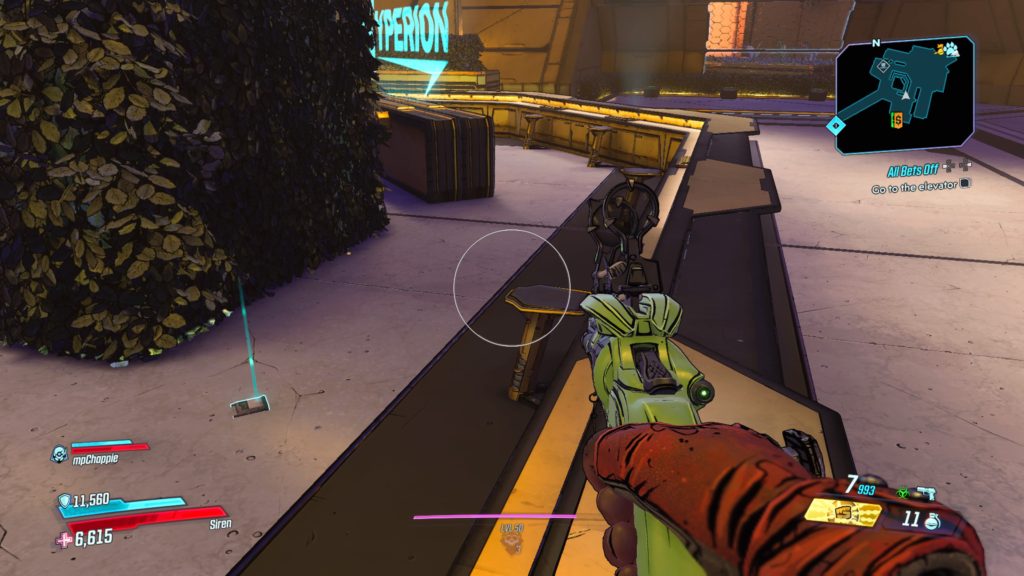
There is one Pretty Boy to be found in Jack's Secret, which is accessible once you start the sixth mission, Jack's Wild. It's worth completing this challenge as you play through this mission to avoid backtracking.

The statue can be found in the first main room after you drop down the hole leading you deeper into the factory. After dropping down the hole, look to your right to see the statue standing on the edge of a ledge.
To reach it you need to jump onto the floor panels to the right hand side of the ledge you drop down onto.

There you'll find a sheet of metal hanging slightly over the edge. You can use this metal to jump across the gap and reach the area where the Pretty Boy statue sits.
This jump may take some time, as the wall can knock you down, and you may land you in the lava, killing you. Once you do manage to make the jump, all you have to do is place the Piece of Résistance and shoot it to complete this challenge.

The final Pretty Boy statue awaiting its Pieces of Résistance can be found on the first floor of the VIP Tower.

After walking down the corridor leading from the lobby to the main room, turn immediately to your left, where you'll see an ivy covered wall.

You can easily climb up this wall to reach a ledge where the last Pretty Boy awaiting its Piece of Résistance can be found.
Once you've delivered all five Pieces of Résistance, Ember will spend you Ember's Purge.
To find it open the start menu in-game, which allows you to quit, view your trophies and access the options, among other things. You need to select the 'Social' option to open your in-game inbox.

Ember's Purge will be in a message from Ember, which should be the first email in your inbox. Now you just need to ensure you've got a free space in your inventory, so that you can press 'Accept' to receive your new gun.

If you're looking for more challenges to complete, check out our guides on the Dead Claptraps , Broadcast Towers , Eridian Writing , Hijack Targets , Legendary Hunts and Typhon Logs and Typhon Dead Drops . If you want some easy rewards, consult our Borderlands 3 Shift Codes and VIP Codes page.
When you've finished Borderlands 3, visit our guides on Guardian Rank and Rewards , Mayhem Mode and True Vault Hunter mode to learn more about what you unlock in the post-game.
Ember's Purge is a Maliwan SMG. This means that, after a small amount of charge, you can keep the trigger held down and unleash some rapid fire - both in the terms of bullets and literal fire.

This gun deals in incendiary damage, which makes it very effective against enemies made of flesh. It also has the special ability to create a pool of lava beneath its victim, which won't damage you.

Overall, if you're looking for a mainstay incendiary gun, then Ember's Purge is an excellent choice. It has a large magazine size, 34, and thanks to an increased Weapon Fire Rate, +15%, it will easily mow down your foes.
Read this next
- Take-Two acquires Borderlands studio Gearbox from Embracer for $460m
- Embracer Group sale of Borderlands studio Gearbox reportedly in "late stages" of finalisation
- Borderlands movie start of "Cinematic Universe", Randy Pitchford says
Pokémon Go Buddy distance chart for when Buddy Pokémon drop rewards
Stellar Blade guides, tips and tricks
How to complete First Customer quest in Stellar Blade
Anime World Tower Defense codes
Past Wordle answers and all previously used Wordle words
Arm Wrestle Simulator codes
Anime Fighters codes
Pokémon Go Mega Evolution update and new bonuses, how to Mega Evolve and all Mega Evolutions list
Borderlands 3 The Spendopticon
- Planet Region The Handsome Jackpot
The Spendopticon Map

The Spendopticon Discoverable Sources
.webp "borderlands 3 jack's secret fast travel locations")
The Debt Collector Mk II
.webp "borderlands 3 jack's secret fast travel locations")
Junpai Goat Eater
.webp "borderlands 3 jack's secret fast travel locations")
Evil Saint Lawrence

Do it for Digby (Part 3)
Double Down
The Handsome Jackpot
Playing with Fire
Winners and Losers
Locations related to the spendopticon.
.webp "borderlands 3 jack's secret fast travel locations")
Grand Opening
.webp "borderlands 3 jack's secret fast travel locations")
The Spendopticon
.webp "borderlands 3 jack's secret fast travel locations")
Impound Deluxe
.webp "borderlands 3 jack's secret fast travel locations")
The Compactor
.webp "borderlands 3 jack's secret fast travel locations")
Jack's Secret
.webp "borderlands 3 jack's secret fast travel locations")
Global - DLC 1
Fast Travel
- View history

Fast Travel is a teleportation system accessible from prominent interactive Hyperion or Dahl New-U Stations . The devices seem to use the same concept as digistructing; deconstructing the traveler and reconstructing them at their destination.
- 1 Background
- 2.1 Downloadable Content Access
- 3.1 Downloadable Content Locations
- 4.1 Downloadable Content Locations
- 4.2 Exit Only Fast Travel Stations
- 5.1 Downloadable Content locations
- 6.1 BL3 Fast Travel Stations
- 6.2 Sanctuary III
- 6.3 Pandora
- 6.4 Promethea
- 6.5 Athenas
- 6.7 Nekrotafeyo
- 6.8 Slaughterstar 3000
- 6.9 Proving Grounds
- 6.10 The Handsome Jackpot (Moxxi's Heist)
- 6.11 Xylourgos (Guns, Love, and Tentacles)
- 6.12 Gehenna (Bounty of Blood)
- 6.13 Krieg's Mind (Fantastic Fustercluck)
Background [ ]
Certain prominent New-U Stations scattered around Pandora have Fast Travel capability. Each Fast Travel terminal is connected to all other Fast Travel terminals in a planet-wide network. By accessing any one of them, a character can be instantaneously transported to any of the other terminals that they have previously visited. Users require a Fast Travel Pass in order to utilize Fast Travel capabilities.
At the time of the Borderlands Vault Hunters ' arrival on Pandora, the Fast Travel network is shut down thanks to the machinations of the bandit lord Mad Mel . In order to activate it, a power station must be recaptured and restarted during the mission Powering The Fast Travel Network in the Dahl Headlands , upon which Lucky Zaford provides the needed Fast Travel Pass. From here, right through to the rise of Handsome Jack and beyond, any Fast Travel terminal can be activated for instant transport to new locations.
In addition to Hyperion's manufacturing of New-U and Fast Travel Stations, Borderlands: The Pre-Sequel shows that at some point in the past, Dahl also mass-produced the same technology and distributed them across Elpis for their use. Hyperion is able to tap into and manipulate Elpis' network, as shown by the ability to travel from a Dahl Fast Travel terminal on Elpis to a Hyperion Fast Travel terminal on Helios . Dahl-manufactured Fast Travel networks were used to also transport cargo via digistruction, which inadvertently populated Sub-Level 13 with ghosts.
Fast Travel Access [ ]
To access the Fast Travel Network, players must move within activation range of the terminal and use the action key. Using the action key a second time while in the menu will initiate travel to the chosen location.
In Borderlands , the menu that appears has two tabs: the menu with the rabbit icon denotes the Fast Travel menu; the menu with the character card icon denotes the Character Customization menu. As players explore Pandora , more locations get added to the Fast Travel Network list, and each one can be accessed by scrolling through the location listing to find the desired one.
In Borderlands 2, Borderlands: The Pre-Sequel and Borderlands 3, only the Fast Travel menu itself is available on a Fast Travel terminal due to character customization being available at Quick Change stations. As players explore Pandora, Elpis and the Universe, more locations are added to each game's Fast Travel list and players can travel to any available one.
Travel occurs instantly in single player, or after a two second countdown in Borderlands multiplayer, which is extended to a five second countdown in Borderlands 2, Borderlands: The Pre-Sequel and Borderlands 3 . However, travel cannot be initiated if any players are Crippled into Fight For Your Life, are in another Fast Travel or Catch-A-Ride menu, are in their inventory, or have triggered a game save.
The Fast Travel Network is a valuable part of the series, allowing players to quickly change zones to search for more loot, battle different enemies and bosses or complete or gather new missions.
Downloadable Content Access [ ]
Upon installing any add-on content pack in Borderlands , Borderlands 2 , or Borderlands: The Pre-Sequel , previously non-existent locations are added to each respective game's fast travel list.
In Borderlands , downloadable content areas can be accessed at any time after the completion of the mission Skags At The Gate , regardless of whether or not the Fast Travel Network has been activated by completing the mission Powering The Fast Travel Network . Downloadable content areas for Borderlands feature multiple locations to explore, but only the very first location visited in each downloadable content pack is available for Fast Travel.
In Borderlands 2 and Borderlands: The Pre-Sequel , downloadable content locations can be accessed at any time at any Fast Travel enabled Hyperion or Dahl New-U Station. Unlike Borderlands , Fast Travel is available to most (if not all) locations of each downloadable content pack.
Fast Travel Network (Borderlands) [ ]
- Cauldron (The Rust Commons East)
- Cesspool (The Rust Commons West)
- Crazy Earl's Scrapyard
- Crimson Fastness
- Crimson Enclave
- Devil's Footstool
- Eridian Promontory
- Fyrestone (Arid Badlands)
- Fyrestone Coliseum
- Headstone Mine
- Krom's Canyon
- Lucky's Last Chance Watering Hole (Dahl Headlands)
- Middle of Nowhere (Rust Commons East)
- Outeryard (Rust Commons West)
- Sledge's Safe House
- Tetanus Warrens
- Titan's End (Arid Badlands)
- Trash Coast
- Treacher's Landing
- Underpass (Rust Commons West)
Downloadable Content Locations [ ]
Available after completing Skags At The Gate .
- Jakobs Cove from The Zombie Island of Dr. Ned .
- The Underdome from Mad Moxxi's Underdome Riot .
- T-Bone Junction from The Secret Armory of General Knoxx .
- Tartarus Station from Claptrap's New Robot Revolution .
Fast Travel locations (Borderlands 2) [ ]
- Arid Nexus - Badlands
- Arid Nexus - Boneyard
- Bloodshot Ramparts (exit only)
- Bloodshot Stronghold
- Caustic Caverns
- End of the Line (exit only)
- Eridium Blight
- Frostburn Canyon
- Hero's Pass
- Opportunity
- Sawtooth Cauldron
- Southern Shelf
- Southpaw Steam & Power
- The Bunker (exit only)
- The Highlands - Extraction Plant (The Highlands)
- The Highlands - Hyperion Bridge (The Highlands)
- The Highlands - Outwash
- The Highlands - Overlook (The Highlands)
- Thousand Cuts
- Three Horns - Divide
- Three Horns - Valley
- Tundra Express
- Tundra Express - Farmhouse
- Vault of the Warrior (exit only)
- Wildlife Exploitation Preserve
- Windshear Waste
Captain Scarlett and Her Pirate's Booty
- Hayter's Folly
- Magnys Escape (exit only)
- Magnys Lighthouse
- The Rustyards
- Washburne Refinery
Mr. Torgue's Campaign of Carnage
- Badass Crater of Badassitude
- Badass Crater Bar
- The Beatdown
- Southern Raceway
Sir Hammerlock's Big Game Hunt
- Ardorton Station
- Candlerakk's Crag
- H.S.S. Terminus (exit only)
- Hunter's Grotto
- Hunter's Grotto - Lodge (Hunter's Grotto)
- Scylla's Grove
Tiny Tina's Assault on Dragon Keep
- Dragon Keep
- Flamerock Refuge
- Hatred's Shadow
- Immortal Woods
- Lair of Infinite Agony
- Mines of Avarice
- Unassuming Docks
Commander Lilith & the Fight for Sanctuary
- Fight for Sanctuary (entrance only, one-time)
- The Backburner
- Dahl Abandon
- The Burrows
- Helios Fallen
- Helios - Fire Control Alpha (exit only)
- Mt. Scarab Research Center
- Research Center - Paradise Bio-Lab (exit only)
- Gluttony Gulch from The Horrible Hunger of the Ravenous Wattle Gobbler .
- Hallowed Hollow from TK Baha's Bloody Harvest .
- Marcus's Mercenary Shop (Frost Bottom) from How Marcus Saved Mercenary Day .
- The Raid on Digistruct Peak from Digistruct Peak Challenge .
- Rotgut Distillery from Mad Moxxi and the Wedding Day Massacre .
- Wam Bam Island from Sir Hammerlock vs. the Son of Crawmerax .
Exit Only Fast Travel Stations [ ]

The Magnys Escape exit only Fast Travel station at Magnys Lighthouse
Some Fast Travel stations in Borderlands 2, Borderlands: The Pre-Sequel, and Borderlands 3 are classified as "exit only" Fast Travel stations. They offer a normal menu of destinations, but are not listed on the menus of other stations themselves. This allows one-way travel away from the exit-only Fast Travel, and is generally used to offer an exit point at the end of a story mission. An exit only Fast Travel terminal can be identified by its yellow holographic projections featuring a "no u-turn" symbol only in Borderlands 2 and Borderlands: The Pre-Sequel and without a "no u-turn" symbol and only a no entry symbol in Borderlands 3 . A regular Fast Travel terminal features blue holographic projections.
Fast Travel locations (Borderlands: The Pre-Sequel) [ ]
- Crisis Scar
- Eye of Helios (exit only)
- Hyperion Hub of Heroism
- Jack's Office
- Lunar Launching Station
- Outlands Canyon
- Outlands Spur
- Pity's Fall
- Research and Development
- Serenity's Waste
- Titan Industrial Facility
- Titan Robot Embarkation (exit only)
- Titan Robot Production Plant
- Triton Flats
- Tycho's Ribs
- Vorago Solitude
Downloadable Content locations [ ]
- The Holodome from The Holodome Onslaught
Claptastic Voyage
- Cluster 00773 P4ND0R4
- 00773 VAULT EXCAVATION SITE (exit only)
- Cluster 99002 0V3RL00K
- Deck 13 1/2
- Deck 13.5 (exit only)
- Subconscious
- Sub-subconscious (exit only)
Fast Travel locations (Borderlands 3) [ ]
Bl3 fast travel stations [ ], sanctuary iii [ ], pandora [ ].
- Ascension Bluff
- Cathedral of the Twin Gods
- Covenant Pass
- Destroyer's Rift
- Devil's Razor - Roland's Rest
- Devil's Razor - Boomtown
- Guts of Carnivora
- Konrad's Hold
- Sandblast Scar
- The Droughts
- The Droughts - Highway
- The Great Vault
- The Slaughter Shaft
- The Splinterlands - Chop Shop
- The Splinterlands - Pitt's Stop
- Stormblind Complex
- Stormblind Complex (exit only)
Promethea [ ]
- Cistern of Slaughter
- Lectra City
- Meridian Metroplex
- Meridian Outskirts
- Meridian Outskirts - Drop Pod
- Neon Arterial
- Skywell-27 - Shuttle
- The Forgotten Basilica
Athenas [ ]
- Ambermire - Rogue's Hollow
- Blackbarrel Cellars
- Floodmoor Basin - Drop Pod
- Floodmoor Basin - Reliance
- Floodmoor Basin - Knotty Peak
- Jakobs Estate
- The Floating Tomb
- Voracious Canopy
Nekrotafeyo [ ]
- Desolation's Edge
- Desolation's Edge - Drop Pod
- Tazendeer Ruins
- The Pyre of Stars
Slaughterstar 3000 [ ]
- Slaughterstar 3000 - Drop Pod
Proving Grounds [ ]
- Gradient of Dawn - Drop Pod
- Gradient of Dawn (exit only)
- Ghostlight Beacon - Drop Pod
- Ghostlight Beacon (exit only)
- Precipice Anchor - Drop Pod
- Precipice Anchor (exit only)
- Wayward Tether - Drop Pod
- Wayward Tether (exit only)
- Skydrowned Pulpit - Drop Pod
- Skydrowned Pulpit (exit only)
- The Hall Obsidian - Drop Pod
- The Hall Obsidian (exit only)
The Handsome Jackpot (Moxxi's Heist) [ ]
- Grand Opening
- The Spendopticon
- The Spendopticon - Casa de Timothy
- The Spendopticon - Vice District
- The Spendopticon - Market District
- The Spendopticon - Tricksy Nick's Hideout (exit only)
- Impound Deluxe
- Impound Deluxe - Beggar's Berth
- Impound Deluxe - Flynt's Garage Spaceservice at La Femme Brûlée (exit only)
- The Compactor
- The Compactor - Trashlantis
- Jack's Secret
- Jack's Secret - Prototype Testing Arena (exit only)
- VIP Tower Entrance
- VIP Tower Stash (exit only)
Xylourgos (Guns, Love, and Tentacles) [ ]
- Skittermaw Basin - Drop Pod
- Skittermaw Basin - Cursehaven Gondola
- Skittermaw Basin - Clan Amourette
- Cursehaven - Withernot Cemetery
- Cursehaven - Lantern's Hook
- Cursehaven - Bleak Terrace
- Cursehaven - Olmstead Square
- Dustbound Archives
- Dustbound Archives - Founder's Office (exit only)
- The Cankerwood
- Negul Neshai
- Negul Neshai - Xenocardiac Containment (exit only)
- Heart's Desire - Entrance
- Heart's Desire - What Beats Beneath
- Heart's Desire (exit only)
Gehenna (Bounty of Blood) [ ]
- Vestige - Drop Pod
- The Blastplains
- The Blastplains - Fort Kickwater
- The Blastplains - Pump & Charge
- Ashfall Peaks
- Ashfall Peaks - Caldera Stronghold
- Ashfall Peaks - Rose's Private Alcove (exit only)
- Obsidian Forest
- Obsidian Forest - Chrone's Contentment
- Bloodsun Canyon
- Bloodson Canyon - Presentation Room
- Bloodsun Canyon - Materials Transport (exit only)
- Crater's Edge
- Crater's Edge - Birth of Ruin (exit only)
Krieg's Mind (Fantastic Fustercluck) [ ]
- The Psychoscape - The Screaming Meadow
- The Psychoscape - Sanity's Sanctum
- Castle Crimson
- Castle Crimson - The Walls
- Sapphire's Run
- Benediction of Pain
- The 2019 release of Borderlands: Game of the Year Edition made Fast Travel terminals easier to distinguish from New U stations by adding the blue hologram of Pandora and the words "Fast Travel", a development previously seen on Fast Travel stations in Borderlands 2 .
- Borderlands
- 2 Add-on content
- 3 Cult of the Vault locations (Borderlands 2)
Russia Travel Blog | All about Russia in English
- About our blog
- RussiaTrek.org
Sidebar →
- Architecture
- Entertainment
- RussiaTrek.org News

- Send us a tip with a message
- Support RussiaTrek.org
- Travel Guide to Ukraine
- Comments RSS
← Sidebar
The trains and stations of the Moscow Metro
2 Comments · Posted by Alex Smirnov in Cities , Travel , Video
The Moscow Metro is the third most intensive subway system in the world after Tokyo and Seoul subways. The first line was opened on May 15, 1935. Since 1955, the metro has the name of V.I. Lenin.
The system consists of 12 lines with a total length of 305.7 km. Forty four stations are recognized cultural heritage. The largest passenger traffic is in rush hours from 8:00 to 9:00 and from 18:00 to 19:00.
Cellular communication is available on most of the stations of the Moscow Metro. In March 2012, a free Wi-Fi appeared in the Circle Line train. The Moscow Metro is open to passengers from 5:20 to 01:00. The average interval between trains is 2.5 minutes.
The fare is paid by using contactless tickets and contactless smart cards, the passes to the stations are controlled by automatic turnstiles. Ticket offices and ticket vending machines can be found in station vestibules.

Tags: Moscow city
You might also like:

The bridge over Zolotoy Rog Bay in Vladivostok
The views of St. Petersburg from the TV tower >>
Tomás · August 27, 2012 at 11:34 pm
The Moscow metro stations are the best That I know, cars do not.
Alberto Calvo · September 25, 2016 at 8:57 pm
Great videos! Moscow Metro is just spectacular. I actually visited Moscow myself quite recently and wrote a post about my top 7 stations, please check it out and let me know what you think! :)
http://www.arwtravels.com/blog/moscow-metro-top-7-stations-you-cant-miss
Trains Moscow to Elektrostal: Times, Prices and Tickets
- Train Times
- Seasonality
- Accommodations
Moscow to Elektrostal by train
The journey from Moscow to Elektrostal by train is 32.44 mi and takes 2 hr 7 min. There are 71 connections per day, with the first departure at 12:15 AM and the last at 11:46 PM. It is possible to travel from Moscow to Elektrostal by train for as little as or as much as . The best price for this journey is .
Get from Moscow to Elektrostal with Virail
Virail's search tool will provide you with the options you need when you want to go from Moscow to Elektrostal. All you need to do is enter the dates of your planned journey, and let us take care of everything else. Our engine does the hard work, searching through thousands of routes offered by our trusted travel partners to show you options for traveling by train, bus, plane, or carpool. You can filter the results to suit your needs. There are a number of filtering options, including price, one-way or round trip, departure or arrival time, duration of journey, or number of connections. Soon you'll find the best choice for your journey. When you're ready, Virail will transfer you to the provider's website to complete the booking. No matter where you're going, get there with Virail.
How can I find the cheapest train tickets to get from Moscow to Elektrostal?
Prices will vary when you travel from Moscow to Elektrostal. On average, though, you'll pay about for a train ticket. You can find train tickets for prices as low as , but it may require some flexibility with your travel plans. If you're looking for a low price, you may need to prepare to spend more time in transit. You can also often find cheaper train tickets at particular times of day, or on certain days of the week. Of course, ticket prices often change during the year, too; expect to pay more in peak season. For the lowest prices, it's usually best to make your reservation in advance. Be careful, though, as many providers do not offer refunds or exchanges on their cheapest train tickets. Unfortunately, no price was found for your trip from Moscow to Elektrostal. Selecting a new departure or arrival city, without dramatically changing your itinerary could help you find price results. Prices will vary when you travel from Moscow to Elektrostal. On average, though, you'll pay about for a train ticket. If you're looking for a low price, you may need to prepare to spend more time in transit. You can also often find cheaper train tickets at particular times of day, or on certain days of the week. Of course, ticket prices often change during the year, too; expect to pay more in peak season. For the lowest prices, it's usually best to make your reservation in advance. Be careful, though, as many providers do not offer refunds or exchanges on their cheapest train tickets.
How long does it take to get from Moscow to Elektrostal by train?
The journey between Moscow and Elektrostal by train is approximately 32.44 mi. It will take you more or less 2 hr 7 min to complete this journey. This average figure does not take into account any delays that might arise on your route in exceptional circumstances. If you are planning to make a connection or operating on a tight schedule, give yourself plenty of time. The distance between Moscow and Elektrostal is around 32.44 mi. Depending on the exact route and provider you travel with, your journey time can vary. On average, this journey will take approximately 2 hr 7 min. However, the fastest routes between Moscow and Elektrostal take 1 hr 3 min. If a fast journey is a priority for you when traveling, look out for express services that may get you there faster. Some flexibility may be necessary when booking. Often, these services only leave at particular times of day - or even on certain days of the week. You may also find a faster journey by taking an indirect route and connecting in another station along the way.
How many journeys from Moscow to Elektrostal are there every day?
On average, there are 71 daily departures from Moscow to Elektrostal. However, there may be more or less on different days. Providers' timetables can change on certain days of the week or public holidays, and many also vary at particular times of year. Some providers change their schedules during the summer season, for example. At very busy times, there may be up to departures each day. The providers that travel along this route include , and each operates according to their own specific schedules. As a traveler, you may prefer a direct journey, or you may not mind making changes and connections. If you have heavy suitcases, a direct journey could be best; otherwise, you might be able to save money and enjoy more flexibility by making a change along the way. Every day, there are an average of 18 departures from Moscow which travel directly to Elektrostal. There are 53 journeys with one change or more. Unfortunately, no connection was found for your trip from Moscow to Elektrostal. Selecting a new departure or arrival city, without dramatically changing your itinerary could help you find connections.
Book in advance and save
If you're looking for the best deal for your trip from Moscow to Elektrostal, booking train tickets in advance is a great way to save money, but keep in mind that advance tickets are usually not available until 3 months before your travel date.
Stay flexible with your travel time and explore off-peak journeys
Planning your trips around off-peak travel times not only means that you'll be able to avoid the crowds, but can also end up saving you money. Being flexible with your schedule and considering alternative routes or times will significantly impact the amount of money you spend on getting from Moscow to Elektrostal.
Always check special offers
Checking on the latest deals can help save a lot of money, making it worth taking the time to browse and compare prices. So make sure you get the best deal on your ticket and take advantage of special fares for children, youth and seniors as well as discounts for groups.
Unlock the potential of slower trains or connecting trains
If you're planning a trip with some flexible time, why not opt for the scenic route? Taking slower trains or connecting trains that make more stops may save you money on your ticket – definitely worth considering if it fits in your schedule.
Best time to book cheap train tickets from Moscow to Elektrostal
The cheapest Moscow - Elektrostal train tickets can be found for as low as $35.01 if you’re lucky, or $54.00 on average. The most expensive ticket can cost as much as $77.49.
Find the best day to travel to Elektrostal by train
When travelling to Elektrostal by train, if you want to avoid crowds you can check how frequently our customers are travelling in the next 30-days using the graph below. On average, the peak hours to travel are between 6:30am and 9am in the morning, or between 4pm and 7pm in the evening. Please keep this in mind when travelling to your point of departure as you may need some extra time to arrive, particularly in big cities!
Moscow to Elektrostal CO2 Emissions by Train

Anything we can improve?
Frequently Asked Questions
Go local from moscow, trending routes, weekend getaways from moscow, international routes from moscow and nearby areas, other destinations from moscow, other popular routes.
IMAGES
VIDEO
COMMENTS
This video shows Jack's Secret All Fast Travel Stations Location Borderlands 3.Thanks for watching, like and subscribe for more videos.
Here are all of the Borderlands 3: Moxxi's Heist of the Handsome Jackpot challenge locations in Jack's Secret. Check out the completed area map below, as well as individual images for each ...
Fabricator Mk II. Boss. advertisement. This is an up-to-date Borderlands 3 Jack's Secret Location Guide. Contains: map locations, sources in the area, and more….
Borderlands 3 Map. Season 2 Update ... Show Zones. Grand Opening Impound Deluxe Jack's Secret Midnight's Cairn. The Compactor The Spendopticon ... Blackjack Chest 0. Boss 0. Eridium 0. Eridium Chest 0. Minor Loot 0. Named Enemy 0. Red Chest 0. White Chest 0. Other. Ammo Dump 0. Easter Egg 0. Fast Travel 0. Location 0. Miscellaneous 0. Mission ...
No one would suspect a casino-but-secretly-a-debt-prison of having TWO secret agendas! Boom!gameJack's Secret is a location in Moxxi's Heist of the Handsome Jackpot DLC in Borderlands 3. It is a secret Loader construction facility located in the core of The Handsome Jackpot. Loaders Ratches Fabricator Crew challenges: Pieces of Résistance Torgue's Marketing Mistake Maintainence area with a ...
The Borderlands 3 Super Badass Completionist Checklist - everything you need to 100% each world + a handy location map! ... Fast Travel: The Handsome Jackpot: Jack's Secret: Fast Travel: The Handsome Jackpot: The Splendopticon - Vice District: ... Jack's Secret - Prototype Testing Area: Fast Travel: The Handsome Jackpot: Midnight's Cairn - Drop ...
The Handsome Jackpot Walkthrough. To begin The Handsome Jackpot side mission (and DLC), you'll need to visit the poster outside of Moxxi's bar on Sanctuary . Once you've began the first DLC ...
High Roller (Part 2) This log is located in Silky's Soak (area with all the purple water) on a bar behind a waterfall. Last Show. This log is located on a small stool in the karaoke section (northwestern corner) of Foxxxi's Cabaret. High Roller (Part 3) This log is located in the J-Spot under the skag sculpture. Ugly Mug.
Fast travel to the area and get to the location. You need to place the bomb at the spot shown in the image below: Once you have placed the bomb, step back and wait a few seconds. When it goes off, the challenge will be completed. This is how you can complete all the Borderlands 3 Jack's Secret Crew Challenges.
Hide ads. Head over to Moxxi's and find the quest marker (this one is inside a box, rather than just being a standalone !) and pick up The Handsome Jackpot. Moxxi will speak to you over the echo ...
The complete map of Impound Deluxe. Image: Gearbox Software/2K Games via Polygon. Look for the icons on the map above to find the challenges in Impound Deluxe. This map has a few twists and turns ...
Timestamps:-Hot Sauce 00:05-Piece Of Resistance 00:26-----...
Fabricator - Borderlands 3 Farming Guides. Fabricator is one of the bosses you fight during the Jack's Wild Story Mission which is part of the Moxxi's Heist DLC storyline. You can find the Fabricator boss at the end of the Jack's Secret zone; the closest fast travel terminal is at the start of the zone which means you'll have to run through the ...
Once it's down, head into Jack's Secret. Follow the marker on your map and head towards the power source. Along the way you'll be attacked by enemies that you need to defeat. Once they're dead ...
Jack's Secret Pieces of Résistance location in Borderlands 3 There is one Pretty Boy to be found in Jack's Secret, which is accessible once you start the sixth mission, Jack's Wild.
All Jack's Secret Crew Challenges Locations Borderlands 3 video. This video shows where is location of all the Crew Challenges Jack's Secret in Borderlands 3...
Global - DLC 1. This is an up-to-date Borderlands 3 The Spendopticon Location Guide. Contains: map locations, sources in the area, and more….
Fast travel in Borderlands 3 is as fairly straightforward and will become relevant once you start to unlock multiple zones and planets . Open the menu and tab over to your map. You can use orbit ...
Fast Travel is a teleportation system accessible from prominent interactive Hyperion or Dahl New-U Stations. The devices seem to use the same concept as digistructing; deconstructing the traveler and reconstructing them at their destination. Certain prominent New-U Stations scattered around Pandora have Fast Travel capability. Each Fast Travel terminal is connected to all other Fast Travel ...
2 Comments · Posted by Alex Smirnov in Cities, Travel, Video. The Moscow Metro is the third most intensive subway system in the world after Tokyo and Seoul subways. The first line was opened on May 15, 1935. Since 1955, the metro has the name of V.I. Lenin.
map to travel: Elektrostal. ... Open Location Code. 9G7WQCRR+56. OpenStreetMap ID. node 156167469. OpenStreetMap Feature. place=city. GeoNames ID. 563523. Wikidata ID. Q198419. Thanks for contributing to our open data sources. This page is based on OpenStreetMap, GeoNames, Wikidata, Wikimedia Commons and Wikipedia.
The journey from Moscow to Elektrostal by train is 32.44 mi and takes 2 hr 7 min. There are 71 connections per day, with the first departure at 12:15 AM and the last at 11:46 PM. It is possible to travel from Moscow to Elektrostal by train for as little as or as much as . The best price for this journey is . Journey Duration.
Elektrostal , lit: Electric and Сталь , lit: Steel) is a city in Moscow Oblast, Russia, located 58 kilometers east of Moscow. Population: 155,196 ; 146,294 ...