- Succès/Trophées
- Guides/Tutos
- Centre d'aide
- Wiki Soluces
- Xbox Series X|S
- Succes/Trophees
- Wiki soluces

Soluce Elden Ring
- Zones optionnelles
- Tour Divine Isolée
- Ajouter une precision
Sommaire de la soluce
- Bien débuter dans Elden Ring
- Chapelle de l'Anticipation
- Cimetière Abandonné
- Nécrolimbe Occidentale
- Bastion de la Table Ronde
- Péninsule Larmoyante
- Château de Vent-Hurlant
- Château de Voilorage - Partie 1
- Château de Voilorage - Partie 2
- Tour Divine de Nécrolimbe
- Liurnia, Contrée Lacustre
- Académie de Raya Lucaria - Partie 1
- Académie de Raya Lucaria - Partie 2
- Manoir de Caria
- Les Trois soeurs
- Plateau Altus
- Manoir du Volcan - Partie 1
- Manoir du Volcan - Partie 2
- Manoir du Volcan - Partie 3
- Tour Divine d'Altus-ouest
- Faubourgs de la Capitale
- Leyndell, Capitale Royale - Partie 1
- Leyndell, Capitale Royale - Partie 2
- Leyndell, Capitale Royale - Partie 3
- Leyndell, Capitale Royale - Partie 4
- Tour Divine d'Altus-est
- Terres Interdites
- Cimes des Géants
- Ruines de Farum Azula - Partie 1
- Ruines de Farum Azula - Partie 2
- Ruines de Farum Azula - Partie 3
- Leyndell, Capitale des Cendres
- Catacombes Orageuses
- Grotte du Bosquet
- Ruines de la Porte
- Ruines Calcinées par un Dragon
- Grotte Marine
- Relais en Ruines
- Galeries de Nécrolimbe
- Caverne des Eaux Noires
- Catacombes des Eaux Noires
- Cavernes de la Chaussée Royale
- Catacombes Funestes
- Tréfonds de Voilorage
- Tombe des Héros des Confins
- Village des Eaux Nécromantes
- Bâtisse Abandonnée des Bois brumeux
- Fort Haight
- Boss Optionnels de Nécrolimbe
- Tour de Pierre d'Eclat d'Oridys
- Catacombes de l'Empaleur
- Cavernes Insondables
- Village Dément
- Galerie de Vent-Hurlant
- Ruines Sylvestres des Semi-Humains
- Catacombes du Val-aux-Tombes
- Cavernes du Val-aux-Tombes
- Ruines du Val-aux-Tombes
- Ruines du Trépas-des-Sorcières
- Boss Optionnels de la Péninsule Larmoyante
- Grotte aux Eaux Stagnantes
- Ruines Purifiées
- Tour de Guet de la Chaussée
- Catacombes au pied des Falaises
- Ruines de Laskyar
- Grotte Cristalline du Lac
- Village des Albinauriques
- Grotte Cristalline de l'Académie
- Village aux Portes de l'Académie
- Galerie Cristalline de Raya Lucaria
- Tour du Prosélyte
- Catacombes de l'Impasse
- Les Quatre Beffrois
- Tour de Pierre d'Eclat de Testu
- Catacombes des Couteaux Noirs
- Ruines du Domaine Royal
- Village de la Flamme Exaltée
- Flèche du Prosélyte
- Ruines des Falaises
- Salle d'Etude de Caria et Tour Divine de Liurnia
- Boss optionnels de Liurnia
- Aval de l'Ainsel
- Ruines de Lux
- Ruines des Parfumeurs
- Catacombes des Aberrations
- Cavernes du Sage
- Ruines de Wyndham
- Catacombes de Wyndham
- Vieille Galerie d'Altus
- Grotte du Parfumeur
- Galerie d'Altus
- Tour Illusoire
- Ruines des Sylvains
- Dominula, Village aux Moulins
- Ruines Grouille-Sang
- Tombe du Héros Canonisé
- Le Bastiombre
- Boss optionnels du Plateau Altus
- Cavernes aux Eaux Ignées
- Fort Laiedd
- Village des Ermites
- Grotte Volcanique
- Tombe des Héros de Gelmir
- Boss Optionnels du Mont Gelmir
- Galerie Scellée
- Tombe Auxiliaire d'Auriza
- Tombe des Héros d'Auriza
- Boss optionnels des Faubourgs
- Prison Souterraine des Parias
- Catacombes de Leyndell
- Profondeurs Abandonnées
- Boss optionnels des Terres Interdites
- Château du Lion rouge
- Catacombes de l'Arbre-Monde Mineur
- Ruines de Caelem
- Galerie de Gael
- Cavernes aux Geôles
- Grotte Désertée
- Ruines de la Rue des Sages
- Galerie Cristalline de Sellia
- Sellia, Cité de la Sorcellerie
- Antre de Sellia
- Catacombes de Caelid
- Catacombes des Défunts Valeureux
- L'épreuve de la Grande-Jarre
- Boss optionnels de Caelid
- Tour Divine de Caelid
- Fort Faroth
- Cavernes du Tertre Draconique
- Tour de Lenne
- Boss optionnels du Tertre Draconique
- Nokron, la Ville Eternelle - Partie 1
- Nokron, la Ville Eternelle - Partie 2
- Lit Principal de l'Ainsel
- Nokstella, la Ville Eternelle
- Lac Putréfié
- Autel Lunaire
- Profondeurs de Fonderacine - Partie 1
- Profondeurs de Fonderacine - Partie 2
- Ruines de Zamor
- Catacombes des Cimes des Géants
- Grotte du Mande-Esprit
- Ruines de l'Observatoire Céleste
- Tour Hérétique
- Garnison des Gardiens
- Tombe des Pourfendeurs de Géants
- Boss Optionnels des Cimes
- Chemin Secret vers l'Arbre-Sacré
- Crypte des Champs Enneigés Consacrés
- Tour de Pierre d'Eclat de l'Albinaurique
- Grotte des Parias
- Galerie d'Anis Jaune
- Ruines d'Anis Jaune
- Ordina, Cité Liturgique
- Boss Optionnels des Champs Consacrés
- Palais Mohgwyn
- Arbre-Sacré de Miquella
- Elphael, Corset de l'Arbre-Sacré - Partie 1
- Elphael, Corset de l'Arbre-Sacré - Partie 2
- Ranni la Sorcière
- Frère Corhyn
- Gideon Ofnir
- Fia la Compagne Mortuaire
- Rogier le Sorcier
- D, Traqueur des Non-Morts
- D, Témoin de la Mort
- Blaidd le Semi-Loup
- Maître Forgeron Iji
- Hyetta la Chercheuse de Lumière
- Le Coprophage
- Varré le Blême
- Boc le Semi-Humain
- Yura, Chasseur de Doigts Sanglants
- Sellen la Sorcière
- Jerren le Chasseur de Sorcières
- Pat l'Affranchi
Bernahl le Réfractaire
- Hewg, Maître Forgeron
- Nepheli Loux
- Gostoc, Gardien des Portes
- Kenneth Haight, Héritier de Nécrolimbe
- Irina de Vent-Hurlant
- Châtelain Edgard
- Gurranq le Clerc Bestial
- Alexander le Guerrier-Jarre
- Thops le Sorcier
- Gros Boggart (Malfrat)
- Latenna l'Albinaurique
- Le Vieil Albus
- Précepteur Seluvis
- Pidia, Serviteur de Caria
- Gowry le Sage
- Kalé le Marchand
- Les Marchands Nomades
- Les Marchands Ascétiques
- Carcasses des Servantes Jumelles
- Enia, l'Augure des Doigts
- Rennala, Reine de la Pleine Lune
- Miriel le Prêtre des Voeux
- Objets clés
- Objets de jeu en ligne
- Lames d'Affûtage
- Sacoches à Talisman
- Graines Dorées
- Larmes de Vie
- Larmes de Cristal
- Larmes Larvaires
- Mortefleurs
- Flacons de Parfum
- Clés-Lames de Pierre
- Pots Fissurés et Pots Rituels
- Caboches Causantes
- Rosées Célestes
- Cendres de Guerre Perdues
- Coeurs de Dragon
- Fragments de carte
- Eclats de Lumière Stellaire
- Epées droites
- Epées colossales
- Epées d'estoc
- Epées d'estoc lourdes
- Epées courbées
- Espadons courbés
- Lames Double
- Grandes Haches
- Fléaux d'armes
- Marteaux de Guerre
- Armes Colossales
- Grandes lances
- Hallebardes
- Arcs courts
- Arcs géants
- Arbalètes et Balistes
- Bâtons de Pierre d'Eclat
- Sceaux Sacrés
- Petits boucliers
- Boucliers moyens
- Talismans d'Attributs
- Talismans de Résistances
- Talismans d'Armes
- Talismans de Magies et de Compétences
- Talismans d'Effets Spéciaux
- Parchemins de Sorts et Bréviaires
- Sorcelleries des Pierres d'Eclat
- Sorcelleries de Caria
- Sorcelleries de Sellia
- Sorcelleries du Mont Gelmir
- Sorcelleries des Neiges
- Sorcelleries de Cristal
- Sorcelleries Gravitationnelles
- Sorcelleries des Serviteurs de la Mort
- Sorcelleries des Boueux
- Sorcelleries Aberrantes
- Incantations des Deux Doigts
- Incantations de l'Arbre-Monde
- Incantations de l'Ordre d'Or
- Incantations des Dragons Anciens
- Incantations de la Flamme des Géants
- Incantations de la Flamme Noire
- Incantations Bestiales
- Incantations du Serment Sanglant
- Incantations de la Putréfaction
- Incantations des Trois Doigts
- Incantations de la Communion Draconique
- Affinité "Lourd"
- Affinité "Acéré"
- Affinité "Qualité"
- Affinité "Magique"
- Affinité "Feu" et "Pyrotechnique"
- Affinité "Sacré"
- Affinité "Foudre"
- Affinité "Empoisonné"
- Affinité "Glace"
- Affinité "Sanguin"
- Affinité "Occulte"
- Aucune Affinité
- Cendres d'Esprits Communes
- Cendres d'Esprits Illustres
- Cendres d'Esprits Légendaires
- Manuels de Guerrier Nomade
- Manuels d'Armurier
- Manuels de Missionnaire
- Manuels de Fevor
- Manuels d'Artisan des Pierres d'Eclat
- Manuels d'Exalté
- Manuels de Parfumeur
- Manuels d'Apôtre des Dragons Anciens
- Pierres de Forge des Dragons Anciens
- Pierres de Forge Sombres des Dragons Anciens
- Grands Muguets Mortifères
- Grands Muguets Fantomatiques
- Perles de Mineur de Pierre de Forge
- Perles de Mineur de Pierre Sombre
- Perles de Cueilleur de Muguet
- Souvenirs d'un Tableau
- Marques d'invocation
- Les Mausolées Ambulants
- Rejeton Greffé
- Margit le Déchu
- Godrick le Greffé
- Cerbère Funèbre de l'Arbre-Monde
- Homme-Bête de Farum Azula
- Chefs Semi-Humains
- Troll Fouisseur
- Darriwil, Chevalier-Limier
- Tête de Citrouille Démente
- Duelliste Gardien du Tombeau
- Assassin des Couteaux Noirs
- Golem Gardien
- Chevalier du Creuset
- Agheel, le Dragon volant
- Sentinelle de l'Arbre-Monde
- Cavalier Crépusculaire
- Rapace Funeste
- Chasseur de Perles Cinéraires
- Nocher Diaphane
- Esprit d'Arbre Ulcéreux
- Esprit d'Arbre Corrompu
- Chimère Léonine
- Veilleur de l'Arbre-Monde
- Ours Runique
- Chimère Ecailleuse
- Ombre du Cimetière
- Miranda la Fleur Galeuse
- Cavalier Crépusculaire (Péninsule)
- Rapace Funeste (Péninsule)
- Avatar de l'Arbre-Monde (Péninsule)
- Ancien Héros de Zamor
- Loup Cramoisi de Radagon
- Loretta, Chevaleresse Royale
- Chevalier Noble de la Putréfaction
- Veilleur de l'Arbre-Monde (Liurnia)
- Chevalier-Limier
- Cavalier Crépusculaire (Liurnia sud)
- Rapace Funeste (Liurnia sud)
- Nocher Diaphane de Liurnia
- Adan, voleur du Feu
- Tueur de Réprouvés
- Sorcier et Lancier Cristalien
- Escargot Mande-Spectre
- Makar le Dragon de Magma
- Bols, Chevalier de Caria
- Avatar de l'Arbre-Monde (Liurnia sud)
- Smarag, Dragon de Pierre d'Eclat
- Volatile Funéraire
- Spectre Royal
- Ombre du Cimetière (Liurnia)
- Assassin des Couteaux Noirs (Liurnia)
- Avatar de l'Arbre-Monde (Liurnia nord)
- Cavalier Crépusculaire (Liurnia nord)
- Chasseur de Perles Cinéraires de Liurnia
- Seigneur d'Albâtre
- Soldat Draconide de Nokstella
- Soldat Draconide
- Esprit Ancestral
- Gilika, Reine Semi-Humaine
- Parfumeuse Tricia
- Garryth le Nécromancien
- Assassin des Couteaux Noirs (Altus)
- Nocher Diaphane de Wyndham
- Veilleur de l'Arbre-Monde de Wyndham
- Troll Fouisseur (Altus)
- Godefroy le Greffé
- Créature Stellaire du Plateau
- Cavalier Crépusculaire du Plateau
- Tueur de Réprouvés et Miranda
- Lancier et Danseur Cristaliens
- Face de Ver
- Apôtre Sanctechair de Dominula
- Noble Sanglant
- Assassin des couteaux Noirs de la Tombe
- Ancien Héros de Zamor du Plateau
- Lansseax le Dragon Ancien
- Elemer du Roncier
- Rykard, Seigneur du Blasphème
- Vierges Ravisseuses
- Noble Sanctechair
- Adeptes de la Putréfaction
- Maggie, Reine Semi-Humaine
- Dragon de Magma du Mont Gelmir
- Margot, Reine Semi-Humaine
- Loup rouge du Champion
- Créature Stellaire Adulte du Mont Gelmir
- Esprit de l'Arbre Ulcéreux du Mont Gelmir
- Duo de Sentinelles de l'Arbre
- Sentinelle Draconique de l'Arbre
- Rapace Funeste des Faubourgs
- Seigneur d'Onyx
- Duelliste Gardien du Tombeau d'Auriza
- Chasseur de Perles Cinéraires des Faubourgs
- Ordovis, Chevalier du Creuset
- Godfrey, Premier Seigneur d'Elden
- Morgott, Roi des Réprouvés
- Jumeaux Abominables
- Esgar, Prêtre du Sang
- Mohg le Réprouvé
- Radahn, le Fléau des Astres
- Chimère et Chevalier du Creuset
- Duo de Veilleurs de l'Arbre-Monde
- Duo de Têtes de Citrouille Démentes
- Dragon de Magma (Galerie de Gael)
- Chevalier et Faucheur de la Noble Putréfaction
- Duelliste Frénétique
- Avatar de l'Arbre-Monde de Caelid
- Ekzykes le Putréfié
- Cavalier Crépusculaire (Caelid sud)
- Volatile Funéraire (Caelid sud)
- Créature Stellaire de Sellia
- Commandant O'Neil
- Epéiste et Prêtre Nokrien
- Cristaliens Putrides
- Ombre du Cimetière de Caelid
- Esprit d'Arbre Putride
- Adepte de la Lame d'Ebène
- Cavalier Crépusculaire des Terres Interdites
- Apôtre Sanctechair de la Tour Divine
- Duo d'Hommes-Bêtes de Farum-Azula
- Mage de Bataille Hugues
- Avatar Putride
- Greyll le Dragon Volant
- Chasseur de Perles du Tertre Draconique
- Cavalier Crépusculaire du Tertre Draconique
- Adepte de la Lame d'Ebène du Tertre Draconique
- Larme Imitatrice
- Esprit Ancestral Royal
- Duo de Gargouilles Vaillantes
- Soldat Draconide du Lac Putréfié
- Astel le Rejeton du Vide
- Alecto, Meneuse des Couteaux Noirs
- Adula, Dragon de Pierre d'Eclat
- Siluria du Creuset
- Champions de Fia
- Fortissax la Liche Draconique
- Géant de Feu
- Esprit d'Arbre Ulcéreux des Cimes
- Esprits Sanctechair
- Boréalis la Brume Glaciale
- Avatar de l'Arbre-Monde des Cimes
- Volatile Funéraire des Cimes
- Commandant Niall
- Ancien Héros de Zamor des Cimes
- Vyke, Chevalier de la Table ronde
- Larme Imitatrice Egarée
- Duelliste Putride
- Croisé Chimérique
- Astel la Constellation des Ténèbres
- Theodorix le Grand Ver
- Duo de Cavaliers Crépusculaires
- Volatile Funéraire des Champs Consacrés
- Avatar Putride des Champs Consacrés
- Duo Sanctechair
- Maliketh la Lame d'Ebène
- Placidusax, Seigneur Draconique
- Dragon Ancien de Farum Azula
- Loretta, Chevaleresse de l'Arbre-Sacré
- Malenia, Déesse de la Putréfaction
- Mohg, le Seigneur du Sang
- Sire Gideon Ofnir l'Omniscient
- Hoarah Loux le Guerrier
- Radagon de l'Ordre d'Or
- Bête d'Elden
- Guide des Fins
Cette partie de la Soluce Elden Ring est consacrée à la la zone optionnelle " Tour Divine Isolée ". Vous trouverez ici le cheminement intégral de la zone ainsi que la localisation des éléments à récupérer.
Restauration de la Rune Majeure de Malenia
Pour pouvoir rejoindre cette Tour Divine et ainsi restaurer le pouvoir de la Rune Majeure de Malenia, il s’agira de vous rendre sur le Pont Divin de Leyndell puis d’utiliser le téléporteur se trouvant là-bas ( image1-2-3 ).

Cependant, si vous avez déjà éliminé Maliketh à Farum Azula, cet endroit ne sera plus accessible que par le coffre-téléporteur de la Tour du retour, qui vous attend au sud de la Péninsule Larmoyante ( image4-5-6 ).

Quoi qu’il en soit, une fois sur place, vous pouvez simplement emprunter l’ascenseur et rejoindre le sommet de la tour pour restaurer la Rune Majeure de Malenia ( image7-8 ).

Sur le même sujet
Il parait que ça cartonne ...
- sur la semaine
- l'année
- depuis toujours

Soluce Witcher 3 : Wild Hunt

Soluce Metal Gear Solid V : The Phantom Pain

Soluce Assassin's Creed Unity

Soluce Batman Arkham Knight

Soluce Skyrim
Tour divine isolée Elden Ring : Comment l'atteindre et entrer ?
Les différentes tours divines du jeu de FromSoftware permettent de restaurer les runes majeures, et elles sont en général à proximité du boss correspondant. Mais il y a une exception. Voici un guide sur la tour divine isolée, et comment la rejoindre vers la fin de l'histoire.
Elden Ring possède son lot de Tours divines, chacune affiliée à un des gros boss de région ainsi qu'à sa Rune majeure . Dans la majorité des cas, il y a des obstacles à passer sous une forme ou l'autre pour l'atteindre et obtenir votre récompense. La Tour divine isolée ne fait pas exception, même si elle est un peu différentes des autres.

Position de la Tour divine isolée et comment l'atteindre ?
La méthode "normale" demande d'atteindre Leyndell, capitale royale, et de prendre l'énorme ascenseur, non loin de la zone qui ressemble à la Table ronde . Au sommet, se trouvent un point de Grâce évanouie, un golem géant qui fait le mort et surtout, un portail de téléportation qui va vous mener directement à la tour, en pleine mer. Cependant, la porte est fermée à moins de posséder la Rune majeure de Malenia .
Ironiquement, la méthode la plus simple est disponible dès les premières heures de jeu, même si cela ne sert pas à grand-chose à ce point. Il suffit de se rendre à la pointe Sud-ouest de la Péninsule larmoyante, en Nécrolimbe. En grimpant au sommet de la très bien nommée Tour du retour, vous allez être téléporté directement dans Leyndell, capitale royale, ce qui peut faire bizarre au début du jeu. Et vous n'êtes pas téléporté n'importe où, mais à proximité du portail de téléportation vers la Tour divine isolée, ainsi que du point de grâce mentionné plus haut.
Vers la fin du jeu, après avoir battu Maliketh , la capitale va changer et tous les points de grâce évanouie à l'intérieur sont perdus, dont celui à proximité du téléporteur à destination de la Tour isolée. De plus, l'accès à l'ascenseur n'est plus possible. La solution est évidemment de passer par le coffre de la Tour du retour, ce qui permettra d'activer à nouveau le point de grâce et d'emprunter le portail.

Comment ouvrir la Tour divine isolée ?
La première étape est de réaliser la quête du Médaillon secret de l'arbre sacré , tout en progressant dans l'histoire. Il faut l'utiliser à l'ascenseur géant pour accéder aux Champs de neige consacrés, puis obtenir l'accès au téléporteur caché dans la ville au Nord de la zone. Il faut ensuite traverser les zones de l'arbre sacré de Miquella, pour finalement confronter Malenia , ce qui n'est pas une mince affaire. Vous allez obtenir la Rune majeure de Malenia à sa mort, ce qui débloquera l'entrée de la Tour isolée. C'est probablement la Rune majeure la plus éloignée de sa Tour divine.

Fan de nombreux types de jeux, j'accroche surtout quand il faut faire souffrir ses méninges et peaufiner son gameplay. Des raids WoW, je suis passé aux CRPG, puis des tacticals aux 4X, mais aussi les jeux FromSoftware.
L'actu
21:30 Morgenstern Elden Ring : Où trouver le Morning Star ?
19:45 Liste des talismans Elden Ring : Où et comment tous les trouver ?
21:30 Un code caché dans Elden Ring pourrait se trouver sur la carte du jeu ! C'est en tout cas une théorie avancée par plusieurs fans
08:00 C'est confirmé, le personnage le plus attendu par les fans Elden Ring sera bien présent dans le DLC Shadow of the Erdtree
11:03 Elemer du roncier Elden Ring : Comment battre le boss du Bastiombre ?
08:00 Le DLC d'Elden Ring pourrait apporter encore plus de challenge aux joueurs PS5 grâce à cette vieille tradition qu'il devrait briser
16:00 "On n'a pas décidé si l'histoire est terminée", une suite à Elden Ring pourrait voir le jour, le DLC du jeu n'est pas une fin en soit d'après Miyazaki
11:29 Miquella Elden Ring : Saint Trina, qui est ce personnage du DLC Shadow of the Erdtree ?
16:30 Un fan d'Elden Ring pense avoir découvert une nouvelle arme cachée qui serait présente dans le DLC, Shadow of the Erdtree
18:52 Elden Ring : Comment mettre le jeu en pause ?
recommandés

à découvrir

How to get to the Isolated Divine Tower in Elden Ring
Where to activate Malenia's Great Rune.

Wondering how to get to the Isolated Divine Tower in Elden Ring? Divine Towers are dotted around the landscape of the Lands Between, and exploring them is vital if you want to make use of the Great Runes you get from the Shardbearer bosses. All but the one in Liurnia is tied to a specific rune, and the Isolated Divine Tower activates the Great Rune from one of the endgame bosses.
You can see this tower from various locations in the Lands Between, but it's out in the middle of nowhere, so it's not obvious how to reach it. Don't worry, I'll cover everything you need to know in this guide, including which boss you need to defeat to open the door. Here's how to reach the Isolated Divine Tower in Elden Ring.
Elden Ring Isolated Divine Tower: How to get there
There are a couple of ways to reach this Divine Tower, and how you get there will depend on how far you've progressed the story. The earliest you can reach the tower's base is via a teleporter trap in Weeping Peninsula, but you won't be able to get inside until you've defeated Malenia . This is also the only way to reach the tower if you've defeated Maliketh.
Head to the Isolated Merchant's Shack Site of Grace on the west edge of Weeping Peninsula and make your way southeast. You're looking for a ruined tower on top of a hill. A few enemies are patrolling around, but you can easily run past them and climb the ladders to reach the top. Here you'll find a chest, so use it to trigger the teleporter trap.
The trap transports you to Leyndell, to the top of the Fortified Manor. There's a large elevator at the bottom end of the walkway, which is inactive if you've never been here before, and a new Site of Grace to activate. Once done, head up the steps, and you'll see a sleeping golem. You can fight it if you like or sneak past to the left to find the teleporter. This takes you to the foot of the Isolated Divine Tower.
The second option is from within Leyndell, Royal Capital, though this won't be accessible if you've already defeated Maliketh. From the Fortified Manor, First Floor Site of Grace, head back to the main entrance hall, then, facing the front door, take the next doorway on your left.

Elden Ring guide : Conquer the Lands Between Elden Ring bosses : How to beat them Elden Ring map fragments : Reveal the world Elden Ring weapons : Arm yourself Elden Ring armor : The best sets Elden Ring Smithing Stone : Upgrade your gear Elden Ring Ashes of War : Where to find them Elden Ring classes : Which to choose
Comic deals, prizes and latest news
Sign up to get the best content of the week, and great gaming deals, as picked by the editors.
This takes you into an outdoor area, but be careful as there are two Abductor Virgin enemies here. From the door, turn left into the central courtyard as soon as possible, then sprint across towards the building ahead of you. There's a large elevator inside, and you can take this up to the same place you arrive via the Weeping Peninsula teleporter trap. From here, activate the Site of Grace, then locate the teleporter to the left of the sleeping golem.
Whichever way you get here, once you've reached the Isolated Divine Tower, open the doors, then use the elevator inside to ascend to the top. Take the step around the side of the tower, and you'll see the familiar Two Fingers in the centre of the platform, ready to activate Malenia's Great Rune.

Sarah started as a freelance writer in 2018, writing for PCGamesN, TechRadar, GamingBible, Red Bull Gaming and more. In 2021, she was offered a full-time position on the PC Gamer team where she takes every possible opportunity to talk about World of Warcraft and Elden Ring. When not writing guides, most of her spare time is spent in Azeroth—though she's quite partial to JRPGs too. One of her fondest hopes is to one day play through the ending of Final Fantasy X without breaking down into a sobbing heap. She probably has more wolves in Valheim than you.
Honkai: Star Rail Robin build—The best relics and Light Cones
Nothing makes sense anymore: They're making Funko Pops out of the cult classic 2004 Obsidian RPG, Star Wars: Knights of the Old Republic 2: The Sith Lords
A 10-foot-tall statue of Messmer the Impaler could be yours, but first, you need to edit a killer Elden Ring trailer
Most Popular
- 2 Best ultrawide monitor for gaming in 2024: the expansive panels I recommend for PC gamers
- 3 Best wireless gaming keyboard in 2024
- 4 Best gaming laptops in 2024: I've had my pick of portable powerhouses and these are the best
- 5 Best gaming chairs in 2024: the seats I'd suggest for any gamer
- 2 Endgame Gear OP1 8K wired gaming mouse review
- 3 Gigabyte G6X (2024) gaming laptop review
- 4 Flexispot E7L adjustable standing desk review
- 5 Starforge Systems Navigator Pro review
/cdn.vox-cdn.com/uploads/chorus_image/image/70700407/Elden_Ring_Leyndell_Royal_Capital_walkthrough_header.0.jpeg "tour divine leyndell")
Filed under:
- Elden Ring guide and walkthrough
Elden Ring Leyndell, Royal Capital walkthrough
Defeat enemies, find items, discover secrets, beat the boss
Share this story
- Share this on Facebook
- Share this on Reddit
- Share All sharing options
Share All sharing options for: Elden Ring Leyndell, Royal Capital walkthrough
Elden Ring ’s Leyndell, Royal Capital is a labyrinthine Legacy Dungeon, populated by tenacious adversaries led by a boss skilled in swordplay. In this Leyndell, Royal Capital walkthrough, we’ll show you how to defeat every enemy, find every item, and defeat Morgott, the Omen King.
Table of contents
Entering the capital, capital ramparts site of grace, east capital rampart site of grace, a forking path, up the stairs, the room to the north, the hallway (the critical path), avenue balcony site of grace, the right path, the left path, the path directly ahead, near the end of the lane, lower capital church site of grace, to the left, through the corridor on your right, back to the sewage canal, backtracking and exploring, down to the cellar (lower capital church site of grace), up the ladder, unlock a shortcut, a sandy vista, back the stairs, up the lift, avenue balcony site of grace (again), west capital rampart site of grace, fortified manor, first floor site of grace, divine bridge site of grace, godfrey, first elden lord boss fight, the erdtree sanctuary, back to the erdtree sanctuary site of grace, morgot, the omen king boss fight.
:no_upscale()/cdn.vox-cdn.com/uploads/chorus_asset/file/23324517/ramparts_approach_gates_Elden_Ring_Leyndell.jpeg "tour divine leyndell")
Although you can enter the capital by completing most of Ranni the Witch’s extended quest line (which requires you to defeat a powerful boss and explore numerous dangerous regions throughout the world), it’s more direct to pass through the gates not far from the Capital Ramparts site of grace on the Altus Plateau.
Approach the Capital Ramparts site of grace from the west by traveling east from the Outer Wall Battleground site of grace. Pass some ruined siege weapons in that direction to reach crumbling steps ascending along a cliffside.
From the top of the steps, follow the main path past some weaker enemies and through a trio of giants with bows and an ax to finally arrive at a guarded main gate. Defeat the challenging Draconic Tree Sentinel, who is weak to poison-based attacks. When he falls, you will receive the Dragon Greatclaw and Dragonclaw Shield . Then you should pass through the doorway he guarded to access a walkway leading to the Capital Ramparts site of grace.
Continuing directly ahead from the site of grace, you need to use two activated Great Runes, likely already in your possession. The rune for Rennala, Queen of the Full Moon activates automatically once you defeat and talk to her in the Academy of Raya Lucaria. After vanquishing Godrick the Grafted in Stormveil Castle , you can activate his rune in the Divine Tower of Limgrave .
With both runes activated, head through the main gates to arrive in the capital.
:no_upscale()/cdn.vox-cdn.com/uploads/chorus_asset/file/23360987/outskirts_lift_Elden_Ring_Leyndell.jpeg "tour divine leyndell")
Head through the door from the Capital Ramparts site of grace, and ascend some stairs to the left. Ride a lift to the upper level, and then start along that corridor. There is some Magic Grease resting on a corpse along the right. Beyond that point, you’ll reach a cathedral with a corpse resting on an altar to the left. Check it for the Furlcalling Finger Remedy , and then head right and up some stairs.
:no_upscale()/cdn.vox-cdn.com/uploads/chorus_asset/file/23361004/outskirts_sand_mound_Elden_Ring_Leyndell.jpeg "tour divine leyndell")
From the top of the stairs, as you start forward, watch for a weak Commoner enemy to attack from the grass to the left, and then look for another near a torch to the right. Past them, you’ll reach a sand mound looking toward a large segment of collapsed wall. To the right, you’ll shortly reach the East Capital Rampart site of grace and a summoning pool.
:no_upscale()/cdn.vox-cdn.com/uploads/chorus_asset/file/23361011/East_Capital_Rampart_summoning_pool_Elden_Ring_Leyndell.jpeg "tour divine leyndell")
Head through the next doors and descend some stairs. You are now at a sandy mound overlooking the capital. The door to your right is locked, so start by heading left and descend while dealing with a series of conspicuous white enemies. Among them, a larger enemy lurks in a flat area atop some short stairs. Defeat that foe and check the corpse to the left for a Golden Rune [10] .
:no_upscale()/cdn.vox-cdn.com/uploads/chorus_asset/file/23361013/East_Capital_Rampart_statue_Elden_Ring_Leyndell.jpeg "tour divine leyndell")
Continue along the main walkway and take out enemies as necessary, and watch ahead for an enormous statue ahead of a doorway. Defeat him with ranged attacks if possible. Check the corpse for the Golden Rune [7] . Through the door the statue guarded, you’ll find an enemy you should defeat quickly with melee attacks. It’s possible to hit him from behind while he descends some stairs.
:no_upscale()/cdn.vox-cdn.com/uploads/chorus_asset/file/23361016/East_Capital_Rampart_up_the_stairs_Elden_Ring_Leyndell.jpeg "tour divine leyndell")
At the base of the stairs, the path splits. Check to the left behind a screen to find a corpse holding the Cave Moss x10 . Looking out from there, you’ll see a door to your left and another one directly ahead (it was on your right as you descended the steps). Proceed straight ahead and eliminate three more of the white bulbous enemies. One is on the left and two are on the right.
Climb the stairs past them and defeat another enemy, and then pass through the door to the right while holding your shield at the ready in preparation for an ambush. Defeat that soldier and check the corpse in the chair for the Smithing Stone [4] . Exit through the door on the room’s far side, and head up some stairs to arrive along the route you’ve already cleared. Return to the room with the fork in the path, where you found the Cave Moss. This time, head directly forward from the base of the steps.
:no_upscale()/cdn.vox-cdn.com/uploads/chorus_asset/file/23361021/East_Capital_Rampart_slumbering_commoners_Elden_Ring_Leyndell.jpeg "tour divine leyndell")
Through that doorway, you’ll see a yellowish roof with a balcony ahead of you. You are on a lift, which you can ride to the lower level. Directly ahead, there are two slumbering commoner enemies. Take care of them. There is a room ahead, which you will return to in a moment by an alternate route. For now, look back toward your left to spot a low rooftop next to the balcony. Jump over the balcony onto that rooftop, and then walk to its edge. Ahead, there is an enemy with his back to you. Kill it from afar if you can, and then drop down and deal with a nearby soldier who was asleep.
Head next toward the left, passing underneath where the lift descended and proceeding toward the left along an alleyway. There is another knight here, and there are some commoners. Past them, you can enter a doorway to find Miranda Powder x10 on a corpse. Also notice some crates and barrels you can destroy to pass through another open door.
:no_upscale()/cdn.vox-cdn.com/uploads/chorus_asset/file/23361025/East_Capital_Rampart_forking_path_Elden_Ring_Leyndell.jpeg "tour divine leyndell")
Here, the path splits in several ways. You can proceed up some stairs, or pass through a doorway leading to a large room to your right, or head past the base of the stairs to find another doorway.
For now, head up the stairs at the fork. At the top, there is a sleeping commoner to your right. Defeat him, and pass along another corridor with sand and a couple more commoners. Then the next room is the one you ignored after descending the lift. Here, you can sneak up on and stab a crouching enemy from behind, and then check a nearby corpse to obtain Preserving Boluses .
:no_upscale()/cdn.vox-cdn.com/uploads/chorus_asset/file/23361029/East_Capital_Rampart_crowded_room_Elden_Ring_Leyndell.jpeg "tour divine leyndell")
Return to the room with the multiple branches, now approaching it by descending the stairs you climbed a moment ago. There’s a room that branches to your left, just past the base of the stairs. You can see a corpse with a glowing point, which holds the Warming Stone . The enemies here are powerful. Attacking one of them alerts the others and even triggers an ambush. You may wish to come back to this room later, depending on how badly you want the stone.
:no_upscale()/cdn.vox-cdn.com/uploads/chorus_asset/file/23361031/East_Capital_Rampart_back_to_fork_Elden_Ring_Leyndell.jpeg "tour divine leyndell")
When you’re ready to return to the main event, head along the narrow hallway leading past the base of the stairs to reach a sandy courtyard with a single enemy ahead of you. You can sneak up on him and stab him from behind if you like. Then check the nearby corpse for the Smithing Stone [6] .
:no_upscale()/cdn.vox-cdn.com/uploads/chorus_asset/file/23361036/East_Capital_Rampart_over_fence_Elden_Ring_Leyndell.jpeg "tour divine leyndell")
Just past where you looted that corpse, there is a low fence looking toward a narrow alley. You can hop over the fence and proceed along the walkway, where you’ll see some canines. Two are positioned directly ahead of you, eating a corpse, and a third lurks to the left. Defeat the enemies and check the corpse for the Old Fang x3 .
Continue along the alleyway, and you’ll approach a long lane. Directly across the way, there is a corpse resting on some steps. You can check it for the Gold Firefly x3 , but that’s not a priority just yet because there is a powerful enemy patrolling left and right along the lane. Let that enormous fellow shuffle past you and toward the right as you make use of available cover. Then run left past an overturned carriage.
The corpse leaning out that carriage’s window holds the Holy Grease , which you can get by climbing the nearby stairs and circling back along the rooftop. Defeat several enemies waiting there, and check behind the sculpture for the Smithing Stone [4] . Then, when the patrolling monster is out of range, drop over the edge of the balcony to land on the carriage and grab your loot.
There is a site of grace nearby, so you may wish to head there directly. Otherwise, drop from the carriage and return to the balcony area. Once there, climb some stairs to the left to find two enemies standing near the corner of a building. Kill them and check the back of the alley to find a corpse with the Golden Rune [8] .
:no_upscale()/cdn.vox-cdn.com/uploads/chorus_asset/file/23361040/East_Capital_Rampart_sandy_streets_Elden_Ring_Leyndell.jpeg "tour divine leyndell")
Head back along the alley and now veer right through some sand-lined streets. There are several more enemies in this direction, including one of the fire-spewing statues at a dead end. Near that adversary, there are several bodies you can check for the Golden Rune [11] , another Golden Rune [8] , and a Somber Smithing Stone [5] . Grab that loot and then head back the way you came, to the overturned carriage.
:no_upscale()/cdn.vox-cdn.com/uploads/chorus_asset/file/23361045/avenue_balcony_site_of_grace_Elden_Ring_Leyndell.png "tour divine leyndell")
From the overturned carriage, look across the street and to the left to spot a low opening with burning torches and flags. Head through that opening and descend some steps to find the Avenue Balcony site of grace . Now you can more safely backtrack to grab any loot you might have left untouched, including the Golden Rune [9] located on the back side of a coach on the far end of the street.
:no_upscale()/cdn.vox-cdn.com/uploads/chorus_asset/file/23361052/East_Capital_Rampart_steps_to_higher_area_Elden_Ring_Leyndell.jpeg "tour divine leyndell")
Return to the Avenue Balcony site of grace once again because this is a good opportunity to make a quick run for some easily missable, heavily guarded loot. Head up the steps in the direction of the lane, then veer right past the overturned coach. Proceed along the alley to the left of the stairs, and ascend the stairs beyond. Numerous heavily armored enemies are posted here, and the path essentially splits in three directions: right, left, and directly ahead.
:no_upscale()/cdn.vox-cdn.com/uploads/chorus_asset/file/23361054/East_Capital_Rampart_dead_end_fountain_Elden_Ring_Leyndell.jpeg "tour divine leyndell")
To the right, there is an open fountain area, guarded by a cloaked enemy and his powerful beast companion. There also are two corpses nearby, plainly visible with loot. The nearest corpse as you approach holds a Golden Rune [10] . The second corpse holds a Hero’s Rune [2] . Beyond them, there is a broken bridge, meaning this area is a dead end.
:no_upscale()/cdn.vox-cdn.com/uploads/chorus_asset/file/23361058/East_Capital_Rampart_golden_rune_13_Elden_Ring_Leyndell.jpeg "tour divine leyndell")
To the left from the fork in the path, there are two corpses near the balcony rails. The first one on the left holds the Golden Rune [13] , while the one further along the way to the right holds an item.
:no_upscale()/cdn.vox-cdn.com/uploads/chorus_asset/file/23361060/East_Capital_Rampart_gazebo_corpse_Elden_Ring_Leyndell.jpeg "tour divine leyndell")
Directly ahead of the fork in the path, there is a low balcony guarded by several weaker enemies. One of those enemies stands near a low point in a fence. You can run at the gap in the fence and leap through it to land on the rooftop of a gazebo below, where a corpse waits. Check the corpse for a Stonesword Key . If you neglect to defeat the enemies on the overhead balcony before making your jump, some of them may follow you and fire arrows at you or drop down to join you.
Now you are done looting this particular area, which connects with other buildings and walkways you have already explored or will soon explore from other directions.
:no_upscale()/cdn.vox-cdn.com/uploads/chorus_asset/file/23361065/fountain_split_Elden_Ring_Leyndell.jpeg "tour divine leyndell")
When you are done gathering local loot, return to the Avenue Balcony site of grace. Head back upstairs and work your way along the lane leading to your left, where the giant enemy patrolled. Pass the large carriage near the end of the street and continue until you find stairs descending left to a plaza with a fountain. Head through the door to the left to find a lift and ride to the lower level.
:no_upscale()/cdn.vox-cdn.com/uploads/chorus_asset/file/23361076/fountain_hop_to_roofs_Elden_Ring_Leyndell.jpeg "tour divine leyndell")
From the base of the lift, head through the door to arrive at the top of some stairs. To your right, there are low rooftops to your right. Hop to the nearest one, and then run and jump along several more to reach an area with a corpse you can check for the Black Bow . Then descend to street level and check a nearby corpse in the square not far from the base of the stairs to find a Golden Rune [9] . Your looting will attract several skeletons.
:no_upscale()/cdn.vox-cdn.com/uploads/chorus_asset/file/23361079/fountain_stonesword_key_Elden_Ring_Leyndell.jpeg "tour divine leyndell")
Head back to the base of the stairs and head through the plaza while veering left to reach an alley with a corpse at the end. Grab the Gravel Stone , defeat the skeletons, and then continue exploring in that general vicinity. You will find a tree with a body near its base. Grab the Smithing Stone [4] , and then defeat the enemy that attacks. Off to the side, you should also see a tombstone with a corpse resting against it that holds the Stonesword Key .
:no_upscale()/cdn.vox-cdn.com/uploads/chorus_asset/file/23361082/fountain_walkway_along_canal_Elden_Ring_Leyndell.jpeg "tour divine leyndell")
Return to the base of the stairs, and then head along the plaza again but this time veer right to find a narrow alley leading to the top of a short set of stairs. Ahead, a walkway leads along the left side of a canal. Follow that walkway and watch for a place where you can head right. There, a skeleton is kneeled ahead of you with its arms lifted into the air. Defeat it, and then look down along the canal and you should see a corpse against one end, in the shadows. Drop down and check that corpse to find the Guilty Hood .
:no_upscale()/cdn.vox-cdn.com/uploads/chorus_asset/file/23361088/fountain_rats_Elden_Ring_Leyndell.jpeg "tour divine leyndell")
Head back along the sewage canal and enter the covered tunnel area, where rats await. As you advance, you’ll find one body in the corner you can loot for a Golden Rune [8] and another one further along that holds a Hefty Beast Bone . Watch the ceiling as you advance to target an enemy you can hit with a projectile.
Continue past where you dropped that enemy, and then climb the stairs to your left to reach higher ground. At the top of the steers, turn right and follow a short ledge to reach the base of a ladder. Climb it to reach the edge of a church courtyard, where an enemy is patrolling. He sometimes drops the Omensmirk Mask , plus the nearby corpse holds the Smithing Stone [6] . You can rush past the enemy for now to enter the church to access the useful Lower Capital Church site of grace.
:no_upscale()/cdn.vox-cdn.com/uploads/chorus_asset/file/23361102/church_loot_Elden_Ring_Leyndell.jpeg "tour divine leyndell")
Once you arrive at the Lower Capital Church site of grace, loot the immediately available treasure. Two glowing points rest on nearby corpses. One point of light holds Lionel’s equipment set, which includes Lionel’s Helm , Lionel’s Armor , Lionel’s Gauntlets , and Lionel’s Greaves . The other one rewards you with the Deathbed Dress .
Return outside and head back downhill and down the ladder. Follow the ledge past the head of the steps you recently ascended and through the doorway to find an armored enemy that rushes as you approach, along with a corpse against the far wall that yields a Cracked Pot . Through the door to its left, you will find yourself back in the square where you recently killed the skeleton that was kneeling with its arms in the air.
:no_upscale()/cdn.vox-cdn.com/uploads/chorus_asset/file/23361103/church_giant_enemy_Elden_Ring_Leyndell.jpeg "tour divine leyndell")
Left through that open area, a giant monster attacks. Kill it (with frost attacks or arrows) for a Golden Seed and check a nearby corpse for the Golden Arrow x15 . There is an additional corpse in this area, which holds the Smithing Stone [6] .
Return to the base of the ladder near the church and drop down into the sewage canal, and then make your way forward to a fork where there are rats to your left and right. For now, head left. In this direction, there are some of the clinging hand-shaped enemies on the ceiling, so defeat them with projectile magic. Then head to the end of the passage and check the corpse for the Poisonbone Dart x8 .
Head back the way you came, but now you should pass through the opening to your right and proceed along that corridor. You’ll find a few more enemies hanging from the ceiling here. If you need to farm Sober Smithing Stone [4] , note that a lot of enemies of this type will drop it when defeated, so this is a terrific farming area. Past the second such foe, an especially large and powerful enemy hangs from the ceiling. He is best taken out with a series of quick melee strikes while you avoid his grip. Defeat him, and then check the corpse for the Lost Ashes of War .
:no_upscale()/cdn.vox-cdn.com/uploads/chorus_asset/file/23361107/church_canal_progress_Elden_Ring_Leyndell.jpeg "tour divine leyndell")
Return to the ladder near the church yet again for any necessary recovery. Then drop back into the sewage canal and make your way to the fork in the path where you previously went left. This time head right. In that direction, there is a corpse you can loot for String x4 . Continuing in that direction to find another hand-shaped foe on the wall. Blast it from afar, and then head down the tunnel to the right but watch out from an ambush from behind. You need to be ready to eliminate some enemies with melee attacks. There are Nascent Butterfly smithing resources at the end of that tunnel.
Backtrack to the main corridor and continue along it to find a large enemy you can stab from behind. Beyond it, three corpses rest along the floor. Defeat the enemy, and then drop down and check the corpses for the Fan Daggers x5 , Erdsteel Dagger , and Holyproof Dried Liver . Then cross to the back wall and climb the ladder. From its top, jump over the low wall and head up some stairs to the left to find a corpse holding the Dragonwound Grease .
:no_upscale()/cdn.vox-cdn.com/uploads/chorus_asset/file/23361112/church_dragon_view_Elden_Ring_Leyndell.jpeg "tour divine leyndell")
Look back down the steps and ahead you will see a small building and a large dragon wing of stone. There is a stationary enemy with a bow who has his back to you, just past the building on its right side. Another knight patrols to the left. You can surprise attack the one on the right fairly easily, provided his fellow to the left isn’t patrolling nearby. Past him another one lurks behind some rubble to the right. If you like, rush straight forward, through a door, and up some stairs ahead to find yourself back at the Avenue Balcony site of grace. Coming from the direction of the church, note that engagement with these enemies is optional and the rewards are minimal.
In the area with those three knights, check a corpse along the balcony rail where the one knight patrolled. It contains the Golden Rune [9] . Collect that, and then return to the stone dragon wing and ascend it. Along one point, you can grab the Gravel Stone material. Continue up the carcass and look left to spot a corpse you can loot for a Rune Arc .
:no_upscale()/cdn.vox-cdn.com/uploads/chorus_asset/file/23361114/church_ladder_near_corpse_Elden_Ring_Leyndell.jpeg "tour divine leyndell")
Near that corpse, there is a ladder leading to an upper level. Along the corridor, climb some stairs and tend to the knight that is waiting, and then check the corpse near where he was standing for Gravel Stone x5 . Next, head through the doorway but be prepared for a soldier to ambush you. Kill him and check the nearby corpse for Golden Rune [11] , and then keep going to find the West Capital Rampart site of grace.
If you’ve followed this walkthrough closely, you’ve gathered most items available by the time you reach the West Capital Rampart site of grace. However, there are a few treasures that require some backtracking to reach them.
It’s easiest to start your hunt by returning to the Lower Capital Church site of grace, descending the ladder, and then heading through the room guarded by a knight to where the skeleton is on his knees with his arms raised. Head up the steps to the right from there (across the canal) to reach a fork in the path. Then start right again where there are some stairs visible through a doorway.
Pass through that opening but be ready for a fight in an enclosed cellar area. The enemies here lob flame bursts your way, and there are quite a few of them. Many are positioned on upper platforms, so you have to move quickly to them. Clear the area, and then check the corpse dangling from the upper scaffolding for Clarifying Boluses . On ground level, look to the room’s side to spot a gate you can open to reach a treasure chest that holds a Stonesword Key .
Also on the ground level in the cellar, there is a ladder leading to an upper ledge. There, open the door to produce a shortcut that takes you to the Avenue Balcony site of grace. Also check near the far end of the balcony near the site of grace to find the Smithing Stone [6] hiding on a corpse in some brush.
Return to the cellar the way you just came. Exit that chamber and cross the skeleton-filled graveyard to reach the lift at the top of the stairs on the far side. Ride the lift to reach the familiar plaza with a fountain, and cross the plaza to enter the room on the far side. Here, you can battle a powerful armored enemy, who you find standing near an altar. If you prefer, you can instead sneak past him.
You can check the corpse that the enemy guards to obtain the Hero’s Rune [5] . To the left of the room’s entrance, there’s another corpse with the Golden Rune [9] . Just to the right of that corpse, there’s a door you can pass through to reach a short hallway that leads to a lift. Ride it to the next floor and open the door to create a shortcut to the East Capital Rampart site of grace (after going through the door, the site of grace is up the stairs to your left).
After activating the shortcut, ride the lift back down and return to the fountain in the plaza. Head up the stairs to your left and then look left again, where there are two high doors against a wall. Head to the doors and open them to produce an opening to the adjoining area.
This sandy area features a variety of enemies and loot. Ahead, you will see some stairs ascending. To the right from the base of those stairs, defeat some enemies and check a glowing point for the Beast Blood x3 . As you continue through this sandy lower area, you’ll find more enemies, as well as the Golden Rune [9] , Lightningproof Dried Liver , and Perfume Bottle . There also are numerous Miquella’s Lily materials you can gather from the glowing yellow flowers.
Once you clear out the enemies in that lower area, return to the stairs near where you first entered this area and begin your ascent. As possible near the top of the first group of steps, veer left up the cliff and defeat the enemy that descends toward you. There are more enemies in a graveyard area here, along with a corpse holding the Soporific Grease x2 . Continue along the high ground, back toward the head of the stairs. Look nearby and you’ll see a statue at the base of a slope, with a corpse behind it and an enemy. The corpse holds the Somber Smithing Stone [6] .
Head up the slope after killing the enemy, and you will find more like him. Defeat the mob in this area in the manner that works best for you, while keeping in mind a powerful enemy with a long-reaching sword strike that tears through armor. If you descend from there to the top of the stairs, you can check the corpse that rests there for the Nascent Butterfly x3 . The corpse dangling over the side of the nearby ledge holds the Exalted Flesh .
At the very top of the stairs, you can enter a building to find a large lift, with a podium that you can activate to ride it to a high chamber. Proceed through the opening and you’ll find a few last enemies, as well as a corpse. Check the corpse for the Flamedrake Talisman +1 . You can check the door also, but it is sealed by Morgott the Grace-Given so that you can’t pass through it quite yet.
Fast travel to the Avenue Balcony site of grace, and head upstairs directly ahead of you upon arrival, and then pass through the open doors and start to the right. There are some soldiers and a knight in this direction. Defeat them and check the nearby corpses for Golden Rune [8] , Golden Rune [12] , and Lightningproof Dried Liver x2 .
Since you can’t open the door the enemies were guarding, descend the steps and head around their base toward an alleyway. There are enemies ahead, but you should veer right toward the base of some steps at the end of the alley. Ahead of those steps, head left again and along a narrow alley that leads to an enemy you can ambush from behind with a critical attack. Take him out so he doesn’t sound his horn and raise the alarm.
Next, head back to the base of those steps you avoided a moment ago and head around their right side to discover a corpse in the foliage that holds a Golden Rune [8] . Return along the alley where you recently executed the guard, but this time watch for an opening to the right. There, an enemy guards a small building. Defeat him with projectile magic if you can, without alerting a nearby knight. Then head left from where he was standing to enter a building’s opening and arrive at the top of a ladder.
You now find yourself on a ledge with shallow troughs of water ahead of you. Follow that ledge to the door at the far end to arrive at a ladder looking down on the building that houses the Lower Capital Church site of grace. You can kick the top of the ladder to make it drop and create another shortcut. If you’ve been following our walkthrough up to this point, you’ve already explored this area while following steps outlined in the previous section, so you should go ahead and fast travel to the West Capital Rampart site of grace to resume your journey.
:no_upscale()/cdn.vox-cdn.com/uploads/chorus_asset/file/23361294/west_entry_view_Elden_Ring_Leyndell.jpeg "tour divine leyndell")
From the West Capital Rampart site of grace, head forward to reach the top of some stairs. Descend them and wrap around their base to the right to find a corpse at the end of a corridor. Check the corpse for the Cane Sword . Then head back to the base of those stairs and continue through the arch. Defeat the enemies to the left and right, and check the corpse the enemies on the right were guarding for a Golden Rune [9] . Near to it, there is a lever you should also pull.
:no_upscale()/cdn.vox-cdn.com/uploads/chorus_asset/file/23361300/west_golden_seed_Elden_Ring_Leyndell.jpeg "tour divine leyndell")
Head back upstairs and continue along the rampart to find a powerful stone gargoyle enemy. Defeat it to acquire the Gargoyle’s Halberd . To the left of where the gargoyle was positioned are several white enemies standing around a glowing tree. Defeat them and pick up the Golden Seed . Then look back the way you came and you’ll see the top of some stairs that descend to a lower door. As you descend, watch for an enemy that attacks from your left. Then look ahead through the arches to see a corpse you can loot for a Smithing Stone [6] .
:no_upscale()/cdn.vox-cdn.com/uploads/chorus_asset/file/23361304/west_large_root_Elden_Ring_Leyndell.jpeg "tour divine leyndell")
After grabbing the item, drop down from the roof, and head to the left. There are some roaming hounds here, as well as the base of a large root leading to the upper balcony. To the right from that root, you’ll see a body resting on the roof of a low building you can climb from a sand dune to the left. It holds a Golden Rune [9] . Look along the roof to your left from there to find a low gap in the wall, allowing access to an archway.
Head through the archway and then the next door to reach a treasure room of sorts. There are two glowing points in plain view. One is the Sanctified Whetblade and the other is the Hammer . Through the next room on that level, you’ll find a bedroom with two more glowing points that are the Hero’s Rune [1] and the Be My Sword gesture.
Return to the previous room and pass through the opening to your left. You’ll see a large round table with chairs around it, like the one in Roundtable Hold. There is a Rune Arc resting on that table. Exit to the balcony to find a corpse hanging from the railing that holds a Smithing Stone [5] . Then return to the room with the table and enter the next door, then cross to the far chamber to reach a fireplace where a corpse holds the Furlcalling Finger Remedy .
:no_upscale()/cdn.vox-cdn.com/uploads/chorus_asset/file/23361317/west_double_doors_Elden_Ring_Leyndell.jpeg "tour divine leyndell")
Head back out through the door and veer left. Proceed in that direction to reach a room at the end, where a corpse rests in a chair. It holds the Seedbed Curse . Then backtrack to the room with the round table. Enter the double doors and cross to the throne to grab the Coded Sword . Then return to the previous room and head back toward the room with the suits of armor, from which you made your initial approach. There are some stairs there that you should now descend toward the lower level.
Halfway down those stairs, check the corpse for a Smithing Stone [6] . Then drop down to the lower area and double back to find a hallway leading into a dining area. Check in this chamber to find two glowing points to investigate. Near the fireplace, you’ll find the Two Fingers’ Prayerbook . The point at the base of some pillars to the room’s side holds Black-Key Bolt x20 . You can kill the enemies in the next room for some runes, though they aren’t hiding any treasure. Then head back in the direction of the ruined stairs you descended a short time ago, where you’ll find doors leading left.
Head left through this room. Examine the corpse seated ahead of some statues to receive the various pieces of Alberich’s armor: Alberich’s Pointed Hat , Alberich’s Robe , Alberich’s Bracers , and Alberich’s Trousers . Through the opening to the right from that corpse, first head immediately right and check behind some racks to find a Smithing Stone [5] . Then cross the room and enter the next door. At the end of that chamber, the door leading right leads to the Fortified Manor, First Floor site of grace.
:no_upscale()/cdn.vox-cdn.com/uploads/chorus_asset/file/23361318/west_fortified_manor_site_approach_Elden_Ring_Leyndell.jpeg "tour divine leyndell")
In the room with the Fortified Manor, First Floor site of grace, examine the painting to receive the “Flightless Bird” Painting . Then return the way you came until you reach the wide corridor with open doors leading outside.
Ahead of the doors leading outside, a set of double doors lead left. Continue through yet another set of doors, already opened. In this area, two roaming enemies attack. You can backtrack through the opened doors to the previous corridor and the enemies will ram up against the opening without being able to pass through it. Lure your foes to that place one at a time, and safely pelt them with projectile magic to eliminate them.
:no_upscale()/cdn.vox-cdn.com/uploads/chorus_asset/file/23361322/manor_room_with_lift_Elden_Ring_Leyndell.jpeg "tour divine leyndell")
With those dangerous enemies out of the way, you should explore the yard they guarded. Head around the outer corridor the enemies patrolled and check against the dead end to find a Somber Smithing Stone [6] . Then head to the central area. Against one wall, check a corpse for the Stormhawk Axe . On another corpse in the brush near the center of that same yard, find Nascent Butterfly x3 . Cross to the edge of the open area to find a chamber with a lift you can ride up one level.
:no_upscale()/cdn.vox-cdn.com/uploads/chorus_asset/file/23361326/manor_approach_divine_bridge_Elden_Ring_Leyndell.jpeg "tour divine leyndell")
After riding the lift, head forward and up some stairs to reach the Divine Bridge site of grace. Activate it, then head back to the manor grounds and proceed through the doorway that leads outside.
As you exit the manor, you arrive at the edge of a lane leading left and right. Start by exploring to the left, where an armored knight patrols. You can sneak behind the stables to the right to find a corpse at the end, which holds the Old Fang x5 . Keep advancing from there and follow the soil path left to ascend over where another knight with a bow is positioned. From there, you can climb over a stony ledge and find an area with a glowing point where you can acquire the Gravel Stone x3 .
Next, turn around and look down the street. There is a giant stone claw formation you can ascend along. From its tip, you can jump to the roof of a building to the right, and then leap from that building to the next one. Timing is crucial, and you have to run. Inside the upper room, there are two glowing points where you can acquire a Smithing Stone [6] and a Stonesword Key . Then you should return along the street until you arrive back at the manor entrance.
Continue along the street to reach the base of a giant root at its far end with some patrolling hounds. You need to ascend that root while battling many enemies. Along the way, follow an extension leading to cliffs to the right. Near some poison flowers, you can check a corpse for a Smithing Stone [6] . Then, near the very top, follow a branch to a rooftop to the left and check along its side to find a body that holds Holy Grease x3 . Then return to the main portion of the root and ascend to its highest point for a boss battle with the lethal Godfrey, First Elden Lord.
Preparing for the Godfrey, First Elden Lord boss fight
The fight with Godfrey after climbing Leyndell’s tree roots won’t be your last encounter with the First Elden Lord, and it’s really just a warm-up for the boss battle that will follow soon afterward. Nevertheless, the Golden Shade of Godfrey can stymie even experienced Souls players with unpredictable combos and a difficult-to-dodge stomp attack.
That means you’ll want to make sure you’re prepared. If you followed our guide to defeating Draconic Tree Sentinel on the way into Leyndell, you’ve already explored the Altus Plateau . But if not, you should — there’s plenty of loot that can help you in the fight.
Gearing up in Altus Plateau
First off, you want your healing Flasks to be as effective as possible at this point, so make sure to grab all the Golden Seeds and Sacred Tears you can find in Altus Plateau. Without venturing too far and encroaching onto Mt. Gelmir to the west, you can grab two Sacred Tears in Altus Plateau at the following locations:
- Second Church of Marika, on the western edge (accessible from the north)
- Stormcaller Church, near the Rampartside Path site of grace
:no_upscale()/cdn.vox-cdn.com/uploads/chorus_asset/file/23360881/Elden_Ring_altus_plateau_flask_upgrades.jpg "tour divine leyndell")
Meanwhile, Golden Seeds can be found in the following locations:
- Beside the Erdtree Gazing Hill site of grace
- Roadside East of 1
- Inside the Capital wall past the two Tree Sentinels
- Near the road heading north from 4, outside the Capital wall
- Near the Minor Erdtree (watch out for the wormface enemies)
:no_upscale()/cdn.vox-cdn.com/uploads/chorus_asset/file/23360887/Elden_Ring_capital_flask_upgrades.jpg "tour divine leyndell")
And within the capital city itself, you can find two more Golden Seeds:
- The Ulcerated tree Spirit that spawns in the courtyard near the Avenue Balcony site of grace drops one
- One is guarded by a group of envoys and a large gargoyle enemy on a balcony just outside the West Capital Rampart site of grace room (it’s hard to miss on your way to Godfrey fight)
With your flasks upgraded, you’ll want to grab the Arsenal Charm +1 from the Altus Tunnel dungeon, which you can see on your map — it’s a roundish discoloration just south of the Altus Plateau Minor Erdtree . In addition, if you somehow missed the extra Margit fight on your way to the Draconic Tree Sentinel, follow the road north/northeast from the Outer Wall Phantom Tree site of grace and fight the boss again for the Viridian Amber Medallion +1 . These two talismans raise your maximum equip load and maximum stamina, respectively, and should be useful no matter what kind of build you’re running.
:no_upscale()/cdn.vox-cdn.com/uploads/chorus_asset/file/23360883/Elden_Ring_sainted_hero_s_grave.jpg "tour divine leyndell")
However, the Brass Shield, Boltdrake Talisman, and defensive incantations you may have looted for the Draconic Tree Sentinel fight won’t be much use here. Despite appearing to be a big golden ghost, Godfrey uses purely physical attacks. And a shield is basically useless for this fight, as we’ll explain shortly. One thing you will want to grab, though, is the Dragoncrest Shield Talisman +1 , a charm that boosts physical damage negation. You’ll find it behind a stone sword key fog gate in the Sainted Hero’s Grave dungeon in the central area of the Altus Plateau.
Godfrey, First Elden Lord boss
— By Mike Rougeau
The Golden Shade of Godfrey uses entirely physical attacks, so your elemental defense talismans and incantations are useless. And surprisingly, using a shield during this battle is hard to pull off, thanks to Godfrey’s aggressive and powerful moves. His combos often include five or six successive attacks, which will leave you stance-broken and vulnerable if you try to block them all. Instead, you’ll have to either keep your distance from Godfrey, or learn how to dodge his attacks.
Dodging to live, living to dodge
Thankfully, Godfrey’s attacks are fairly predictable. This Golden Shade only has one phase, and he never changes his combos up, even as he approaches death. Spend some time getting to know his move set; putting down your summoning sign by using the Tarnished’s Furled Finger item outside the boss fog is a great way to get some practice in.
Without a doubt, Godfrey’s most dangerous move is his stomp attack, which sends spikes jutting up from the floor in a cone outward in front of him. It might seem counterintuitive at first, but it actually is quite easy to dodge this attack. The trick is waiting until his foot starts coming down, then dodging toward the boss. You’ll be safe from damage and firmly in melee range, ready for a counterattack.
However, you’re still not quite free to get some swings in. Godfrey nearly always follows up the stomp with several powerful melee swings. This post-stomp combo often involves one powerful swing followed by the boss dragging his axe in a circle behind him before unleashing another overhead attack. Dodging this can be tricky, as you’ll be tempted to roll far too early; instead, let the axe complete its circle and begin to come down before you roll.
The other possibility involves a combo of up to five attacks that begins with two rapid-fire overhead swings. If Godfrey begins to unleash these, make sure you’re ready to dodge all five swings before trying to get your own hits in.
The range option
Of course, if you’re a magic or faith user, there’s no need to get close to Godfrey’s Golden Shade at all. Simply back away from him continuously, dodging when necessary, and unleash spells whenever you have an opening. Godfrey can be staggered, so the Rock Sling sorcery is a particularly good choice (it can be found in a chest in the Street of Sages ruins in Caelid). For faith users, Stone of Gurranq is another great option, though it’s less easily accessible, since it requires giving six deathroots to the Beast Clergyman in eastern Caelid.
Of course, the same timing tricks will apply — Godfrey’s attacks have surprising reach, so you want to wait for him to finish his combos before you start casting. In fact, the best strategy is probably a combination of melee and magic attacks; either way, you’ll have to learn how to avoid Godfrey’s attacks.
Summoning for Godfrey, First Elden Lord
Just like with other boss fights in Elden Ring , you can summon help by opening your multiplayer menu and using the Furlcalling Finger Remedy item to enable you to see other players’ summon signs. And don’t forget that you can use the Tarnished’s Furled Finger item to place your own summon sign, allowing you to help other players beat the boss in their own world, while getting to practice the fight without risking your runes.
With a summoning pool effigy and a Stake of Marika right next to the boss fog, summoning help or offering your own help for Godfrey’s Golden Shade is easy. However, keep in mind that the more players or NPCs you summon for the fight, the more health the boss will have. With that in mind, you might want to opt for a Spirit Ash instead — using one doesn’t increase the boss health.
With these strategies, the Golden Shade of Godfrey, the First Elden Lord, should soon dissipate, netting you a much-appreciated extra talisman slot — and access to the Capital’s real final boss fight, Morgott, the Omen King.
After defeating Godfrey, you will receive a Talisman Pouch . Make sure to activate the Erdtree Sanctuary site of grace in the vicinity and look for a body along the side of the main chamber that you can loot for the Somber Smithing Stone [5] x3 . Then follow the lift to reach the capital’s lower reaches once again as you plan your approach to Morgott, the Omen King.
:no_upscale()/cdn.vox-cdn.com/uploads/chorus_asset/file/23361334/erdtree_outside_again_Elden_Ring_Leyndell.jpeg "tour divine leyndell")
From the Erdtree Sanctuary site of grace, you can advance in two new directions. Start by heading down the short steps and following a wide corridor to reach an outside area. Descend the steps and enter the building. Then catch a ride on the lift to the lower level and descend more steps before heading toward a statue against a far wall. Ahead of the statue, steps descend toward the left and a couple of enemies near a corpse. Defeat the enemies and check the corpse for the Holy Grease x5 .
:no_upscale()/cdn.vox-cdn.com/uploads/chorus_asset/file/23361335/erdtree_statue_near_railing_Elden_Ring_Leyndell.jpeg "tour divine leyndell")
Next, turn around and start along the balcony past where the two enemies were positioned. There is a statue ahead of you. As you approach it, look for an invisible enemy to start running away to your right. Follow its golden steps and defeat it with a suitable spell to receive the Barrier of Gold incantation. If the enemy gets away from your early efforts, it follows a course along the walkway ahead, which is guarded by a powerful enemy. Be mindful of that trap.
:no_upscale()/cdn.vox-cdn.com/uploads/chorus_asset/file/23361337/erdtree_elusive_treasure_Elden_Ring_Leyndell.jpeg "tour divine leyndell")
You are then ready to return to the Erdtree Sanctuary site of grace near where you fought Godfrey and to head outside in the opposite direction of the one you just explored. You’ll soon reach a fork in the path. First, follow the path winding along the building to the right. In a gazebo at the end of that path, you’ll find Holy Grease x6 . Then, backtrack and head along the path that led left from the balcony. Climb along a root that forms an arc over that path to reach a higher balcony. To the left is a glowing point on a hanging bit of rubble that you can’t reach quite yet.
Head through an opening to the right to arrive at the edge of an outdoor walkway curving toward the right. Drop left here to access a lower platform and the roof beyond it. Climb the eave and pass through an open window to return to the chamber you just left, except this time on the other side of the large root. Follow the balcony to the right to find a treasure chest you can open for the Erdtree Bow .
:no_upscale()/cdn.vox-cdn.com/uploads/chorus_asset/file/23361342/erdtree_ladder_and_corpse_Elden_Ring_Leyndell.jpeg "tour divine leyndell")
Near that treasure chest is another opening. Pass through it to find a corpse hanging over a ledge, along with the top of a ladder. Kick the ladder to create a convenient shortcut to the balcony. Check the body for the Celestial Dew . Then return to the previous room and head along the balcony to reach the root, which you can jump to and walk along. Follow it to find yourself closer to the hanging debris you saw previously. You can acquire the Golden Order Principia by searching while standing on the nearby root.
:no_upscale()/cdn.vox-cdn.com/uploads/chorus_asset/file/23361344/erdtree_follow_walkway_Elden_Ring_Leyndell.jpeg "tour divine leyndell")
Return to the outdoor balcony you initially reached by climbing the root to the left of the site of grace (it’s to your left as you stand facing the hanging debris that held the Golden Order Principia). This time, instead of dropping left to the rooftop, proceed along the walkway. As you do, you’ll see an enemy sitting on the steps. When you step within range, he will attack using a powerful projectile spell, or by rushing you and dazzling you with swift swordplay. Defeat him quickly with melee attacks.
Head through the wide opening your swift foe guarded and climb some stairs to reach and activate the Queen’s Bedchamber site of grace. There is a glowing point in plain view on the tarped stone sculpture that you can check for the Blessing of the Erdtree .
Once you are ready to face the area’s boss, proceed along the steps that ascend from the Queen’s Bedchamber site of grace to reach that confrontation with Morgott, The Omen King.
The self-proclaimed “last of all kings” is no slouch, and this battle is significantly more chaotic and difficult than earlier fights with Margit. Thankfully, there’s a lot you can do to make it easier. If you checked out our guides for the Draconic Tree Sentinel and Godfrey’s Golden Shade, some of this will look familiar. If not, you have some exploring to do. Get ready to get the most out of Altus Plateau .
- Second Church of Marika , on the western edge (accessible from the north)
- Stormcaller Church , near the Rampartside Path site of grace
:no_upscale()/cdn.vox-cdn.com/uploads/chorus_asset/file/23335427/Elden_Ring_Altus_Plateau_flask_upgrade_map_locations.jpg "tour divine leyndell")
- The Ulcerated Tree Spirit that spawns in the courtyard near the Avenue Balcony site of grace drops one
:no_upscale()/cdn.vox-cdn.com/uploads/chorus_asset/file/23335435/Elden_Ring_Sainted_Hero_Grave_map_location.jpg "tour divine leyndell")
Another thing you’ll want to grab is the Dragoncrest Shield Talisman +1 , a charm that boosts physical damage negation. You’ll find it behind a stone sword key fog gate in the Sainted Hero’s Grave dungeon in the central area of the Altus Plateau.
:no_upscale()/cdn.vox-cdn.com/uploads/chorus_asset/file/23335442/Elden_Ring_Seaside_Ruins_map_location.jpg "tour divine leyndell")
In addition, unlike the previous boss, Godfrey, Morgott does Holy damage as well as Physical. So go pick up the Haligdrake Talisman too if you don’t already have it. From the Seaside Ruins site of grace in Limgrave, jump down the ruins directly south and alight on the beach by jumping into the whirling spirit spring. Defeat the enemy there for an unrelated Ash of War, then head into the cliffside cave to pick up this talisman, which improves holy damage defense.
Alternatively, if you’re feeling even more adventurous and have already begun delving into the Subterranean Shunning-Grounds underneath Leyndell, you can pick up the slightly more effective Haligdrake Talisman +1 in the Leyndell Catacombs dungeon. To reach the dungeon, head beneath the Capital by dropping down a well in the shadow of the large stone dragon, and then continue navigating downward until you reach a large room full of meandering pipes. Sneak past the giant lobsters at the bottom and the dungeon is through the next passage.
:no_upscale()/cdn.vox-cdn.com/uploads/chorus_asset/file/23335445/Elden_Ring_Cathedral_of_Dragon_Communion_map_location.jpg "tour divine leyndell")
Lastly, Morgott is quite susceptible to status effects like Poison, Frost, Bleed , and even Scarlet Rot . Faith users can cast Rotten Breath , a dragon incantation purchased at the Cathedral of Dragon Communion in southwest Caelid.
:no_upscale()/cdn.vox-cdn.com/uploads/chorus_asset/file/23335450/Elden_Ring_Smoldering_Church_map_location.jpg "tour divine leyndell")
Poisonbone Darts and Poison Pots are easy to craft, as long as you’ve looted the Nomadic Warrior’s Cookbook [14] from the Smoldering Church, also located in Caelid. For Frost, magic users can purchase Glintstone Icecrag from Preceptor Seluvis after giving his potion to either Nepheli or Gideon in the Roundtable Hold.
:no_upscale()/cdn.vox-cdn.com/uploads/chorus_asset/file/23335460/Elden_Ring_Hoarfrost_Stomp_Caria_Manor_map_location.jpg "tour divine leyndell")
Alternately, Hoarfrost Stomp — an Ash of War looted from an invisible scarab in the small body of water east of Caria Manor — is still a powerful option, despite getting slightly nerfed in the 1.03.1 patch.
:no_upscale()/cdn.vox-cdn.com/uploads/chorus_asset/file/23335454/Elden_Ring_Murkwater_Cave_map_location.jpg "tour divine leyndell")
Lastly, it’s a very good idea to bring Margit’s Shackle into this fight. Despite Morgott changing his loadout and his name, the shackle still works to pin him to the ground during the battle’s first phase, making for a very good opportunity to lay on some damage. If you never got this item, go meet Patches in the Murkwater Cave in eastern Limgrave, and be sure to spare him when he begs for mercy.
Learn the Morgott fight
This new-and-improved version of Margit has a much bigger and more threatening arsenal. His attacks are varied and unpredictable, and even come loaded with status effects in his second phase. Trying to predict Morgott’s attacks is usually a losing strategy; he mixes things up far too effectively. Instead, you’ll want to keep your distance and look for openings during which you can get some damage in.
Phase 1: Let’s get this over with
Morgott waits until his second phase to unleash his bleed and fire attacks, which can easily kill you if he catches you off guard with a combo. That’s when you’ll need all your flasks and FP for abilities and magic; as such, it’s a good idea to get through phase 1 as quickly as possible.
Luckily, that’s fairly easy to do if you’ve summoned Melina outside the fog gate (or summoned other players using a Furlcalling Finger Remedy ), have Margit’s Shackle in your hotbar, and are using bleed and/or frost status effects. Even post-nerf, using a katana imbued with the Cold Affinity does massive damage by stacking frost and bleed. Basically, as soon as the battle begins and you get within range of the boss, use the shackle, then get in close and attack him as much as you can before he gets up. Then do it again. If you’re effective, you can get him nearly or even all the way down to phase 2 right from the start.
Otherwise, you’ll have to try your luck dodging and blocking Morgott’s attacks and trying to get in a swipe here or there. This is where magic or Hoarfrost Stomp can really come in handy, although Morgott will still catch you off guard with fast, unpredictable attacks like his holy daggers and his spinning hammer move. On the other hand, his jumping hammer slam and holy spear throw are extremely easy to dodge, and should give you an opening to punish him with some damage.
Likewise, when Morgott charges at you with his spear, roll toward him and then turn around to attack his back as he charges past you (don’t try to block this, as he’ll likely break your guard). And the large-area attack that sends holy swords falling from the sky is a great time to heal, or punish the boss with distance attacks or even status items like throwing pots or darts.
Phase 2: Holy moly
The second phase is where things really get crazy. You can get some attacks in as Morgott kneels on the ground, but watch out for the considerable explosion that quickly follows. This is when Morgott begins imbuing his weapons with status effects, including bleed and fire. Random explosions occur throughout the arena, and the boss’s combos get even meaner. Watch out in particular for the deadly thrust after Morgott coats his blade in blood; the wind-up is painfully small, and it can easily one-shot you.
Luckily, the same general strategies apply. Keep your distance from Morgot as much as possible, watching out for easily dodged moves like the high-flying hammer slam. Use those opportunities to get one or two attacks in, or spam a highly damaging move like Hoarfrost Stomp, then back off again before Morgott gets his next attack off. If you summoned Melina, feel free to hang by her, as she’ll cast powerful healing spells that you can take advantage of.
Even in this dangerous second phase, it’s possible to break Morgott’s stance, though you’ll have to be dangerously aggressive to do so. Luckily, Morgott will still do his easily avoided raining-holy-swords attack, leaving you enough openings to get damage or status effects in from a distance.
Maidenless no more
Summoning Melina for the fight with Morgott is a very good idea. She uses powerful attacks and can even heal you with incantations, which might make you wonder why she doesn’t help out more often. Alternatively, if you’ve leveled up your Spirit Jellyfish ash summon, the poison might come in handy.
And just like with other boss fights in Elden Ring , you can summon help by opening your multiplayer menu and using the Furlcalling Finger Remedy item to enable you to see other players’ summon signs. And don’t forget that you can use the Tarnished’s Furled Finger item to place your own summon sign, allowing you to help other players beat the boss in their own world, while getting to practice the fight without risking your runes. However, keep in mind that the more players or NPCs you summon for the fight, the more health the boss will have.
Lay on the status effects and keep your distance while you patiently wait for openings to attack, and Morgott will wind up in the dirt where he belongs eventually. Just keep in mind that your journey is far from over, and keep checking here for more guides as you go.
Once you defeat Morgott, you receive Morgott’s Great Rune and Remembrance of the Omen King . Then you are ready to explore the areas beyond Leyndell by exiting through its eastern gate, which is no longer blocked by the powerful sorcery you encountered on any previous visits.
All Elden Ring Divine Tower locations and how to get inside
How to get into all the Divine Towers in Elden Ring, including Limgrave, Liurnia and the Isolated Divine Tower

All Divine Tower locations in Elden Ring
- How to get into the Divine Towers
What do Divine Towers in Elden Ring do?
The Elden Ring Divine Tower locations number six in total, in a rough circle across the Lands Between, starting with Limgrave Divine Tower. The Great Runes you find from killing certain bosses are restored at these Divine Towers, allowing you to access new powers and buffs while you play, such as enhancing stats or even granting health restoration. However, none of them are easy to get into, with various puzzles, secret entrances or deadly foes to contend with along the way. This is Elden Ring , after all. To help you know where to find all the six Divine Towers in Elden Ring we have all the maps and information you could need coming up. Whether it's Limgrave, Caelid, Liurnia, West Altus, East Altus or the Isolated Divine Tower - have them all here, with all the details you need.

- Divine Tower of Limgrave : Godrick's Great Rune
- Divine Tower of Caelid : Radahn's Great Rune
- Divine Tower of Liurnia : Cursemark of Death (Quest item)
- Divine Tower of West Altus : Rykard's Great Rune
- Divine Tower of East Altus : Morgott's Great Rune and Mogh's Great Rune
- Isolated Divine Tower : Malenia's Great Rune
There's a total of six Divine Towers located in Elden Ring, notably arranged in a circle around… the sea? A suspicious patch of cloud that could be hiding future DLC? You could make an argument that they're supposed to be orbiting the Erdtree, but that looks too high up in the circle to be the focal point, though it would make sense from a storytelling/design perspective. Either way, six towers, some of which will take a lot longer to get into than others. We've laid them all out below in the rough order you'll encounter them, as well as what Great Rune(s) they're associated with (with one exception). You can even click on that Tower's name to find out how to get inside!
All the Divine Towers require you to reach the very highest rooftop, where there'll usually be a pair of giant decayed fingers (don't ask) and some kind of glowing rune among them. That's your goal - despite some of the Towers having divergent paths, your aim is to find the elevator and reach the highest point possible.
How to get into the Divine Towers in Elden Ring
There's six Divine Towers in Elden Ring you can get into, each one accessed in a different way from a different point in the game, so there's no broad approach you can take. However, we've gone through them all individually below, likely in the order you'll need to get in, or be able to access them. Just scroll down to whichever one is giving you trouble and we'll show you how to break in!
How to get into the Divine Tower of Limgrave

The first Tower you'll likely need to get into after beating Godrick, you can reach this one by going through the deadly main gate of Stormveil and sprinting North up the main road, then turning right (East) through the enclosed shrine shown above with the Lion Guardian next to it. Use the Site of Grace ahead to reset your pursuers, then follow the bridge East-by-Northeast, avoiding the giant Golems' arrows and attacks along the way. At the end will be a teleportation portal that'll bring you to the door of the Divine Tower of Limgrave - simply use the doors to get inside and take the elevator to the top.
How to get into the Divine Tower of Caelid

Situated at Caelid's Northern coastline, the Divine Tower here needs to be accessed with Parkour. Approach from the Southern side and ride or run up the giant roots alongside it, then jump across to the ledges and scale the building using the ladders and careful platforming - and be careful about the knights along the way! Eventually you'll find the Divine Tower of Caelid: Center Site of Grace on a balcony. Use it, then take the West path around to a door with the central elevator beyond, which'll bring you up to the top for Radahn's Rune. You can also carefully descend to the tower basement where you’ll find a boss fight, so good luck!
How to get into the Divine Tower of Liurnia

This one proves a sticking point for a lot of people, and we can't blame them. Connected to the Carian Study Hall via a bridge, this actually requires you to get quite far through the Ranni the Witch quest. While you can wander in and explore at any point, you have to complete Ranni's questline at least partway to reach the top and restore the Great Rune.
We've put a guide on how to do that in our Elden Ring Ranni questline and secret ending - once you reach the fifth part of that quest, you'll be able to use a special item to flip the Carian Study Hall and access the bridge, though you'll have to watch out for a nightmarish hostile NPC and blob monster along the way. We recommend killing Preceptor Miriam (as horrible as she is, it's easier in the long run), but just run around the giant Godskin Noble on the bridge if you don't feel ready to fight him.
Of course, once you're up there you won't get to restore any Great Rune, as the only Rune in the area is one you get for killing Rennala, and it comes pre-restored and ready to go. Instead, this serves as another point of Ranni's questline. So don't worry about getting to the top if you're not bothered about the Princesses' quest.
How to get into the Divine Tower of West Altus

The Sealed Tunnel is one of the Elden Ring Bell Bearing locations , which can let you buy all manner of useful items - including Smithing Stones! Check our guide to find them all.
One of the easier Towers, the West Altus Divine Tower is found by going into the moat around the capital of Leyndell and accessing the Sealed Tunnel mini-dungeon at its Southernmost point (the entrance to which you can see below). The Sealed Tunnel is practically a straight line, made of up illusory walls you can hack through.
However, there is a boss at the end called the Onyx Lord, one that's fairly weak to weapon attacks (a vulnerability melee fighters can make use of). Once you've beaten him, you can access the outside door of the Divine Tower of West Altus - though if you haven't beaten Rykard, Lord of Blasphemy yet, you'll get a message stating that it's "tightly locked shut". Once he's dead, you can open the doors and simply step on the elevator ahead to reach the top.
How to get into the Divine Tower of East Altus

On the opposite side of Leyndell is a tower that pulls double-duty, able to restore both Morgott's and Mohg's runes. Once you've beaten Morgott and accessed the path East out of the city towards the Mountaintops, rather than taking the elevator at the end, take the path right (going Southeast), along the giant bridge. Be warned, you'll get ambushed by two monstrous ogres in a boss fight called the Fell Twins, who manifest a void around all three of you and are pretty resistant to Holy damage. Try and fight them one at a time (summons will help here), and use bleed or scarlet rot if you have it, as they're weak to that.
Once the Twins are dead, it's a straight line to the Tower doors and the elevator beyond that. Remember to trigger the Site of Grace inside, as you'll need to come here both after killing Morgott and Mohg.
How to get into the Isolated Divine Tower

This wildcard tower is literally sticking out of the sea, though thankfully you won't have to master sailing to reach it and restore Malenia's Great Rune. This one's a little tougher to get to, as you need to reach the teleportation portal in Leyndell's Divine Bridge, done either by taking the elevator up from the city's own copy of the Roundtable Hold on the Southwest side, or by opening the trapped chest in the Tower of Return on the Weeping Peninsula (Southeast of the Western Peninsula's Walking Mausoleum).
Either way, once you're there they'll be a giant stone Golem like those on the bridge to Limgrave Tower, and on his left side, a portal. Trigger it and you'll be sent all the way to the Isolated Divine Tower, and then you just need to head up the stairs to the top. Keep in mind that this portal only becomes active either after beating Malenia - though you have no reason to go to the Isolated Divine Tower until you've beaten Malenia, so it all works out.

Divine Towers in Elden Ring are used to restore Great Runes (with the exception of Liurnia), special items gained by killing major bosses that won't be usable until you bring them to their corresponding Tower. As mentioned, each tower is used for a specific Great Rune and can't be used to restore any other one. We've explained more about these runes and how they're used in our Elden Ring Great Runes and Rune Arc farming guide, which will show you their strengths and their best uses, as well as how to activate them as much as possible.
Sign up to the GamesRadar+ Newsletter
Weekly digests, tales from the communities you love, and more

Joel Franey is a writer, journalist, podcaster and raconteur with a Masters from Sussex University, none of which has actually equipped him for anything in real life. As a result he chooses to spend most of his time playing video games, reading old books and ingesting chemically-risky levels of caffeine. He is a firm believer that the vast majority of games would be improved by adding a grappling hook, and if they already have one, they should probably add another just to be safe. You can find old work of his at USgamer, Gfinity, Eurogamer and more besides.
- Leon Hurley Managing editor for guides
After millions of sales and a glut of awards, Baldur's Gate 3 director says he's nearly done talking about his smash CRPG hit: "I really want to focus on new things"
Former Dragon Age writer thinks pressure will be on for Dreadwolf to release in 2024
Indie developer says Warner Bros isn't forcibly delisting his game after all: "Ownership and store listings will return to me"
Most Popular
- 2 Crow Country review: "a lovingly built greatest hits mix of retro horror ideas"
- 3 Hades 2 review: "The roguelike DNA at the heart of this sequel remains as tight and cutthroat as its predecessor"
- 4 Sand Land review: "Feels inferior to what Akira Toriyama constructed years ago"
- 5 Stellar Blade review: "A good action-RPG that I enjoyed a lot despite several issues"
- 2 Tarot review: "A predictable and tame take on Final Destination"
- 3 Unfrosted review: "Jerry Seinfeld’s Netflix movie is a deliciously silly, spoofy tale"
- 4 The Idea of You review: "Anne Hathaway works overtime to give this rom-com even the appearance of substance"
- 5 The Fall Guy review: "A snappy, sharp, sexy screwball action romance"
- 2 Doctor Who episodes 1 & 2 review: Space Babies may divide the fans, but Ncuti Gatwa and Millie Gibson make for an immediately winning new TARDIS team
- 3 Tales of the Empire review: "Mature, beautifully animated shorts that are worthy additions to the Star Wars canon"
- 4 X-Men '97 episode 8 review: "It's the beginning of the end for our beloved X-Men"
- 5 Dead Boy Detectives review: "Delightfully dark, deeply moving, and the perfect companion to The Sandman"

Elden Ring Leyndell, Royal Capital Walkthrough
March 21, 2022 by Gage Leave a Comment
Welcome to the Elden Ring Walkthrough for the Leyndell, Royal Capital region! Leyndell is the main location you are making your way to from the start of the story, and the first area you have to actually fight a boss to get into, as well as requiring you have beaten at least 1 prior Shardbearer boss before you can enter. It contains two major story bosses you are required to fight to progress, then opens up access to the northeastern area of the map that you have to progress through to reach the end of the story.
Leyndell also contains the only missable Legendary Item in the game, the Bolt of Gransax weapon. Be sure to grab it once you have access to the area it is in after defeating Godfrey the First Lord.
For all other regions refer to Elden Ring Walkthrough .
Leyndell, Royal Capital
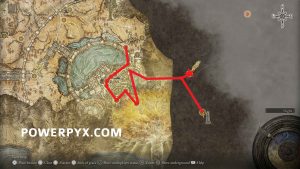
Progression Order:
Capital Rampart
East Capital Rampart
Avenue Balcony
West Capital Rampart
Godfrey the First Lord
Erdtree Sanctuary
Queen’s Bedchamber
Morgott, the Omen King
Elden Throne
Divine Tower of East Altus: Gate
From the Capital Rampart site of grace just after the Draconic Tree Sentinel, continue across the bridge and into the building to continue. Take the elevator to the upper area, then continue following the path again until you reach the inner area of Leyndell.

When you reach the pit where you can see the Erdtree directly ahead, continue to the right into another room where you can find the next site of grace.
When you first rest at this site of grace, Melina will appear and thank you for bringing her to the Capital, then leave. This has implications for the story, but doesn’t matter gameplay-wise as she still allows you to use Torrent and level up with runes without her.

Continue out of the room to reach the ramparts themselves. The door on the right is a shortcut you will want to open in a bit, to get back through, so continue to the left. The white enemies ahead are called Envoys, and you can find them in a few locations throughout the capital. They cast some bubble magic using their weapons and can also swing at your with them, but they are generally relatively easy to deal with.

Continue forward through the first group of Envoys, then you can see a dismembered Gargoyle sitting on the path ahead of you. The Gargoyles like this don’t move, and spit the explosive Perfumer dust towards you when you are near. You can try to avoid the dust it spits to progress, or loop directly around to the left to follow a path going to a room below.

If you’re going through the lower room, watch out for a guard sitting in the right corner who will attack as you move through the room. You can then continue out onto the next path which is down to the right from the Gargoyle guarded path.
The door to continue further to the right, but if you wish you can go up the stairs on the left first. Watch out for another guard at the top of the stairs, then you can follow the path to a doorway that is directly behind the Gargoyle, allowing you to easily kill it.
Back through the door on the right, you take an elevator down to a large circular building. On this floor watch out for the Perfumer that is in the middle crouched by a sitting Commoner.

You can take the ladder and then a set of stairs up to the top floor of the building, where you can find a Seedbed Curse from a body in a chair. This will very likely be your first one you find, which you can take back to the Dung Eater sitting in Roundtable Hold, who then allows you to start working on his questline where you free him from the sewer underneath the capital.

Continue following the path, then down the stairs in the next building. Ahead there are two paths, the obvious one to the left and then one ahead behind the group of breakable boxes in the door.

Whichever you go through doesn’t really matter as they both lead to the same location, just going through either a couple Perfumers and a guard, or one Knight who wanders back and forth.
Continue following the path down, and past one more knight and out on the main road of the capital. To continue you need to head down the road leading to the southwest, but first, you should go in the opposite direction to the northeast and down the path on the left between the statues.
Head through the doorway on the right, then you will enter a room with a Crucible Knight who is staring at a wall. This one doesn’t really react to you unless you attack them or walk directly in front of them, so you can just ignore them if you want.
Head through the door on the left and talk the elevator up. This leads to the doorway back by the East Capital Rampart site of grace, and works as a shortcut you can use later.

Head back down to the main road and continue to the southwest. An Ertree Avatar will appear in the middle of the road, you can fight it if you want, or just choose to ignore it and run past. If you do decide to kill it then it drops a Lord’s Rune , which is the highest value consumable rune in the game, giving 50,000 runes if used or being sold.
Continue down the road a short distance ahead and you can see a set of steps ahead leading to a large door. This door is locked and needs to be opened with a lever, so you can’t progress forward this way yet. To find the next site of grace head through the set of open doors on the right, and the next site of grace at the bottom of the flight of stairs on the right.
Continue down the next flight of stairs, and you are going to be making your way towards the giant stone dragon corpse to climb up. Watch out just as you leave the building, as there is a knight standing at the end of the path who will start shooting arrows at you.

You can move to the left around the buildings, then follow the path down the avoid getting shot at. But there will be a couple more knights to watch out for as you reach the end of the first building.

Once the knights are dealt with, you can move near the closed gate then start jumping up the dragon wing, moving towards the building that the corpse is sitting on.

Follow it until you reach the spot where the wall of the building is broken, then jump down off the left side into the building.

Climb the ladder up, then watch out for the knight standing at the top of the next flight of stairs. You can then continue forward into the next room to find the next site of grace.
Continue out of the room, then take the set of stairs immediately in front and lead back into the building. Just you can find a few more Envoys, as well as a switch on the balcony. Pulling this switch opens the large doors at the end of the main road that you couldn’t get in before.

If you did decide to go back and through the doorway, this leads into the lower ash-filled area. You can follow the root at the end of the area up to the next boss.

Back by the prior site of grace, you can continue along the rampart to find a few more Envoys around a phantom tree, along with a fully limbed Gargoyle standing still waiting. You can mostly avoid this Gargoyle if you want, or try to take it out. If defeated it will drop the Gargoyle’s Halberd . It has basically the same moveset as the first Gargoyle in the Valiant Gargoyle fight in Nokron, just you have a comparatively tiny area to fight in. You can sort of cheese the Gargoyle by attacking it from down the stairs closer to the site of grace, just make sure you take out the guard in the room first before focusing on the Gargoyle. It also has a very long melee range that can hit through the walls, as well as a range shout attack that it can get directly through the door more often than you would think, so this isn’t a free win as much as hiding down stairwells normally is.
Once the Gargoyle is defeated or if you choose to ignore it, make sure to grab the Golden Seed from beside the tree that was directly in front of where it was standing.

Climb on the tree root sticking into the ground, then follow it all the way up towards the next building. There are a number of guardians that are sitting on the root, and you can either ignore them and run by or fight them on your way up. Head into the room at the top for the first boss in this area.
Reward: 80,000 Runes, Talisman Pouch, 80,000 Runes
Strategy: A golden ghost knight wielding a big but slow axe. This is a relatively easy boss for this late into the game, due to his attacks being very slow and easy to dodge, his attacks not reaching very far, so you can run away from him, and his moveset is quite limited. As a mage, simply keep your distance and spam him with spells, when he rushes towards you dodge backward. As a melee character, dodge towards him and slightly to the side to get behind him and deal a few hits between his combos. You shouldn’t have much trouble dodging his slow axe attacks. Sometimes he likes to do a stomp that deals AoE damage but if you are dodging it won’t hurt you, and you can also dodge this by moving towards him to the side to get out of the area it affects. If you try to heal while being away from him he will instantly rush towards you, so it’s better to dodge a combo and heal afterward, this gives you a long enough break without being attacked.
After Godfrey is defeated, you can activate the next site of grace in the middle of the room.

From this site of grace there are two paths you can take, one to the next story boss, or one that leads to more areas to explore in the Capital. You will want to explore a bit first and make sure to pick up the only missable Legendary Item in the game as soon as possible . This is the only missable item because after events that occur near the end of the story it disappears and can’t be picked up without going into NG+ or having someone else drop it for you.
There are two doorways out of the room, go out the one leading to the west.

Down a short stairwell, there is another building with an elevator inside. Take the elevator down to reach an area above where the giant spear is sticking out of the wall. You want to go over to just above where the spear is, and jump over the railing on the left to drop to the end of the spear.
You may need to take a bit of a running jump to clear the railing or jump on top of it. Once you make it down, carefully make your way along the spear to the point you are blocked by the coils around it to pick up the Bolt of Gransax .
You can now head back to the Erdtree Sanctuary site of grace, and this time of out the west side of the room.

Climb up the root that stretches from the balcony back into the room, allowing you to reach the upper floor.

Continue following the path leading towards the next building. Watch out to the right of the doorway, as there will be non-boss Black Knife Assassin enemy sitting just beside the door who will attack you as you try to pass.

Once it is defeated (or if you ignore it) you can proceed into the room to reach the next site of grace.

Before leaving the room, you can pick up the Blessing of the Erdtree incantation from the bed.

Continue out of the room to the right, and make your way towards the gold fog wall ahead. Before entering, you can summon Melina from the gold summon sign just to the right.

Reward: 90,000 Runes, Morgott’s Great Rune, Remembrance of the Omen King
Morgott is somewhat the same boss as Margit, The Fell Omen (for mechanical and story reasons), as he shares some of the same attacks and looks the same. Particularly his dagger throw is the same, but he also uses some new attacks. He has a lot more health and hits harder, but in one way this fight is easier: the arena is much bigger and it’s easier to get some distance from him. As a spell user this is advantageous to spam him with spells. Before the fight, interact with the yellow sign on the floor to summon the NPC fighter “Melina” to help you. As soon as the fight starts, summon some Ashen Remains. This gives you two NPC helpers to distract Morgott. They should survive at the very least until Morgott’s health is half depleted. During this phase, you should play very aggressively and attack Morgott from behind whenever he is focusing on the other NPCs. Ideally, you can take around 60%+ of his health before your NPC helpers die. This is where it gets trickier because he will then focus on only you, and he is very aggressive and quick at close-medium range. He often throws a yellow spear or holds the spear to stab you. When he throws the spear you must dodge in the very last moment when he releases it, if you dodge too early you can get hit by it. He has a long delay between aiming it and throwing it, so don’t evade too early. He sometimes uses AoE swords raining from the sky, get away to look where the swords fall down, there will be gaps where no swords fall and it’s safe to stand there. He also uses explosive bubbles on the floor which explode after a few seconds, don’t stand in them. If you need to heal, either run to the other end of the arena so far that he won’t throw daggers, or evade one of his combos and heal after that. If you stand at medium range he will instantly throw daggers at you when trying to heal. It’s definitely another test of patience and learning when to evade, due to how much health this boss has and his varied moveset takes some tries to memorize.
With Morgott defeated, the site of grace in this area won’t appear yet. You first need to go forward towards the thorn-covered-door at the top of the stairwell and interact with it.

Currently, you cannot pass the thorns to enter the Erdtree itself, so need to do more story-related things. Go back down the stairwell to where you can activate the site of grace in the middle of the area.

You need to rest at this site of grace, then Melina will appear again, and say that she is going to rejoin you so that you may both enter the Erdtree.

She gives the Rold Medallion item, which will allow you to use another lift to enter the Mountaintop of the Giants area. You will also have two spots marked on your map, pointing to where you need to go to progress.

You can fast travel back to the East Capital Rampart site of grace and go through the shortcut you would have opened prior, then go to the opposite side of the road you went down originally to reach Godfrey. At the end of the road, there is a large double door that you can open to reach another area of the capital.

Follow the path to the east, continuing up the stairs leading around the water on the right.
At the top of the stairs and past all the enemies, you can find a large lift that you take you up and out of the main capital area.

Continue forward onto the bridge, keeping mind of the two knights that are here. One is on the horse wandering around, but one is standing off to the left and starts shooting arrows at you if you don’t get close to it.
Once they are dealt with you can continue to the end of the bridge. In this next building, there will be an elevator that takes you down to the Forbidden Lands , the first area of the Mountaintop of the Giants . If you wish you can first take the other bridge leading towards the Divine Tower where you can activate Morgott’s rune. Note that you are kicked into the next boss fight automatically once you start approaching the enemy in the distance.

Reward: 29,000 Runes, Omenkiller Rollo (Ashen Remains)
Fell Twins is a double boss, consisting of two “Fell Twins”. When approaching the Divine Tower, the screen will fade to black and you are trapped in a black void with these bosses. However, you can fight them one at a time. One of them uses melee only and will come to you first. The second one uses some ranged attacks but it will hang back and you don’t have to fight it until the first is defeated. Just keep dodging backward for the first melee boss to put distance between you two and the second one. The first Twin’s attacks have a short-range and are super easy to dodge. When the 1st is dead, you repeat the same for the 2nd boss. When it shoots projectiles simply dash sideways, they are easy to dodge. For its melee attacks dodge backward, nothing spectacular here.
When the Twins are defeated you will automatically be returned from the black void on the other side of the bridge leading to the tower, with the site of grace directly in front.

You can then go through the large doors to enter the tower, then up the elevator to the top. There are no other items or anything to look out for in this tower, just head to the top and activate the rune to power up Morgott’s Great Rune .

You can then return to the tower back on the other side of the bridge and take the elevator down to enter the Forbidden Lands, the first section of Mountaintop of the Giants.
Summary – Leyndell Sites of Grace
Outer Wall Phantom Tree

Minor Erdtree Church

Outer Wall Battleground

Hermit Merchant’s Shack

Auriza Side Tomb

Auriza Hero’s Grave

Sealed Tunnel

Divine Tower of West Altus: Gate (accessed through Sealed Tunnel )

Divine Tower of West Altus (accessed through Sealed Tunnel )

Lower Capital Church

Fortified Manor, First Floor

Divine Bridge

Minor Erdtree (Named Location)

Leave a Reply Cancel reply
Your email address will not be published. Required fields are marked *
- Terms of Service
- Privacy Policy
- Cookie Policy
All Elden Ring Divine Tower locations: How to activate Great Runes
A holy high.
Update: We've streamlined the information on this page and added some additional tips so that you have no trouble finding Elden Ring's Divine Towers and activating any Great Runes that you have collected.
Elden Ring Divine Towers are easy to find in theory. The massive monoliths loom above the horizon everywhere you look, but they're locked behind dungeons, quests, and sometimes even boss fights.
If you want to make the most of your demigod spoils, you’ll need to brave their challenges. Divine Towers are the only way to activate Great Runes . These are completely separate from Remembrances, so even if you opt to consume a Remembrance and ignore the weapons and spells they offer, you can still activate Great Runes. It's also a one-time process. While you can swap Great Runes at Sites of Grace, you only need to activate them once.
How do you activate Great Runes in Elden Ring?
- Where is Limgrave’s Divine Tower?
- Where is Liurnia’s Divine Tower?
- Where is Caelid’s Divine Tower?
Where is the Divine Tower of East Altus in Elden Ring?
- Where is the Divine Tower of West Altus?
- How do you activate Malenia’s Great Rune?
Each Great Rune needs to be activated at the Divine Tower in the region where you defeated the demigod in question, with a few exceptions. Activating Malenia’s Great Rune takes you to the Isolated Tower in the middle of the ocean, and Rennala’s Great Rune doesn’t need activating. Its power is granting you rebirth (respeccing) and is always active.
The trouble is, Elden Ring is pretty happy not telling you much about Divine Towers and how they work. Divine Towers are massive structures visible from anywhere in their respective regions, though getting inside is often a much more complicated matter. Most Divine Towers are relatively straightforward once you gain access – except Caelid’s, which is fittingly hellish.
Where is Limgrave’s Divine Tower in Elden Ring?
If you want to activate Godrick ’s Great Rune – and you should, since it’s among the best – you’ll need to venture back inside Stormveil Castle. The route to Limgrave’s tower is just inside the front gate. If you took the long way around, head back south through the courtyard from the Liftside Site of Grace. You’ll still have to contend with the deadly ballistae and fire bombs, but the pacing is slightly better than storming the front gate.
Take a left under the portcullis, and just run. There’s a deadly sword-wielding lion that attacks, and unless you’ve cleared out the enemies in the courtyard, fighting this is more trouble than it’s worth. Activate the Site of Grace beyond the statues – these don’t come to life, no matter how threatening they look – and move ahead onto the bridge.
You’ll eventually reach two giant golems, an axe-wielding one and a greatbow golem. You can defeat them if you want or just run past them and activate the teleporter. From there, it’s just a matter of following the staircase up to the tower’s roof and activating the Rune next to the dead Fingers. Once activated and when equipped, Godrick's Great Rune raises all of your attributes by five.
Where is Liurnia’s Divine Tower in Elden Ring?
Liurnia’s Divine Tower is the Carian Study Hall, east of the Church of Vows. You can access it from the north, at the end of the road opposite the Ainsel Well elevator. It’s required for Ranni’s quest, and Ranni’s ending subsequently, but not for Rennala ’s Great Rune. Inside is a host of ghostly Carian knights and scholars, along with the miniboss Preceptor Miriam.
She fires Glintstone Comet and uses the Glinstone greatbow spell, and she also vanishes after taking a certain amount of damage. You’ll fight her for most of your trip up the tower. Bolster your magic defenses to make this easier.
Rennala's Great Rune is essentially your ability to respec; you won't actually be able to acivate it at the Divine Tower or Liurnia. Instead, your reward for venturing to the tower is a key part of Ranni's quest , and there's ultimately no point going to the tower until Ranni asks you to invert it. There's also a Godskin Noble here who's armor you can collect after defeating it.
Where is Caelid’s Divine Tower in Elden Ring?
Caelid’s Divine Tower is in Dragonbarrow, south of the Bestial Sanctum and east of the Isolated Merchant’s Shack. It’s also a bit of a trial to enter that requires you to parkour along the outside of it for the most part, rather than venturing inside.
Approach it from the west, and use the giant roots to reach the platform outside of the tower with a campfire. There is also a slope on the other side of the tower that takes you down to a circle of dead people in a chair, where you can grab some Somber Smithing Stones and a few other rare items.

Once you’re ready to start climbing, head toward the platform with the campfire. Defeat the soldier, and climb the ladder. Walk across the buttress to the other side, defeat the soldier there, and climb the ladder. Use the buttress to cross the gap to your left, and continue making your way around the tower counterclockwise. You’ll need Torrent’s double jump for a few of these areas. Just take care to hug the wall as you jump, since Elden Ring likes to have you bounce off the edges of ledges at times.
Activate the tower Site of Grace, and head up the stairs to your right. Heading left takes you into the tower basement, a complicated platforming maze with Godskin Monks and a Godskin Apostle at the bottom. If you don’t feel like taking that route, you’re free to skip it. The elevator at the top of the stairs takes you to the top of the tower, where you can activate Radahn ’s Great Rune. This boosts your HP, FP, and max Stamina.
The Divine Tower of East Altus is east of Leyndell, on the road to the Mountaintops of the Giants, and it’s one of the easier ones to reach. You have to defeat Morgott before the path opens. After that, it’s just a matter of taking the capital outskirts road east until you reach the Grand Lift of Rold .
After taking the lift, take the second exit that doesn't lead you outside into the Forbidden Lands (but do grab the Site of Grace here). You'll soon find yourself in the dark, literally, as two Fell Twins fight you. After that, however, you'll be straight on your way to the Divine Tower of East Altus.
Here, you'll be able to activate both Morgott and Mohg 's Great Runes. Morgott's will raise your maximum HP when equipped, while Mohg's will provide the blessing of blood to phantoms when equipped. This means that any of your summoned Spirit Ashes will have the blessing of blood while using Mohg's Rune; they'll gain a buff when inflicting blood loss and be able to life-steal, which is great for bleed build players or Black Knife Tiche users.

Where is the Divine Tower of West Altus in Elden Ring?
The Divine Tower of West Altus is where you’ll activate Rykard ’s Great Rune, so you'll need to beat him first before you're able to access the tower.
Enter the Sealed Tunnels outside Leyndell – accessed by descending to the moat – and defeat Onyx Lord at the end of it. The path that opens after him leads to the tower, but you will no doubt be spending plenty of time getting lost in the Sealed Tunnels among all of its illusory walls first...
How do you activate Malenia’s Great Rune in Elden Ring?
Malenia ’s Great Rune is a bit different. You’ll need to access the Isolated Divine Tower, which is in the middle of the ocean. There’s a teleporter in the capital that takes you there, though.
Head towards the Fortified Manor, but in the large hall where you normally turn right, take the first doorway instead of the second. Follow the pathway until you reach a gate in the metal fence. Turn left, and there’s an elevator at the far end. There’s also a giant iron maiden with two Ghiza’s Wheels in the courtyard. Deal with it first, or at least distract it so you can reach the elevator without it joining you.
Follow the path once the elevator stops, and take the teleporter. It transports you to the tower, where you can activate the Rune at the dead Fingers like usual. Malenia's Great Rune, when equipped, will allow you to recover HP whenever you dish out an attack after taking damage.
If you're looking for more help in The Lands Between, check out our extensive collection of Elden Ring guides , including how to defeat Maliketh and how many endings Elden Ring has .
Read this next
- FromSoftware vastly underestimated how long Elden Ring would be for most players, so it's not saying how long Shadow of the Erdtree is
- Elden Ring's fate sealed as Shadow of the Erdtree confirmed as sole DLC by FromSoftware boss
- Elden Ring's now been beaten using morse code, and yes, watching it happen will probably make you feel useless at games
Honkai Star Rail Harmony Trailblazer kit and Traces priority
The Witcher 3: Free Spirit walkthrough
The Witcher 3: Finders Keepers walkthrough
The Witcher 3: The Family Blade walkthrough
The Witcher 3: Crime and Punishment walkthrough
The Witcher 3: Brave Fools Die Young walkthrough
The Witcher 3: A Bard’s Beloved walkthrough
The Witcher 3: Abandoned Sawmill walkthrough
GameSpot may receive revenue from affiliate and advertising partnerships for sharing this content and from purchases through links.
Elden Ring Leyndell, Royal Capital Guide - Secrets, Bosses, Important Locations, And More
This non-optional area is home to some of the most challenging (and easily missable) zones in all of the Lands Between.
By Sam Pape on June 6, 2022 at 7:03AM PDT
From the moment you open the doors of the Stranded Graveyard and first step foot into the Lands Between, Elden Ring makes clear the significance of the Erdtree. Your eyes are instantly drawn to it, towering golden and majestic in the distance. Getting there and discovering its mysteries is, in a nutshell, the main objective of your adventure. But to do that, you'll need to first make your way through the city where the Erdtree lays its roots: Leyndell, Royal Capital.
Leyndell is at the center of Elden Ring's lore--and at the center of the map itself. Given its significance to the story, it's no surprise that it's teeming important items, immense challenges, and confounding secrets around every corner. We won't cover everything there is to do in Leyndell here; we'll leave some of the exploration and joy of discovery to you! However, with so many hidden (and we mean hidden ) locations and items that can easily be missed, this framework should help aid you in your journey.
You need a javascript enabled browser to watch videos.
Halo Infinite - Official "This is Halo" Extended Multiplayer Trailer
Crow Country | Official Launch Trailer
Learn To Move Like An Ape | Kingdom of the Planet of the Apes
Animal Well - Official Launch Gameplay Trailer
Vampire Survivors: Operation Guns | Launch Trailer | OUT NOW
Historian Reacts To Manor Lords
Master Detective Archives: RAIN CODE Plus - Official Announcement Trailer
PAC-MAN Mega Tunnel Battle: Chomp Champs – Launch Trailer
MultiVersus – Official The Joker Character Reveal Trailer | “Get a Load of Me”
BPM x ROBOBEAT Crossover Gameplay Trailer l Coming May 14th
Sonic Rumble - Official Announcement Trailer
Dead by Daylight | Official Horror In Our Hearts Trailer
Want us to remember this setting for all your devices?
Sign up or Sign in now!
Please enter your date of birth to view this video
By clicking 'enter', you agree to GameSpot's Terms of Use and Privacy Policy
Now Playing: Elden Ring - How to get Every Ending
Getting to Leyndell

Unlike other zones you may have stumbled upon thus far in Elden Ring, Leyndell is both 1) required to beat the game, and 2) impossible to access early. You'll need to have collected--and activated--two Great Runes in order for the gates to the city to open. The easiest option is to kill Godrick and activate his Great Rune at the Limgrave Divine Tower, and then kill Rennala , whose Great Rune is activated automatically. You can also kill Radahn instead, activating his Great Rune at the Divine Tower of Caelid; trekking through Caelid can be a good way to level up and prepare for the tough enemies in Leyndell, as well.
With your two Great Runes activated, it's time to make your way to the Altus Plateau region where you'll find the Royal Capital. The fastest route is up the Grand Lift of Dectus. To use it, you'll need both halves of the Dectus Medallion. The left half is at the top of Fort Haight in Limgrave, and the right half is in Fort Faroth in Caelid.

After riding the Grand Lift of Dectus, continue northeast on the path until you reach the Altus Highway Junction Site of Grace. From there, head east up the huge staircase. There will be a Tree Sentinel duo guarding the gate at the top. You can fight them, or simply run past them and rest at the Outer Wall Phantom Tree Site of Grace. Make sure to grab the two Golden Seeds, as well as the map fragment. Welcome to Leyndell!
Capital Outskirts
Before entering the heart of Leyndell, there is much to explore in the area between the outer wall you just entered through and the wall of the city proper. To start, head south on the path to find the Minor Erdtree Church. Here, you'll find the Golden Order Seal, as well as the Missionary Cookbook [4], which lets you craft Holy Grease, among other items. From there, head to the moat below to find the Sealed Tunnel dungeon. Make your way through the illusory walls and Onyx Lord boss, and you'll come out the other side at the Divine Tower of West Altus, where you can activate Rykard's Great Rune if you've already defeated the boss of Volcano Manor.

Continue north along the main path, and you will eventually stumble upon a familiar face near the northwest entrance to the Capital Outskirts: Margit, the Fell Omen , back for blood after his defeat at Stormveil Castle. Take him down to get the Viridian Amber Medallion +1, which raises Stamina by 13%.
Finally, make your way to the far east of the perimeter to find Auriza's Hero's Grave, which will likely be one of the tougher dungeons you've encountered thus far. After defeating the Crucible Knight duo boss, you'll walk away with the Crucible Axe armor set, Ordovis's Greatsword, and other goodies.

The last thing standing in your way before entering the Royal Capital is the Dragonic Tree Sentinel. This boss is similar to the regular Tree Sentinel you first encountered near the Church of Elleh, except with a wider range of attacks, capable of dealing both Fire and Lightning damage. Fighting on horseback can be a helpful strategy here. With him dead, you'll be rewarded with 50,000 Runes, the Dragonclaw Shield and Dragon Creatclaw, and, most importantly, access to the Leyndell, Royal Capital.
Leyndell, Royal Capital

The streets of Leyndell are crawling with enemies. You'll run into Oracle Envoys big and small, Imps, Foot Soldiers, and fearsome Leyndell Knights capable of taking you out with just a couple hits (or sniping you to death with Lightning Arrows from a distance). There will even be an Erdtree Avatar waiting to ambush you on the main road. Think on your feet, and avoid charging into groups without a plan. Be sure to scour every corner of the rooftops and side streets for loot, which is plentiful.
Fortified Manor

In the southwest corner of the city, you'll stumble upon a familiar sight: The Roundtable Hold, or an alternate version of it, at least. There won't be any of the normal NPCs standing standing around, but in their place you'll find plenty of good items to pick up. Make sure you interact with the Flightless Bird painting as well, then head to the chair apparition near the Windmill Heights Site of Grace in Windmill Village to get the Fire's Deadly Sin Incantation. Note: this spell is currently bugged, causing rapid Bleed buildup just by getting close enough to the enemy. Abuse this effect to your heart's content in PvE, but, for the sake of sportsmanship, keep it out of PvP until the glitch is patched out.

Before you leave, make sure to visit the Two Fingers room. Upon the throne, you'll find the Coded Sword , one of the stronger Faith weapons in the game. It has great range, and can absolutely wreck any enemy weak to Holy Damage with its unblockable special attack.
Godfrey, First Elden Lord (Golden Shade)

Climb up the tree branches in the southeast part of Leyndell to reach the Erdtree Sanctuary. Here, you'll be confronted by a golden apparition version of Godfrey, First Elden Lord. The fight is essentially just phase one of the final Godfrey fight, which you'll encounter near the end of the game. Dodge through his different Axe attacks, and jump over the shockwave whenever he stomps down.
Defeating Godfrey is necessary in order to reach the final boss of Leyndell. Doing so will net you 80,000 Runes and a Talisman Pouch. This should be your third or fourth Talisman slot by this point in the game, which opens the door to really dialing in your build. After this fight, make sure you head down the stairs to get the Bolt of Gransax weapon before continuing on.
Subterranean Shunning-Grounds

Beneath the streets of the Royal Capital lies an enormous, sprawling underground labyrinth known as the Subterranean Shunning-Grounds. It is home to some of the hardest-hitting, tankiest common enemies in the game--including the dreaded Giant Crayfish --as well as the meanest platforming challenges. You'll also want to be sure to track down Dung Eater and complete his quest while you're here.
Much like Blighttown in Dark Souls , the Subterranean Shunning-Grounds stands alone in its infamy, and is easily one of the most feared and loathed zones in Elden Ring. For such a huge, unforgiving zone, it is also remarkably easy to miss.
Making your way underground

The quickest route to the Subterranean Shunning-Grounds is from the Avenue Balcony Site of Grace. Head down the stairs and out the door, being careful of the Knights roaming the area. Hug the railing to your left, and hop onto the rooftops. You will see a well next to a corpse on the ground below.

Drop into the well and open the gate, grabbing the Rune Arc on the way. Continue down until you find yourself in a hallway being patrolled by three huge Omen monsters. Rest up at the Underground Roadside Site of Grace, and prepare to suffer!
Leyndell Catacombs

Make your way through the Imp-infested sewer pipes and drop down to the room with the two Crayfish. Be sure to grab Mohg's Shackle from the corpse on the wall; this will come in handy later on. Head through the door and rest at the Leyndell Catacombs Site of Grace.
These Catacombs are deliberately designed to confuse you. The area is comprised of three different levels, all of which are very hard to tell apart. Rainbow Stones are a good way to keep track of where you've already been here.

After making your way through to the lever, you'll open the door to the Esgar, Priest of Blood boss fight. He uses a variety of Bleed spells and attacks, and also has two Blood Dogs at his side. Take them down, and you'll be rewarded with the Lord of Blood's Exultation Talisman. This is one of the strongest items in the game for Bleed builds, granting you a 20% attack power increase whenever Blood Loss occurs in the vicinity.
Mohg, the Omen

Getting to Mohg, the Omen requires traversing through the maze-like series of sewer pipes, accessed near the rats on your way to Dung Eater. You'll eventually come across a pipe with an opening at the top. Hop into the pipe and continue on until you reach the elevator by the jars, grabbing all the loot along the way.

Much like the Godfrey fight earlier, Mohg, the Omen is basically just an easier version of the fight with Mohg, Lord of Blood that you'll encounter at Mohgwyn Palace later on. Equip Mohg's Shackle, which can pin him to the ground twice during the fight. You can summon Dung Eater to help as long as you've released him from his cell, as well. Look out for his various Bleed attacks and take him down. Doing so will grant you 100,000 Runes, as well as the Bloodflame Talons Incantation.
Frenzied Flame Proscription

Behind the chest in the Mohg fight room is an illusory wall. Head through it and deal with the enemies roaming the halls. (Tip: their Frenzied Flame spells can burn down the fabric huts throughout the area, revealing hidden loot. Stand near the fabric, lure them to you, and wait for them to attack).

Now it's time to take on what is certainly the toughest platforming challenge in the game. Make sure to spend your Runes before attempting, because you will likely die more than once attempting this. Carefully make your way down the beams and stone ledges, grabbing the Inescapable Frenzy Incantation from the corpse on your way. When you reach the ground level, the floor will break beneath you and reveal the Frenzied Flame Proscription Site of Grace.

This is where you can finish Hyetta's questline if you've been following it. It is also where you meet the Three Fingers. Find them by stripping off all your clothes and opening the red doors. They will inflict you with Frenzied Flame, and you will walk away badly burnt with glowing yellow eyes. Doing this will get you the Frenzied Flame ending , but locks you out of all other endings (unless you manage to reverse it) and has serious story implications for the remainder of your journey. Make sure you know what you're signing up for before engaging the encounter.
Wrapping up

The final step to completing Leyndell is fighting the main area boss: Morgott, the Omen King. Get there by walking up the tree branch from the Erdtree Sanctuary Site of Grace and continuing along the path to the base of the Erdtree. Dung Eater is available as a summon for the fight, as is Melina (so long as you haven't met the Three Fingers).

Morgott leans on an arsenal of different Holy attacks, many of which can damage you from all the way across the arena. He is very aggressive and agile, so you'll definitely want to bring along Dung Eater and Melina, as well as your Spirit Summon of choice, to take some of the heat. Kill him for 120,000 Runes, the Remembrance of the Omen King, and Morgott's Great Rune.

With him, dead, rest at the Elden Throne Site of Grace, and you'll be paid a visit by Melina. She'll explain that she must burn the Erdtree, and will give you the Rold Medallion, which grants you access to the Mountaintop of the Giants via the Grand Lift of Rold.

Finally, head through the large doors at the east end of Leyndell's main road. Take the two elevators to find yourself in the Forbidden Lands. Following the path from here will lead you to the Grand Lift of Rold, which is only the beginning of the rest of your journey.
Elden Ring Guides
- What Happens In Elden Ring? The Game's Story, Part 1: Limgrave
- Elden Ring Rune Farming: The Best Early Areas To Level Up Fast
- What To Do First In Elden Ring: Best Route, Weapons, And Important Map Locations
- + Show More Elden Ring Guides Links (7)
- Elden Ring: Best Weapons You Can Find Early In Limgrave
- Elden Ring Margit The Fell Omen Guide - Recommended Level And How To Beat The First Boss
- Elden Ring: How To Upgrade Weapons - Smithing Stones Explained
- Elden Ring Tips For Beginners: Learning The Ways Of The Lands Between
- How To Level Up In Elden Ring, Stats Explained
- Elden Ring: Best Keepsakes To Pick During Character Creation
- Elden Ring Map: Where To Find Your First Map Fragment
Got a news tip or want to contact us directly? Email [email protected]
- Leave Blank
Join the conversation
Use your keyboard!
Log in to comment
Search Results
Leyndell, ashen capital | elden ring wiki.
- Create new page
- Recent Changes
- Permissions
- Edit Open Graph
- Clear page cache
- Clear comments cache
- File Manager
- Page Manager
- Wiki Templates
- Comments Approval
- Wiki Settings
- Wiki Manager
Leyndell, Ashen Capital is a Location in Elden Ring . Leyndell, Ashen Capital is an instance of Leyndell, Royal Capital after it falls into ruin. This version of the capital is accessible only after making significant story progress, and is geared towards high-leveled players. The Ashen Capital features the same structures and landmarks as its intact counterpart, albeit significantly altered. Previously open paths may not be accessible and vice versa. The Ashen Capital also features its own set of Enemies , Bosses , and collectibles with varied placement distinct from the regular version of the city.
The remains of what once was the Royal Capital city of Leyndell. Now, a scenery composed of debris and death.
Leyndell, Ashen Capital Map & Map Fragments
- Leyndell, Ashen Capital shares its map with Leyndell, Royal Capital and does not require collection of a map fragment.
[overall map goes here]
Elden Ring Leyndell, Ashen Capital Sites of Grace & Sub-Locations
Sites of Grace
- Elden Throne [ Map Link ]
- Erdtree Sanctuary [ Map Link ]
- Fractured Marika [ Map Link ]
- Leyndell, Capital of Ash [ Map Link ]
- Divine Bridge [ Map Link ]
- Leyndell Catacombs [ Map Link ]
- Queen's Bedchamber [ Map Link ]
- Underground Roadside [ Map Link ]
- Forsaken Depths [ Map Link ]
Sub-Locations
- Leyndell Catacombs
- Subterranean Shunning-Grounds
All NPCs and Merchants in Leyndell, Ashen Capital
- Goldmask : Found at the base of a cliff, southwest from the Leyndell, Capital of Ash Site of Grace, if you've progressed to the end of Brother Corhyn's questline.
- Brother Corhyn : Found at the base of the large spear in the southwestern part of the Ashen Capital , if you've progressed to the end of his questline.
- Dung Eater : Found in the Subterranean-Shunning Grounds .
- No merchants in this location
All Items in Elden Ring's Leyndell, Ashen Capital Zone
Gather & farm items.
- Golden Sunflower
- Tarnished Golden Sunflower
Upgrade Materials
- Somber Ancient Dragon Smithing Stone
Equipment and Magic
- All-Knowing Armor
- All-Knowing Gauntlets
- All-Knowing Greaves
- All-Knowing Helm
- Crimson Amber Medallion +2
- Erdtree's Favor +2
- Erdtree Heal
- Scepter of the All-Knowing
Unique, Ashes and Keys
- Elden Remembrance
- Remembrance of Hoarah Loux
Elden Ring Leyndell, Ashen Capital Creatures, Enemies and Bosses
Regular creatures and enemies.
- Valiant Gargoyle
- Lesser Ulcerated Tree Spirit
Field Bosses and Bosses
- Sir Gideon Ofnir, the All-Knowing
- Godfrey, First Elden Lord / Hoarah Loux, Warrior
- Radagon of the Golden Order
- Elden Beast
Walkthrough for Leyndell, Ashen Capital in Elden Ring
To get to the Ashen Capital , defeat Maliketh, the Black Blade at Crumbling Farum Azula , and after a cutscene plays, you'll get teleported right to the Leyndell, Capital of Ash Site of Grace. Most of the progression in the Ashen Capital involves beating various Bosses , and after defeating the final boss of this area, you can reach the ending of the game. Leyndell, Ashen Capital replaces Leyndell, Royal Capital , and so you will lose access to all enemies and unclaimed treasure from that area before you begin the endgame.
Exploring Ashen Leyndell
Take your first steps in the area by traveling southwest towards the dragon corpse, and follow the mounds of ash downhill. At the bottom you can find an open sewer hole that leads down to the Subterranean Shunning-Grounds . If you jump down from here, you can access a wooden beam with a corpse holding the Crimson Amber Medallion +2 hanging off of it. From this sewer hole, the open gate to your right contains a corpse with a Tarnished Golden Sunflower . Continue southwest from the hole, going back uphill and navigating to the base of the giant spear and you can find Brother Corhyn at its base, rambling about Goldmask . You must be at the end of the Goldmask questline to find him here, but if you offered him the Tonic of Forgetfulness at the Stargazer Ruins , Corhyn will be there instead.
From Corhyn's location, head directly south and jump over the buried balcony. You'll come across a curved set of stairs; don't ascend them, but look to the right and follow the ash downhill. Cross the bridge, picking up a Smithing Stone (6) , head up the stairs to your left, and you'll find Goldmask at the base of the cliff. You can get the Mending Rune of Perfect Order from him. Reload the area. Where Corhyn once was, you can get a Flail , Corhyn's Bell Bearing , and Corhyn's Robe . Where Goldmask once was, you can get Goldmask's Set (sans mask).
From the open sewer hole, look northwest, then travel past the rubble until you can climb onto the dragon corpse's wing. Instead of needing to climb up the wing like before, you can go under the wing and then jump straight into the broken wall. Climb up the ladder and follow the path southeast until you come to the golden tree and can see a drop with a staircase going down in the opposite direction. Descend these stairs northward. Look to your left, and you can find a Somber Ancient Dragon Smithing Stone at the doors to where the Fortified Manor used to be. Beware the Valiant Gargoyle patrolling this area.
You can also enter the Ashen Capital from the Forbidden Lands. Go back up the elevator, travel west along the path, and fight through the Knights and Soldiers as usual. Descend the elevator to reach an otherwise inaccessible part of the Ashen Capital . The pond in this area can now be traversed over, because it is completely filled with ash. Walk down the stairs, then hug the left wall to not draw the attention of the Lesser Ulcerated Tree Spirits that patrol the area, and emerge from the ground. You'll find an item on a half-buried piece of rubble, which is the legendary talisman Erdtree's Favor +2 .
You can also re-discover the Divine Bridge site of grace by opening the teleporter trap chest at the top of the Tower of Return . The Divine Bridge Golem will respawn even if it was already killed, but will not drop any new items. Access to the Fortified Manor is not possible, as the lift will be at the bottom of its shaft and the lever to raise it will become non-interactable. Access to the Isolated Divine Tower remains open via the sending gate southeast of the Golem.
You can also re-discover the East Capital Rampart site of grace by starting at Capital Rampart and taking the linear path into the Ashen Capital. Boc the Seamster will be there if you're properly progressed his quest.
The Endgame
To head forward and progress the plot, head directly south from the Site of Grace until you reach the walls of the buildings. Follow them around, jumping over the buried pieces of the Erdtree branches, until you reach a curved staircase that isn't covered in ash. Climb the stairs and ride the lift up, entering the Erdtree Sanctuary again. Here, you'll find Sir Gideon Ofnir, the All-Knowing , who is adamant about stopping you from becoming Elden Lord. Defeat him and you'll be rewarded with the All-Knowing Set and the Scepter of All-Knowing .
Interact with the Erdtree Sanctuary Site of Grace that spawns after Gideon's defeat, and head east onto the balcony. Turn left and scale the tree root here, up and to the west. When you get up to another balcony, you'll see an item on a hanging chair to your south, if you haven't already gotten it from Leyndell, Royal Capital . Head outside, and instead of following the path, immediately turn left. Jump down onto the roof around the corner and head into the open window. Run across the large tree root here to be able to grab the Golden Order Principia , then head back down to that balcony where you first saw the item. This time, follow the path north and you'll get to the Queen's Bedchambers. In this room, you may have collected the Blessing of the Erdtree spell in Leyndell, Royal Capital . Here, in the Ashen Capital , you'll find the Erdtree Heal incantation in its place instead.
Continue out the door east and up the stairs, and you'll encounter a fog door. Beyond this door is Godfrey, First Elden Lord , in his physical form rather than the golden spectral form you encountered earlier in the game. Two possible NPC Summons are available for this fight: Nepheli Loux is available if she's been crowned ruler of Limgrave at the end of her questline, and Shabriri can be summoned if you've met the Three Fingers . After reducing Godfrey to about 50% health, he turns into Hoarah Loux, Warrior , and defeating him nets you the Remembrance of Hoarah Loux .
Interact with the Elden Throne Site of Grace that spawned, and head up the stairs to the southeast. Touching the golden light at the top teleports you to the final two bosses of the game, the first of which is Radagon of the Golden Order . Defeat him, and the next phase against the Elden Beast starts immediately after the transitional cutscene. Defeat them both to be rewarded the Elden Remembrance . After the dust has settled, activate the Fractured Marika Site of Grace so that you can return later.
Provided Ranni's quest line has been completed, after defeating the Elden Beast, a blue summon sign will appear on the ground near Marika's broken remains. The player can interact with this summon sign (instead of interacting with Marika's remains) to acquire the "Age of the Stars" ending. Doing so will also unlock a related game achievement/trophy. Otherwise, interact with the fractured remains of Marika to commence other possible endings. If the player has been branded by Three Fingers, no endings other than Lord of Frenzied Flame will be possible unless the player has permanently removed the frenzy by using the Miquella's Needle while standing in the boss arena of Dragonlord Placidusax . (See Endings page for more information)
After the credits roll, you have the option to immediately begin New Game Plus . You can decline this and the game will place you in the Roundtable Hold , where you can proceed to explore the rest of the world, and initiate your next Journey at will.
Elden Ring Leyndell, Ashen Capital Maps and Notes
- You will not be able to access Leyndell, Royal Capital until NG+ after getting to this point. In order to be summoned into Leyndell, Royal Capital after your own world is made ashen, you need to put your sign down by the Capital Rampart grace in the hallway before the elevator. In order to summon for Morgott The Omen King the summoned person must use their Small Golden Effigy and they must have interacted with the effigy near Morgott's fog wall before the capital was made ashen.
- You lose access to everything that would have been obtained in Leyndell, with exception to the items you can find around the Erdtree Sanctuary building. You can still obtain the Golden Order Principia , Erdtree Bow , and the Celestial Dew , if you haven't already gotten them. The Subterranean Shunning-Grounds , and everything below it, remains unchanged.
- You lose access to the legendary weapon Bolt of Gransax . If it is not collected you will lose the opportunity to get the Legendary Armaments achievement for this playthrough.
- You can no longer obtain the Duelist Set and Guardian Garb (Full Bloom) since the Duelists and Full Bloom Guardians no longer appear in the Ashen Capital.
- All Sites of Grace disappear from the Capital , as it is replaced with a new area.
- Gideon Ofnir leaves the Roundtable Hold . Any unclaimed rewards that you would have gotten from speaking to him after discovering Mohgwyn Palace and Miquella's Haligtree , or from defeating Mohgwyn, Lord of Blood and Malenia, Blade of Miquella , can be purchased at the Twin Maiden Husks in the Roundtable Hold .
- The sending gate in the Deeproot Depths that would normally transport you to the entrance to Leyndell becomes inactive.
- If you need to access the Isolated Divine Tower , the transporter trap at the Tower of Return will warp you to the Divine Bridge Site of Grace that gives you access to the sending gate. You cannot descend to the Fortified Manor from here, as the lever to call the lift becomes inactive.
- The Capital Outskirts and everything beyond will not change. You can enter Leyndell, Ashen Capital from the Capital Rampart Site of Grace.
- Boc the Seamster will remain in his usual spot, provided his quest has progressed correctly. If he is not there, try reloading the area.
Welcome home, Ashen One.
not much of a climax, you fight a series of bosses since they had to put them somewhere, then it's over. nothing much to do between them and an empty area otherwise.
If you accidentally knocked the divine bridge golem off a cliff, you can still get its golem's halberd when it respawns after the city gets glassed.
they should have brought back something like the offering box in sekiro. Maybe a looter that could be found on the bridge after draconic tree sentinel, who sells everything that you didnt pick up before it became ash.
omg, i cant believe they put dark souls 3 in elden ring!
Kind of a disappointing area. Wouldve been nice if there were more accessible spots. I love it when games significantly change previous areas. It's so cool seeing old things become new. Can't complain about the game overall tho, the world they created is absolutely massive and crammed with detail. If this doesn't win GOTY from every possible outlet, it's a damn shame.
I got summoned to Goldfrey despite being in the Ashen capital? One of my friends also got summoned to Morgott as well while being in the Ashen capital. I think its tied to Summoning pools that DON'T get buried in the ash. Like the one just by the west ramparts grace site and the one just before the Elden Throne. Idk tho, just my best guess as to why that could have happened.
they couldve had everything ruined but let the main street of leyndell stay, which would lead to the fortified mannor walls, that would then lead to the stairs leading up to gideon, which would be fortfified and guarded by demigod soldiers and knights, that serve godfrey and wield godfreys banner. Wouldve been cooler tbh
can you still get co-op or invasions in the regular capital after you destroyed it?
If the thought of three ulcerated tree spirits is putting anyone off going to get the erdtree's favour +2 talisman they can all be killed at range with no risk.
It says here any unclaimed rewards from Gideon after he leaves the roundtable hold can be bought from the twin maiden husks. But I didn't tell him about the haligtree and I didn't beat malenia until after the tree burns so what have I missed out on?
The part about needing to make Nepheli the ruler of Limgrave in order to summon her is definitely wrong. I don't know what the requirements to summon her actually are, but I'm certain it's not that. I haven't done the Haight stuff in either of my playthroughs, but she's been available both times.
"Boc the Seamster disappears from the East Capital Rampart Site of Grace." This is wrong. Boc doesnt disappear. The Site of Grace deactivates, but he will still be there anyway.
If you go explore the ashen capital after killing the elden beast, you can get the talismans mentioned above. The same entry/ladder is open if you climb up the dragon's wing and jump down, only this time there is a loud, rythmic thumping noise. It sounds like a heartbeat to me, no kidding. Another dlc lead in? Like Malenia saying the Miquella is "the most fearsome of the Empyreans."
I'm in NG+2 & for the first time in Ashen Capital, I was able to re-activate the East Capital Rampart site of Grace and Boc the Seamster is still there. Must have been updated in a recent patch, however I didn't see it in any patch notes.
I'll be that guy... it's "Capitol."
There is also a Rune Arc directly south of the Leyndell, Capital of Ash SoG: From the SoG pass the courtyard with the hole leading to the catacombs on the left side where the two knight statues are, after the half buried gazebo continue up the hill to the south between the buried tower with the golden tree symbol on the octagonal roof and a large fallen tree towards the building ahead that has three small alcoves in it's northern wall. You will find the Rune Arc on a corpse in front of that building.
i accidentaly triggered the ranni ending before activating the bonfire at fractured marika,and it seems that i cant enter anymore inside the erdtree,is there any other way to enter or im just locked out?
One minor correction. Even after this Boc is still at the same location, you just need to get there, either going from outside, or from inside the Capital. You can also reactivate the Site of Grace next to him.
anyone know if this reduces traffic for invasions in the underground section?
anor londo in ds3
Boc was still in east rampart for me in the ashen capital
Who writes these guides.. trying to get the final talisman for the achievement. Guide starts you at sewers and then is like ,"oh yeah you can also get this from a totally different grace that you won't have unlocked if following this guide"
You also get the ritual shield talisman up at the coliseum area here
Boc the Seamster actually remains at the East Capital Rampart site of grace. After killing Maliketh and registering the Ashen Capital grace, I fast travelled back to the Capital Rampart site of grace and walked back to the East Capital Rampart. While Boc wasn't there intiially (from what i recall, I should've looked closer) he was still listed on the map as an icon at the East Capital Rampart. After fast travelling to the East Capital grace to reload the area, he was back in his usual corner.
There’s also a lords rune 4 (I think 4) on top of the roofs a little past the giant spear in the Capital
I can’t get golden order seal now :(
A place covered in ash with the games centrepiece the Erdtree aflame. It’s like when you fight Gael at the end of ds3, really give you a sense of finality. Plus when a major area starts burning in a Fromsoft game, you know you are close to the end
Uhh, my leyndell is all ashy covered and burned after I beat the black luster doggie guy at the tornado sky island. Also the tree is on fire I think someone ****ed things up, but it wasnt me i swear. What do.
"Backtrack to the staircase and at the top, take the lift to go up onto a higher level." For anyone else confusing by this, travel to the Leyndell, Capital of Ash grace and head South past the hole to the Subterranean Shunning-Grounds. From here head up the hill to the left and the stairs leading to Sir Gideon Ofnir will be straight ahead.
Esgar is not a boss of this area, he's in the catacombs, dunno why you listed him here
sorry but this walkthrough must have written by someone who vaguely remembers the area. Directions are all wrong, east is mixed up with west. item locations are incorrect. It is sad really
This place is almost as dumb as the convoluted storyline.
I love how there are virtually no enemies around except bosses. Wish the game would've done that more often instead of giving us spoopy skellington catacombs #726 in the middle of nowhere.
these directions are bad. please rewrite them and be more specific
I don't know if there is one insane person writing these directions, or if this is the result of a ton of people collectively editing them into incoherence, but these instructions are gibberish. "Go up to the top of the stairs and take the lift up" I tried to follow these directions and ended up outside the Leyndell entrance formerly guarded by the Draconic Tree Sentinel.
Has anyone tried to use the trapped chest that takes you to the divine bridge to see what happens? Does the chest (the one in Tower of Return in Weeping Peninsula) no longer work? Or does it send you back up there and its weird now with the ash?
hey i might be wrong but looks like u missed Forsaken depths grace site in leyndell ashen capital.
You missed a Hero's Rune, on top of the golden rooftops (the same that had Imps in normal Leyndell).
Maybe it matters that some of us are touched by 3 fingers?
Boc can still be found here, at the East Capital Rampart, you just need to rediscover it. It's in the same spot.
I'm locked out from getting the fat guy armor now, ****
quick question, can someone in the ashen capital instance help with bosses from the royal capital instance
I love this kind of stuff in video games, where big areas are permanently changed. It gives a real feeling of impact to decisions, and fleshes out the world more. I was blown away when I saw this and realized "oh **** I did this." Massive respect to From Software for making such a bold decision, obviously a lot of people are mad as indicated by these comments but I think it is super cool.
How do I get to the Goldeen seed that I can see when going up the staircase? Jumping won't work.
You also forgot there is a somber ancient dragon stone right where the giant gargoyle is.
This is not good design, there is no way to predict this is going to happen, so you end up losing a bunch of things if you decide to explore it later
I pooped myself thinking I had ruined my ending when I saw the place lol
Gold Mask isnt mentioned.
Good. I'm locked out of the normal capital permanently and can't help friends in Co op. What garbage.
Wish there was a scavenger merchant that sells the gear you didnt pick up before torching the place, albeit with a high price. And maybe put the bolt of gran-whatever behind a side boss
Is there any information about which items / questlines / etc. exactly become inaccessible after the Capital turns to Ash ? Might be worth noting this on this page.
Come for the deeply-discounted downtown property, stay for the love, Ashen One.
There are three damn ulcerated tree spirit in the eastern section where you find erdtree favor+2, anyone know what they drop? want to know if they are worth the hassle
Got an issue where the cutscene hasn't played and I can't get to the Capital of Ash...anybody know if there is a way to access it without needing to be teleported?
Are the underground questlines unaffected at this point?
The normal Leyndell was way more beautiful. Can I go back to the normal Leyndell after killing the Endboss or does this now stays forever untill NG+ the Capital of Ash?
Can someone list what items and npc become unavailable once you advance to capital of ash?

the gargoyle in the area is totally not worth fighting. drops miserable amount of souls and no gear
what is this gargoyle in the area??? literally has demigod hp, unlimited poise and stamina. what does it drop?
Can you go back to old leyndell after accessing leyndell capital of Ash?
How do I acess the divine bridge now to get to the isolated tower?
Doesn't seem like you can be summoned by people in the regular capital after you've made yours all ashen
What areas become blocked off after the capital turns to the capital of ash?
There’s a Somber Ancient Dragon Smithing Stone in front of the now-blocked off gate into the “real” Roundtable Hold area (western edge). It’s guarded by a gargoyle.
How far do you have to go to get there? I mean, ive killed Mogh, that serpent god, and other bosses. Melania is still left, but i wanted to progress some. Ive also killed the fire giant, what more do i need to do? Can't progress atm :/
Can you get summoned as a cooperator to leyndell royal capital if you reached this
wow no one is gonna talk about this ? or aren't you there yet
- Recent Changes +
- File Manager +
- Page Manager +
- Create Wiki +
- ⇈ Back to top ⇈
- World of Warcraft
- Baldur's Gate
- League of Legends
- Counter-Strike
- Ethics Policy
- Ownership Policy
- Fact Checking Policy
- Corrections Policy
- Affiliate Policy

How to enter Leyndell, The Royal Capital in Elden Ring
Leyndell, the Royal Capital is a massive city constantly in your sight as you explore the first few areas of Elden Ring . Getting to the Atlus Plateau is one thing, but entering the city requires a bit more preparation. Let’s enter the capital together, and discuss different ways to get there.
Getting into Leyndell, Royal Capital in Elden Ring
To enter Leyndell, Royal Capital in Elden Ring , get to the Atlus Plateau and head northeast until you reach the city’s outer walls, which you can enter through the large set of double-doors to the city’s west. But be careful to avoid the Tree Sentinels guarding it. To enter the city properly, you must circle around to the northeast and beat the Draconic Tree Sentinel . If you have two Great Runes and defeat this difficult boss, you can head across the bridge and finally enter the Capital.
First thing’s first, you must first ascend to Atlus Plateau through the Grand Lift of Dectus or by climbing the Ruin-Strewn Precipice. The previous will require the Dectus Medallion, a medal gathered from the deadly Fort Faroth in Dragonbarrow and the much less deadly Fort Haight in the Mistwood. Alternatively, you can simply head to northern Liurnia of the Lakes and ascend the Ruin-Strewn Precipice, a dungeon with no prerequisites.
The first step of entering Leyndell is bypassing the city’s gigantic walls. Thankfully, someone was nice enough to leave the double doors to the courtyard unlocked. The western side of Leyndell is covered with enemies, though few can keep up with Torrent—just watch out for the archers. The real issue is the pair of Tree Sentinels keeping watch at the top of the stairs. Do your best to run between them and spam Interact on the door to become invulnerable, then sprint forward toward the Site of Grace. Alternatively, you can fight them, but your reward is rather meager for a frustrating two-vs-one. Using a summon as a distraction is a good idea.
There are plenty of dungeons and events to do in the courtyard of Leyndell, but you will have to enter the city if you want to beat the game. To do so, head around the inner wall until you reach the eastern side of the city, by a cliff edge. You’ll know you made it to the right place if you see a Tree Sentinel wielding a massive club and stony shield. This guy behaves like Tree Sentinels but does a lot of additional area-of-effect damage and lightning-based attacks.
The Draconic Tree Sentinel doesn’t leave many openings, but many of his attacks strike the ground and primarily the ground. Utilize jumping attacks to dodge the first few frames of his moves before hitting his horse. While not a universal solution to all of his moves, this will often let you avoid getting double-hit if you’re wearing heavy armor while maximizing the damage you do during his vulnerable seconds.
Once the Draconic Tree Sentinel is down, the path to the city will open and you’ll get a Site of Grace for your efforts. Sit down, relax, and get ready for a long and arduous dungeon.
Why isn’t the door opening?

To enter the Leyndell, Royal Capital dungeon, you must have at least two Great Runes —rewards for killing endbosses of specific Legacy Dungeons. Before entering Leyndell, it is recommended you test your mettle by killing Godrick and Rennala , the first two bosses of Elden Ring . However, it isn’t too hard to have obtained a third Great Rune before entering Leyndell through slaying Radahn , a more difficult boss than either Godrick or Rennala.
You only need two Great Runes to enter Leyndell. Once you have them, the seal which blocks off the East Capital Rampart should dissipate. If you don’t have two Great Runes yet, there are five locations where you can obtain one before you enter the Capital. They are the following:
Of these options, the last two are quite difficult. Rykard’s Great Rune requires a lot of travel through a dangerous area, or being teleported there by dying to an Abductor Virgin at the bottom of Raya Lucaria Academy. Mohg’s Great Rune requires performing invader tasks given by White Mask Varré and entering an endgame boss fight. We highly recommend sticking to the first two, with Radahn a valid option as well.
If you have two or more Great Runes but the seal hasn’t dissipated yet, you may need to reload the area by going to the Roundtable Hold and returning. An event trigger must occur at the Hold, so make sure you visit there somewhat often as you progress.
Alternative routes into Leyndell
Theoretically, it’s possible to get into Leyndell through the Tower of Return , a small building on the Weeping Peninsula. This building’s trapped chest will bring you to the Divine Bridge Site of Grace, which is a later Site accessible in the city. But you will not be able to access the rest of the capital without the help of an Invader or Hunter player who can bring an elevator up for you. This route is janky and might not work on every patch of the game, so we recommend using the intended route if possible.

- Regent Seven Seas Cruises
Best of Moscow by high speed train
By shuguley , February 15, 2014 in Regent Seven Seas Cruises
Recommended Posts
Sure would appreciate someone who has taken "Best of Moscow by high speed train" from St. Petersburg could please share their impressions of this shore excursion. From the description this sounds like a very long day.
Wondering how the 4 hour train trip was in terms of accommodations, etc. Also what time did you leave the ship and what time at night did you return? Were both legs of the trip on the high speed rail (I read that slower trains also travel the same tracks)?
My wife and I are considering this excursion. We thought that if we are making all the effort to go to Russia then how could we pass up going to Moscow, walking in Red Square, seeing St. Basil, etc.
Link to comment
Share on other sites.
If you are considering this on the 2015 June Baltic cruise on Voyager; my suggestion is don't. There is so much to do in St. Petersburg and although a train is one of my favorite ways to travel the time would be far better spent in St. P.
Thanks for the advice. Yes, this would be on the Voyager during the 2015 season but not yet sure exactly which cruise.
We did the Moscow excursion "on a different luxury line", but from your brief description it sounds very much like the same trip, so I will operate on that assumption. It is a VERY long day! We left the ship at 5:30 AM and returned at 12:30 AM. The highspeed train trip is comfortable, and while they call it "Business Class" it does not compare well to the equivalent class on say Rail Europe. When we did it in 2011, we did have highspeed both ways, and the trip back seemed much longer as the adrenaline and excitement had worn off!:D
Moscow itself is not that terribly different from any other big city in the world, but this Cold War kid never thought he would ever stand in Red Square, never mind walk the grounds of The Kremlin, or tour The Kremlin Palace, or see (but not visit) Lenin's Tomb, or visit The Armoury. But he did, and he loved every minute of it! Yes, it is a long day, and you barely scratch a scratch on the surface, but it is worth it. There is a tremendous amount to see in St. Petersburg, but every Baltic cruise goes to St. Petersburg, so you can go back if you choose to. Not every cruiseline offers you the chance to see Moscow.

I have not personally done this tour, but our last time in St Petersburg, the private guide that we hired for a day was leading the regent tour to Moscow on the high speed train the next day. He said it was way better than the previous alternative, which was flying to Moscow and back. He said that you actually got to Moscow faster because you didn't have to deal with airline checkin etc. it did seem like a very long day to me, and there is so much to see and do in st. Petersburg that I didn't consider doing it.
countflorida
We toured to Moscow from St. Petersburg via the hi-speed SAPSAN train last September, from a Baltic cruise on the Oceania Marina. You need to have a two-night, three day port call in St. Petersburg to take this tour because the tour typically leaves the ship around 5:00 - 5:30 AM and doesn't return until after midnight the next day. We didn't take the ship's tour; we made private arrangements with TravelAllRussia for three days of touring, the first and third days in St. Petersburg and the second day the tour to Moscow by train. Our cost for the private tour for three days was about the same as what the ship charged for the excursion to Moscow alone. There are a number of private tour agencies that operate in St. Petersburg and offer the Moscow train tours; we would strongly recommend them over the ship's tours.
All three days had private guides with car and driver. The second day, the driver picked us up at the ship and took us to the train, but we were alone on the train, and met in Moscow by the guide on the station platform. After our tour and dinner, we were brought back to the train and after the return train trip met by the driver and taken back to the ship. Because you are alone on the train you must have your own Russian visas.
If this is your first visit to St. Petersburg, I would agree there is much more to see there. We found Moscow somewhat a disappointment, particularly Red Square. The Kremlin and the cathedral in Red Square were also worth seeing. But the best thing we saw was the Moscow subway! I worked for the Washington Metro system back in the 1980s as it grew from 40 to 80 miles and although I was in the computer area, I learned a lot about the challenges of running a subway system. We used the Moscow system to get across the city from where we had dinner to the train station, and I was amazed at the cleanliness', speed of operation, the short headways maintained, and the courtesy of everyone involved. A very impressive experience!
We had been to St. Petersburg before, and so had the time to take a day and go to Moscow. Also, I really like trains, and the SAPSAN is a German train set running on Russian rails. Seats are like first class domestic air, spacious but not too plush or comfortable, but with enough room. Not too much recline, and almost 8 hours on the train in two shots is a lot for an old man. They come through and sell drinks, candy, etc. but the sellers don't speak English and no one around us helped, so we had just poor coffee once coming, and brought stuff with us for the trip back. Not too much to see from the train either, particularly on the return when it is night the whole way.
If you decide to go, take a private tour and avoid the overly expensive ship's tour. I'm glad we did it, but wouldn't bother to repeat the tour; we've seen Moscow.
Thanks so much to all of you for the thorough and thought insight. Yhe information you have provided is most helpful.
countflorida: Your detailed post is very helpful. We are not quite ready for a Baltic cruise but should do so within a year. Time enough to do our pre travel research, bookings and visa gathering.:) Thank you!

Emperor Norton
Sure would appreciate someone who has taken "Best of Moscow by high speed train" from St. Petersburg could please share their impressions of this shore excursion. From the description this sounds like a very long day. Wondering how the 4 hour train trip was in terms of accommodations, etc. Also what time did you leave the ship and what time at night did you return? Were both legs of the trip on the high speed rail (I read that slower trains also travel the same tracks)? My wife and I are considering this excursion. We thought that if we are making all the effort to go to Russia then how could we pass up going to Moscow, walking in Red Square, seeing St. Basil, etc.
I did this on Seabourn. IMO DONT. Take Aeroflop (er Aeroflot). The train has non folding seats where you are literally knee to knee with your fellow passenger (facing each other). Further they don't believe in air conditioning. It's also the worlds slowed bullet train. I think I would have found more enjoyment wandering around the St. Petersburg and Moscow airports.
Countflorida,
This is a little off topic,, however we had planned a river cruise in Russia but decided we would rather stay on land and have booked about two weeks with Travel-All-Russia using the private guide and driver. I'm curious as to how you found them as a tour company.
The guides they provided were fine. We had a different guide each of the days in St. Petersburg, but both were flexible, pleasant, knowledgeable and spoke English very well, as did the guide in Moscow, incidentally. She was a bit aloof, distant, not too friendly, but otherwise fine. In fact, she was the one who suggested taking the Metro, which unexpectedly became one of the highlights of the Moscow excursion. If I have a complaint with AllTravelRussia, it is with their plan and its execution (more later).
I had requested emphasis on World War II (in Russia, the Great Patriotic War) sites and info. In scheduling us, they weren't careful about dates and a couple of the sites we wanted to see were scheduled on the third day, after we'd been to Moscow. But both sites were closed that day of the week, and that info was readily available, right on web sites describing them. Also, the included meals (lunches in St. Pete, dinner in Moscow) were not what we asked for: light meals with some choices, so we could avoid things we didn't like and choose things we did like. My request was ignored; we were given full Russian meals with a fixed menu, no choice. On the first day, a fish dish was the entre, but I am allergic to fish. Fortunately, I had the e-mail I'd sent with me and showed it to the guide, and she was able to change my entre to chicken, which was very good actually. But we didn't want a 3-4 course lunches or dinner (in Moscow). We had the guide drop the lunch the third day, although we never got any credit or refund. But, particularly in contrast to the ship's tours, the prices were so reasonable we didn't worry too much about it.
The people who were on the ship's tour to Moscow saw us boarding the same train for which they were forced to queue up and wait on the way back, and asked us what we had done. I was candid and open so they were not happy when I explained what we had arranged and particularly what it had cost. Also, when we returned to the ship, we found they had laid on a late supper for those who had gone to Moscow, so up we went and had something. Well, it turns out the late supper was supposed to be just for those on the ship's tour, but we and others on 'independent' tours, there were a dozen or more of us, crashed the party, actually got there first, and they didn't realize it until the larger group arrived and there weren't enough tables/places set. By that time, the 'independents' had all gotten served and were eating; what could they do?
A couple from the larger group sat down with us and asked us about our tour, and they were the ones I told about our arrangement and its cost. They turned to others who’d been with them and announced the details, loudly enough so the whole room heard, which started a lot of bitching and complaining. I gathered they weren't very happy with the ship's tour to begin with, and this was the straw that broke the camel's back. We finished up and beat it out of there, but overheard later that one of the excursion staff came to check on something and ran into a real mess. I caught a cold on the trip, which forced me to bed the second day following in Tallinn, so by the time we reappeared we heard about the contretemps' but apparently no one recalled who started it, thankfully.
Because of what happened to us, I would probably not use AllTravelRussia if I were to go again, or if I did, I would be sure to get confirmation of every detail of the tour. They do have good reviews generally, and we were certainly helped by their visa department and liked the guides and drivers. Their weakness, I say now with full 20:20 hindsight, is that once the sales person who plans the tour, sells it to you and collects your money, he (or she) transfers the plan to their Russia office for implementation; there is no follow-up to make sure it gets done right. And that is where our problems arose; we paid for a custom tour but got a standard package with a few destinations switched, and no one checked them out, even to see when they were open the day we were scheduled to go. If you check every detail that’s important to you, it should be OK, but that’s a hell of a way to have to do business, in my opinion.
Thank you for the 20/20 hindsight observation on your Russian tour operator, and better priced than the ship's excursion cost.
Thanks very much for the feedback.
We had the same experience as you so far as price. We originally booked a Viking Cruise but, hearing some things about the river cruises that made us unhappy, looked into other options. T-A-R cost the same or less than a cruise and had us in hotels for 11 days. We opted for the private tour. They have three tour levels, based on hotels. We originally opted for the four star as it did not cost much more than the three star hotels. Finally we decided to throw it all in and upgraded to five star. In Moscow we will be at the newly opened Kempinsky which is two blocks from Red Square. In St. Petersburg it is the Grand Hotel Europe, one of the most vaunted luxury hotels in Russia. Location is important for us as the tours use up only part of the day so being in the center of everything for our independent touring is important. As with many other cities, the less you pay, the farther out of the center of town you are.
We have been working with our salesman in D.C. and he seems to get back to us with the changes we want. He recently returned from Russia so is up on everything. When I asked they said they paid the full TA commission if I wanted so I got my usual TA on board so he is watching our back and giving us that extra level of comfort. He also set up our air, which I know pays him little or nothing, and got us business class for much less than T-A-R wanted for economy, though it took working for a while with a consolidator. He's happy to get his 10 percent on this trip without having booked it. He also took care of the trip insurance. We've been doing a lot of research on the CC sister site Trip Advisor and will write a report there. We will, I guess, become a source of info for CC members after having spent 5 days in Moscow and 6 in SP.
- 4 months later...

scubacruiserx2
Anybody considering a day trip to Moscow from St. Petersburg on the Sapsan may want to look at our travelogue filled with pictures.
http://boards.cruisecritic.com/showthread.php?t=1927687

Very informative. Thanks dor sharing. Jeff
Please sign in to comment
You will be able to leave a comment after signing in
- Welcome to Cruise Critic
- New Cruisers
- Cruise Lines “A – O”
- Cruise Lines “P – Z”
- River Cruising
- Cruise Critic News & Features
- Digital Photography & Cruise Technology
- Special Interest Cruising
- Cruise Discussion Topics
- UK Cruising
- Australia & New Zealand Cruisers
- Canadian Cruisers
- North American Homeports
- Ports of Call
- Cruise Conversations
Announcements
- New to Cruise Critic? Join our Community!
Write Your Own Amazing Review !

Click this gorgeous photo by member SUPERstar777 to share your review!
Features & News

LauraS · Started 1 hour ago
LauraS · Started 3 hours ago
LauraS · Started May 3
LauraS · Started May 1
LauraS · Started April 30
.jpg.00c527646bf20dd6c0ff5cba146c8700.jpg "tour divine leyndell")
- Existing user? Sign in OR Create an Account
- Find Your Roll Call
- Meet & Mingle
- Community Help Center
- All Activity
- Member Photo Albums
- Meet & Mingle Photos
- Favorite Cruise Memories
- Cruise Food Photos
- Cruise Ship Photos
- Ports of Call Photos
- Towel Animal Photos
- Amazing, Funny & Totally Awesome Cruise Photos
- Write a Review
- Live Cruise Reports
- Member Cruise Reviews
- Create New...
Trans-Siberian Railway Prices
- Trans-Siberian Railway Tickets
- Trans-Siberian Railway Ticket Booking
- Trans-Siberian Railway Car Classes
- Travel Procedure
- Trans-Siberian Railway Route
- Guides & Gadgets

Home » Prices and Trans-Siberian Tickets » Trans-Siberian Railway Prices
Ticket prices for the Trans-Siberian Railway also depend on the current ruble exchange rate.
Is the Trans-Siberian Railway expensive?
Before starting on your Trans-Siberian Railway adventure you naturally want to know what the entire trip will cost. Although this sounds like a simple question, it is pretty difficult to answer. The Trans-Siberian Railway price of travel depends on the following factors:
- Which travel class do I want to use? The price for a first class ticket is about three times the price of a 3rd class ticket
- Am I willing to buy the tickets myself and assume responsibility for the organisation of the trip?
- How many stopovers do I want to make? The more breaks, the higher the total price.
- What sort of accommodation do I want? Will it be a luxury hotel or will a hostel dormitory be sufficient?
- What tours and excursions would I like to go on?
- What is the current exchange rate for rubles?
Basically, everything from a luxury to a budget holiday is available. If you buy yourself a 3rd Class nonstop ticket at the counter, a few hundred Euros will cover the price. All you will experience is a week on the Trans-Siberian train and will see nothing of the cities on the way. There is, however, any amount of room for upward expansion. Everyone makes different choices about which aspects they are willing to spend money on. I personally prefer to save money on accommodation and railcar class, visit as many cities and do as many trips as possible. To enable better classification of your travel expenses I have contrasted two typical traveler types. In the third column you can calculate the total cost of your own journey on the Trans-Siberian Railway. Please keep in mind that these are only rough estimations and not exact prices.
The all-in costs seem fairly high at first. However, they cover everything and it is quite a long journey taking four weeks. Many people forget to consider that when looking at the list. We should also deduct the running costs for food and leisure at home. I think most visitors to this page will classify themselves somewhere between the two categories, that is around the € 2,000 – € 2,500 range. When comparing these prices with other travel packages, you get the impression that it is hardly worthwhile travelling individually on the Trans-Siberian Railway. Please keep in mind that most packages last no more than 14 days and you are herded like cattle through the most beautiful locations.
If you spend less time on the Trans-Siberian Railway you will, of course, pay less. I chose this particular travel length because I prefer not to do things by halves. If you fulfill your dream of travelling on the Trans-Siberian Railway, enjoy it and don’t rush things. But it’s up to you, of course. Try playing around with the form a bit to find the appropriate price for your trip.
- Trans-Siberian Railway Tickets »

Elden Ring Walkthrough & Guides Wiki
- Progression Guide
- Tips and Tricks
- Interactive Map
Altus Plateau
Leyndell, Royal Capital Legacy Dungeon Walkthrough and Location
☆ DLC Release Time and Countdown ★ Progression Guide / Boss Guides ☆ Level Cap / Rune Farming Guide ★ Best Weapons / Best Builds / Best Equipment

Leyndell, Royal Capital is one of the Legacy Dungeons that you can explore in Elden Ring. Read on for a complete walkthrough of the dungeon, its location on the map, list of bosses and how to beat them, and obtainable items in Leyndell, Royal Capital!
List of Contents
- Walkthrough
Passing through Altus Plateau
Leyndell, royal capital objectives.
- General Tips
What to Do in Leyndell, Royal Capital
- Related Guides
Leyndell, Royal Capital Overview
Leyndell, royal capital basic information, how to get to leyndell, royal capital.
You can reach the Royal Capital by activating the Grand Lift of Dectus using the Dectus Medallion. Ride the lift and ride east until you reach Leyndell.
Leyndell, Royal Capital Walkthrough
Preparation for leyndell, royal capital, traveling to bellum highway.

Fast travel to the Main Academy Gate Site of Grace at Raya Lucaria Academy then head north to find a large blue seal. Examine the seal to pass through it and travel straight to Bellum Highway.
Academy of Raya Lucaria Legacy Dungeon Walkthrough and Location
Obtaining the Dectus Medallion
To activate the Grand Lift of Dectus , you need to obtain the two halves of the Dectus Medallion . The left half of the medallion is found in Fort Haight at Limgrave, while the other half is found in Fort Faroth at Caelid.
Use the complete Dectus Medallion at the Grand Lift of Dectus and ride it up to Altus Plateau.
Go around the capital to reach the entrance

Upon reaching the Site of Grace at the Outer Wall Phantom Tree , travel north until you reach another Site of Grace then east until you find the Draconic Tree Sentinel .
Walkthrough and Progression Guide: Where to Go and What to Do First
Leyndell, Royal Capital General Tips
Stay mounted while fighting the sentinel.

You won't be able to enter Leyndell without defeating the Draconic Tree Sentinel. It would be easier to fight this boss on horseback so you can quickly dodge its attacks. You can also use a Spirit Summon to draw aggro while you attack the sentinel from behind.
How to Beat Draconic Tree Sentinel
Attack Godfey at the end of his combos

Godfrey's attacks are quite slow but they hit really hard. Focus on dodging his attacks until he finishes their animations before landing a few hits in. You can also use Spirit Summons to draw Godfrey's aggro and give you more chances of dishing out damage.
How to Beat Godfrey, First Elden Lord
Boss Fight Strategy for Morgott
Some attack patterns are similiar with margit's.

Morgott's attack patterns are quite similar to the ones Margit the Fell Omen uses. However, some of Morgott's attacks have longer delays and the intervals between his attack animations are short.
How to Beat Morgott, the Omen King
Summon Melina outside the boss area

You can opt to have Melina 's aid during the fight by interacting with the summon sign outside the boss area. Melina can tank Morgott's attacks while you strike from a safe spot and can also heal you using her own spell, easing up the fight significantly.
Melina: Where to Find Her and Everything She Can Do
Get the Smithing-Stone Miner's Bell Bearing

You can get the Smithing-Stone Miner's Bell Bearing 2 inside the Sealed Tunnel . Give this item to the Twin Maiden Husks at the Roundtable Hold and you will be able to purchase Smithing Stones 3 and 4.
Sealed Tunnel Location and What to Do
Get the Viridian Amber Medallion

You can fight and defeat Margit near the Outer Wall Battleground to obtain the Viridian Amber Medallion +1 . This talisman increases your maximum stamina, which can be really helpful in boss fights if you're in need of extra dodges or weapon swings.
How to Get Viridian Amber Medallion +1: Effects and Locations
Get the Blessed Dew Talisman

The Blessed Dew Talisman is a neat talisman found within Leyndell that gradually restores HP while equipped. You can actually obtain this early in the game by opening a transporter chest on top of the Tower of Return in Weeping Peninsula.
Opening the chest will warp you straight to the Divine Bridge, where you can find the chest containing the talisman and a sleeping golem in the area past the Site of Grace.
How to Get Blessed Dew Talisman: Effects and Locations
Restore Morgott's Great Rune

After defeating Morgott, you can bring his Great Rune to the Divine Tower of East Altus , located east of the Royal Capital, to restore the rune's power.
Follow the bridge east of the capital until you reach the lift that takes you to the Forbidden Lands, but instead of riding the lift down, turn right and make your way to the end of the path until you reach the Divine Tower.
What Are Great Runes?
Fight the Fell Twins along the way

Before you reach the Divine Tower, you'll be forced to fight the Fell Twins . Only after beating them can you pass through the bridge and restore the Great Rune.
How to Beat Fell Twins: Boss Fight Guide
Advance Dung Eater's questline

You can continue Dung Eater 's questline by finding his physical body at the Subterranean Shunning-Grounds in Leyndell. Once there, run to his cell and unlock it using the Sewer-Gaol Key that you received from him after giving a Seedbed Curse .
Dung Eater Questline and Location
Elden Ring Related Guides

Story Walkthrough
Legacy dungeon walkthroughs, minor dungeon walkthroughs, limgrave minor dungeons, liurnia of the lakes minor dungeons, caelid minor dungeons, altus plateau minor dungeons, ainsel river minor dungeons, siofra river minor dungeons, mountaintops of the giants minor dungeons.
We at Game8 thank you for your support.
In order for us to make the best articles possible, share your corrections, opinions, and thoughts about 「Leyndell, Royal Capital Legacy Dungeon Walkthrough and Location | Elden Ring」 with us!
When reporting a problem, please be as specific as possible in providing details such as what conditions the problem occurred under and what kind of effects it had.
Do you want to send this information?
Walkthrough Menu
- Shadow of the Erdtree DLC Release Time
- How to Prepare for the DLC
- Who is Messmer the Impaler?
- Complete Story Walkthrough
- Limgrave Region Map Guide
- Liurnia of the Lakes Region Map Guide
- Caelid Region Map Guide
- Altus Plateau Map Guide
- Mountaintops of the Giants Map Guide
- Siofra River Map Guide
- Ainsel River Map Guide
- Deeproot Depths Map Guide
- Crumbling Farum Azula Map Guide
- Stormveil Castle
- Church of Elleh
- Gatefront Ruins
- Castle Morne
- Divine Tower of Limgrave
Liurnia of the Lakes
- Academy of Raya Lucaria
- Beginner's Guide
Tips for Beginners
- Best Starting Classes
- Character Creation Guide
- Best Starting Keepsakes
- All Stats and Attributes
- All Status Effects
- How to Heal
- How to Level Up
- Rune Farming Guide
- What Happens When You Die?
- How to Upgrade Flasks
- What is Arcane?
- Where to Find Melina
- Best Early Game Weapons
- How to Remove Skills
- How to Increase Your Health
- What is Dexterity
Exploration Tips
- How to Save the Game
- Day and Night Cycle Differences
- How to Change Time
- How to Get the Mount
- How to Fast Travel
- Summoning Pool Stakes
- Illusory Walls Guide
- All Scarab Locations
- How to Use Stakes of Marika
- How to Sprint
- How to Get to Nokron
Combat Tips
- How to Parry
- How to Summon Spirits
- How to Guard Counter
- How to Backstab
- How to Two-Hand
- Best Spirit Ash Summons
- Best Builds and Stat Distribution
- How to Dual Wield: Power Stance Guide
- How to Upgrade Weapons
- Broken Arcane Stat
- Stat Scaling Explained
General Tips and Tricks
- All Boss Remembrances
- Best Equipment
- Covenants and Factions
- Trophies and Achievements List
- All Gestures and How to Unlock
- How Long to Beat Elden Ring
- How to Unlock New Game Plus
- How to Increase Memory Slots
- How to Get to The Roundtable Hold
- How to Alter Garments
- How to Strengthen Spirits
- How to Respec
- How to Equip Great Runes
- All Whetblades Locations
- All Buffs and Debuffs and What They Do
- How to Write Messages and Rate Them
- List of Weather Effects
- How to Leave a Boss Fight
- How to Pause the Game
- All Bell Bearings and How to Get Them
- Elden Ring Lore
Elden Ring Endings
- How to Get All Endings
- Elden Lord Ending
- Age of Stars Ending
- Lord of Frenzied Flame Ending
- All Starting Classes
- List of All Bosses
Main Bosses
- Godrick the Grafted
- Margit the Fell Omen
- Red Wolf of Radagon
- Rennala, Queen of the Full Moon
- Royal Knight Loretta
- Starscourge Radahn
- Godfrey, First Elden Lord
- Morgott, the Omen King
- Godskin Duo
- Maliketh, the Black Blade
- Hoarah Loux, Warrior
- Rykard, Lord of Blasphemy
- Sir Gideon Ofnir, the All-Knowing
- Radagon of the Golden Order
- Mohg, Lord of Blood
- Elden Beast
- Regal Ancestor Spirit
- Malenia, Blade of Miquella
- Astel, Naturalborn of the Void
- Lichdragon Fortissax
- Dragonlord Placidusax
Optional Bosses
- Cemetery Shade
- Grafted Scion
- Tree Sentinel
- Demi-Human Chief
- Flying Dragon Agheel
- Grave Warden
- Erdtree Burial Watchdog
- Bloodhound Knight Darriwil
- Soldier of Godrick
- Beastman of Farum Azula
- Stonedigger Troll
- Mad Pumpkin Head
- Tibia Mariner
- Black Knife Assassin
- Night's Cavalry
- Adan, Thief of Fire
- Magma Wyrm Makar
- Leonine Misbegotten
- Erdtree Avatar (East Liurnia)
- Draconic Tree Sentinel
- Alabaster Lord
- Cleanrot Knights
- Glintstone Dragon Smarag
- Spirit-Caller Snail
- Bols, Carian Knight
- Bloodhound Knight
- Royal Revenant
- Mohg, The Omen
- Borealis, the Freezing Fog
- Commander Niall
- Black Blade Kindred (Caelid)
- Black Blade Kindred (Mountaintops of the Giants)
- Putrid Grave Warden Duelist
- Alecto, Black Knife Ringleader
- Bell Bearing Hunter
- Godskin Noble
- Godskin Apostle
- Flying Dragon Greyll
- Frenzied Duelist
- Death Rite Bird
- Decaying Ekzykes
- Guardian Golem
- Godefroy the Grafted
- Miranda the Blighted Bloom
- Perfumer Tricia
- Full-Grown Fallingstar Beast
- Astel, Stars of Darkness
- Battlemage Hugues
- Demi-Human Queen Gilika
- Scaly Misbegotten
- Demi-Human Queen Maggie
- Necromancer Garris
- Demi-Human Queen Margot
- Commander O'Neil
- Sanguine Noble
- Red Wolf of the Champion
- Great Wyrm Theodorix
- Misbegotten Crusader
- Esgar, Priest of Blood
- Kindred of Rot
- Ancient Dragon Lansseax
- Elemer of the Briar
- Misbegotten Warrior
- Virgin Abductors
- Fallingstar Beast
- Valiant Gargoyles
- Putrid Avatar
- Vyke, Knight of the Roundtable
- Ancestor Spirit
- Crucible Knight Ordovis
- Nox Swordstress & Nox Priest
- Putrid Tree Spirit
- Glintstone Dragon Adula
- Crucible Knight
- Crucible Knight Siluria
- Ulcerated Tree Spirit
- Dragonkin Soldier
Mini Bosses
- Lion Guardian
- Valiant Gargoyle (Leyndell)
- Elder Dragon Greyoll
Hostile NPCs and Invaders
- Recusant Henricus
- Bloody Finger Nerijus
- Anastasia, Tarnished-Eater
- Festering Fingerprint Vyke
- Old Knight Istvan
- Rileigh the Idle
- Vargram the Raging Wolf & Errant Sorcerer Wilhelm
- Juno Hoslow, Knight of Blood
- Maleigh Marais, Shaded Castle Castellan
- Inquisitor Ghiza
- Mad Tongue Alberich
- Eleonora, Violet Bloody Finger
- All Weapon Skills
Ashes of War
- All Ashes of War
- Storm Blade
- Storm Stomp
- Determination
- Repeating Thrust
- Piercing Fang
- Barricade Shield
- Carian Glintsword
- Thunderbolt
- Holy Ground
Magic Spells
- List of All Magic Spells
- All Incantations
- Best Incantation Spells
- All Legendary Incantations
- All Sorceries
- All Legendary Sorceries
- All Dragon Incantations
- Best Sorcery Spells
- All Characters
- Merchant Kale
- Bloody Finger Hunter Yura
- White-Faced Varre
- Gatekeeper Gostoc
- Sorceress Sellen
- All Nomadic & Isolated Merchants
- Smithing Master Hewg
- Twin Maiden Husks
- Blaidd the Half-Wolf
- Kenneth Haight
- D, Hunter of the Dead
- Gideon Ofnir
- All Merchant Locations
- Nepheli Loux
- Enia, the Finger Reader
- Miriel, Pastor of Vows
- Blackguard Big Boggart
- Primeval Sorcerer Azur
- Two Fingers
- Three Fingers
- Pidia, Carian Servant
- Master Lusat
- Great Horned Tragoth
- The Great Jar
- List of All Items
Spirit Ashes
- Crafting Materials
- Arrows and Bolts
Bolstering Materials
- Archer Ashes
- Banished Knight Oleg
- Fanged Imp Ashes
- Kaiden Sellsword Ashes
- Lhutel the Headless
- Lone Wolf Ashes
- Mimic Tear Ashes
- Nightmaiden & Swordstress Puppets
- Noble Sorcerer Ashes
- Skeletal Militiamen Ashes
- Spirit Jellyfish Ashes
- Twinsage Sorcerer Ashes
- Wandering Noble Ashes
- Black Knifeprint
- Black Whetblade
- Celestial Dew
- Cursemark of Death
- Dark Moon Ring
- Dectus Medallion (Left)
- Dectus Medallion (Right)
- Dragon Heart
- Fingerslayer Blade
- Ghost-Glovewort Picker's Bell Bearing 1
- Ghost-Glovewort Picker's Bell Bearing 2
- Ghost-Glovewort Picker's Bell Bearing 3
- Godrick's Great Rune
- Great Rune of the Unborn
- Haligtree Secret Medallion (Left)
- Haligtree Secret Medallion (Right)
- Larval Tear
- Memory Stone
- Radahn's Great Rune
- Sanctified Whetblade
- Seedbed Curse
- Seluvis's Bell Bearing
- Smithing-Stone Miner's Bell Bearing 1
- Smithing-Stone Miner's Bell Bearing 2
- Smithing-Stone Miner's Bell Bearing 3
- Smithing-Stone Miner's Bell Bearing 4
- Whetstone Knife
- Ancient Dragon Smithing Stone
- Ghost Glovewort
- Golden Seed
- Grave Glovewort
- Sacred Tear
- Smithing Stone
- Somber Ancient Dragon Smithing Stone
- Somber Smithing Stone
- Baldachin's Blessing
- Bewitching Branch
- Blood Grease
- Clarifying Boluses
- Dragonwound Grease
- Drawstring Blood Grease
- Drawstring Fire Grease
- Drawstring Magic Grease
- Drawstring Soporific Grease
- Duelist's Furled Finger
- Elden Remembrance
- Festering Bloody Finger
- Finger Severer
- Fire Grease
- Flask of Cerulean Tears
- Flask of Crimson Tears
- Flask of Wondrous Physick
- Freezing Grease
- Furlcalling Finger Remedy
- Lands Between Rune
- Magic Grease
- Margit's Shackle
- Neutralizing Boluses
- Preserving Boluses
- Stanching Boluses
- Starlight Shard
- Stimulating Boluses
- Tarnished's Furled Finger
- Tarnished's Wizened Finger
- Thawfrost Boluses
- Throwing Dagger
- Best Talismans
- Assassin's Cerulean Dagger
- Assassin's Crimson Dagger
- Blessed Dew Talisman
- Cerulean Seed Talisman
- Crimson Seed Talisman
- Gold Scarab
- Longtail Cat Talisman
- Moon of Nokstella
- Prince of Death's Pustule
- Radagon's Soreseal
- Sacrificial Twig
- Shabriri's Woe
- Spelldrake Talisman
- List of Weapons
- Best Weapons List
- Standard Weapons
- Striking Weapons
- Piercing Weapons
- Slashing Weapons
- Magic Weapons
- Fire Weapons
- Holy Weapons
- Lightning Weapons
- Bleed Weapons
- Frost Weapons
- Poison Weapons
- Madness Weapons
Weapon Type List
- Colossal Sword
- Colossal Weapons
- Curved Greatsword
- Curved Swords
- Glintstone Staves
- Great Spears
- Greatswords
- Heavy Thrusting Swords
- Sacred Seals
- Straight Swords
- Thrusting Sword
- Great Hammers
Ranged Weapons
- Small Shields
- Medium Shields
- Greatshields
- List of All Equipment
- List of Helms
- List of Chest Armor
- List of Gauntlets
- List of Greaves
- News and Game Info
- All Official Trailers
- Release Date Guide
- Available Platforms
- Controller Layout
- Multiplayer Guide
- New Features
- Is there Crossplay?
- How to Preload
- Pre-Order Bonuses Guide
- What Are the Tarnished?
- Is Elden Ring a Souls Game?
- All Special Edition Differences
- PC and Console System Requirements
- Will Elden Ring Have DLC?
- Can You Change the Difficulty?
- What Was George R.R. Martin's Role?
Patch Notes
- All Patch Notes
- Version 1.02 Patch Notes
- Version 1.02.1 Patch Notes
- Version 1.02.2 Patch Notes
- Version 1.02.3 Patch Notes
- Version 1.03 Patch Notes
- Version 1.03.2 Patch Notes
- Version 1.03.3 Patch Notes
- Version 1.04 Patch Notes
- Version 1.04.1 Patch Notes
- Version 1.05 Patch Notes
- Version 1.06 Patch Notes
Message Boards
- All Message Boards
- Build Sharing Board
- Co-Op Board
- General Discussion Board
- Questions Board
Japanese Wiki (日本語版)
- エルデンリング攻略サイト
- 1 How to Get Coldbone Arrows (Flet...
- 2 How to Get Glovewort Picker's Be...
- 3 Black Flame | How to Get and How...
- 4 Oracle Bubbles | How to Get And ...
- 5 How to Get Spiritflame Arrows: S...
- We could not find the message board you were looking for.
Gaming News

Stellar Blade’s Skin Suit Makes It Harder

Nintendo Removes Twitter (X) Integration, Joining PS5 and...

Stellar Blade Review

Chrono Ark Review
More Gaming News
Popular Games

Genshin Impact Walkthrough & Guides Wiki

Honkai: Star Rail Walkthrough & Guides Wiki

Pokemon Scarlet and Violet (SV) Walkthrough & Guides Wiki

FF7 Rebirth Walkthrough & Guides Wiki

Stellar Blade Walkthrough & Guides Wiki

Monster Hunter Rise: Sunbreak Walkthrough & Guides Wiki

Persona 3 Reload Walkthrough & Guides Wiki

Palworld Walkthrough & Guides Wiki

Pokemon UNITE Walkthrough & Guides Wiki

Call of Duty Modern Warfare 3 (MW3) Walkthrough & Guides Wiki
Recommended Games

Super Smash Bros. Ultimate Walkthrough & Guides Wiki

Pokemon Legends: Arceus Walkthrough & Guides Wiki

FF7 Remake Walkthrough & Guides Wiki

New Pokemon Snap Walkthrough & Guides Wiki

Hyrule Warriors: Age of Calamity Walkthrough & Guides Wiki

The Legend of Zelda: Breath of the Wild Walkthrough & Guides Wiki
All rights reserved
ELDEN RING™ & ©BANDAI NAMCO Entertainment Inc. / ©2021 FromSoftware, Inc. The copyrights of videos of games used in our content and other intellectual property rights belong to the provider of the game. The contents we provide on this site were created personally by members of the Game8 editorial department. We refuse the right to reuse or repost content taken without our permission such as data or images to other sites.
- Popular Articles
IMAGES
VIDEO
COMMENTS
Divine Tower of East Altus is a Location in Elden Ring. It is one of the six Divine Towers. ... Start at central Leyndell's Avenue Balcony site of grace, then go up the stairs and turn left. Follow the road to the large door out of the central city. Go out the door and up the stairs in the ashy sandy area past a vicious mob.
Soluce Elden Ring - Tour Divine Isolée. Cheminement complet de la zone optionnelle, localisation des objets. Soluce Elden Ring - Tour Divine Isolée. Cheminement complet de la zone optionnelle, localisation des objets. ... il s'agira de vous rendre sur le Pont Divin de Leyndell puis d'utiliser le téléporteur se trouvant là-bas (image1-2-3).
Location. East Mountaintops of the Giants, accessible via a waygate in Leyndell, Royal Capital. While you can reach the waygate itself by getting caught in a teleporter trap in Tower of Return, the waygate will only activate if you arrive at the location naturally, which is by passing through the Roundtable Hold in Leyndell, Royal Capital.
Position de la Tour divine isolée et comment l'atteindre ? La méthode "normale" demande d'atteindre Leyndell, capitale royale, et de prendre l'énorme ascenseur, non loin de la zone qui ...
There's a large elevator at the bottom end of the walkway, which is inactive if you've never been here before, and a new Site of Grace to activate. Once done, head up the steps, and you'll see a ...
Leyndell, Royal Capital is a Legacy Dungeon you can encounter in the Altus Plateau area in Elden Ring. It is a massive, labyrinthine city with powerful enemies, multiple bosses, and many treasures.
Elden Ring's Leyndell, Royal Capital is a labyrinthine Legacy Dungeon, populated by tenacious adversaries, and led by a boss skilled in swordplay. In this Leyndell, Royal Capital walkthrough, we ...
The Leyndell, Royal Capital northeastern gate is accessible to players who have gathered two Great Runes, but cannot be accessed without visiting the Roundtable Hold. ... At the top of the tower is a trapped chest that will transport you close to the Divine Bridge site of grace. Once here, to the North-west (away from the Golem) there is an ...
The Elden Ring Divine Tower locations number six in total, in a rough circle across the Lands Between, starting with Limgrave Divine Tower. The Great Runes you find from killing certain bosses are ...
Divine Tower of East Altus: Gate; Capital Rampart. From the Capital Rampart site of grace just after the Draconic Tree Sentinel, continue across the bridge and into the building to continue. Take the elevator to the upper area, then continue following the path again until you reach the inner area of Leyndell.
The Divine Tower of East Altus is east of Leyndell, on the road to the Mountaintops of the Giants, and it's one of the easier ones to reach. You have to defeat Morgott before the path opens.
Vidéo combat contre le géant du pont divin : https://youtu.be/G3B7gWXiPngZone : Leyndell, Capitale Royale.Départ : Manoir fortifié, rez-de-chaussée.Arrivée :...
Leyndell is at the center of Elden Ring's lore--and at the center of the map itself. Given its significance to the story, it's no surprise that it's teeming important items, immense challenges ...
Leyndell, Ashen Capital is an instance of Leyndell, Royal Capital after it falls into ruin. This version of the capital is accessible only after making significant story progress, and is geared towards high-leveled players. The Ashen Capital features the same structures and landmarks as its intact counterpart, albeit significantly altered.
About Press Copyright Contact us Creators Advertise Developers Terms Privacy Policy & Safety How YouTube works Test new features NFL Sunday Ticket Press Copyright ...
East Capital Rampart. Enter the Royal Capital and ride the elevator upward and then follow the path to find a corpse with Magic Grease x3 in the corridor. Continue into the church and check the ...
To enter Leyndell, Royal Capital in Elden Ring, get to the Atlus Plateau and head northeast until you reach the city's outer walls, Tree Sentinels beat the Draconic Tree Sentinel. Jump Attacks ...
Working as of patch 1.05. This video shows how to use the Ruptured Crystal Tear to bypass the elevator in the Divine Bridge, skipping over a bunch of the gam...
Sure would appreciate someone who has taken Best of Moscow by high speed train from St. Petersburg could please share their impressions of this shore excursion. From the description this sounds like a very long day. Wondering how the 4 hour train trip was in terms of accommodations, etc. Also wha...
Welcome to a more in-depth look into the Leyndell Elevator Skip! In this video I go over how to skip the Royal Capital Barrier in Leyndell so you can skip t...
Simple tour to Lake Baikal: ~200€ Tour to the Gobi Desert: ~100€ Short excursions: ~50€ Total price: 350€ Short excursions (~50€) Gobi-Tour (~100€) Tour to Lake Baikal (~200€) Total price: 0€ Expenses: Public transport: ~50€ Self Cooking: ~5€ * 28 Tage = 140€ Total price: 190€ Public transport: ~30€ Taxi: ~50€
Leyndell, Royal Capital is one of the Legacy Dungeons that you can explore in Elden Ring. Read on for a complete walkthrough of the dungeon, its location on the map, list of bosses and how to beat them, and obtainable items in Leyndell, Royal Capital! ... Opening the chest will warp you straight to the Divine Bridge, where you can find the ...
Price per person. 641,69. View details. About the tour Reviews 10. 8 days / 7 nights. St. Petersburg Moscow. We offer you a unique opportunity to visit Russia's two largest cities, Moscow and St. Petersburg. This fascinating, week-long tour will take you to the historic Russian capitals that have always played the most important part in the ...