

OilReset.com Blog
How to reset the 2017 dodge journey engine oil life.

To reset the 2017 Dodge Journey engine oil life after an oil change service, please follow these instructions:
1. turn the ignition to run (one position before starting engine). 2. fully depress the accelerator pedal slowly three times within 10 seconds. 3. turn the ignition off and then start the engine to verify the indicator has been reset., related posts, wax vs. ceramic coating: which is better for your car’s paint.
When it comes to protecting your car’s paint there are 2 popular and easy-to-use products you can choose, car wax and ceramic coating. Car wax…
2002 Mercedes-Benz E 55 AMG Service Light Reset
The 2002 Mercedes-Benz E 320 service light or Flexible Service System (FSS) indicates when the vehicle is due for a Service A or Service B.…
2002 Mercedes-Benz E 430 Service Light Reset
2002 mercedes-benz e 320 service light reset, 2015 ford f-250 oil life reset instructions.
The Ford F-250 Oil Life Reset is performed when the vehicle has an oil change. The oil change intervals are based on how you drive,…
2021 Dodge Ram 1500 Oil Life Reset
Your vehicle’s engine oil change indicator system is a feature that helps you keep track of when your engine oil needs to be changed. This…
News and information from the automotive industry

Saturday Service

Vehicle Reviews

Cabin Filters

Friday Gadgets
Instructions.
Launching soon. Signup for updates.
Members Only

Practical Mechanic
Picture guides for home and auto hobby and repair.
Vehicle Maintenance
How to Reset the “Oil Change Due” Light on a Dodge Journey
Here is a super quick guide on how to reset the “Oil Change Due” light in your Dodge Journey!
If you buy through links on my site, I may earn a commission – at no cost to you. Every click helps; thank you for helping me keep this site active!
The “Oil Change Due” light comes on every 5,000-10,000 miles after being reset (depending on type of driving). This is a nice reminder that you need an oil change, but can be a bit annoying as well! Luckily it is very easy to reset this light. It is in the owner’s manual as well, but usually it is easier just to Google the solution! Here are the steps to reset the light.
Oil-Change Supplies:
- Mobil 1 Full-Synthetic 5w-20 Motor Oil
- Mopar Oil Filter – Dodge Journey (2009-2019) (both 4 Cyl 2.4L and 6 Cyl 3.5L)
- Oil Change Kit
Step by Step Instructions:
Reset the “Oil Change Due” Light using these steps:
- Start with the vehicle off. Do not press any foot pedals.
- Press the start button twice to get it to the “On/Run” setting.
- Press the gas pedal all the way to the floor 3 times within 10 seconds.
- Press the start button again to turn the vehicle to the “Off” setting.
Detailed Steps with Pictures:
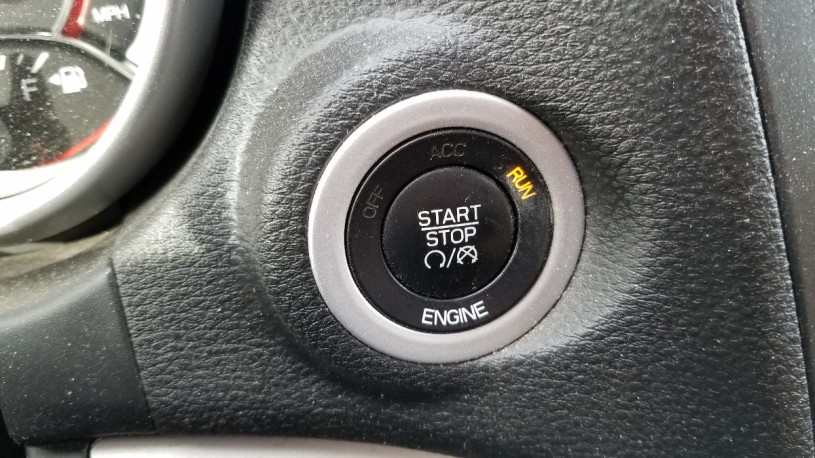
Start with the car in the off position. Normally you would press the brake with your foot and press the start button. In order to reset the “Oil Change Due” light, DON’T press the brake pedal with your foot.

Simply press the “Start” button twice, slowly, to get it into the “RUN” position.

Once in the “RUN” position, with your foot, press the accelerator pedal (gas pedal) all the way to the floor, then release. Repeat this a total of 3 times within 10 seconds.

Then press the “Start” button again to get it into the “OFF” position.

Now you can go ahead and start the vehicle as you normally would. The “Oil Change Due” light should now be off!
Supplies and Tools to Change Oil:
Thanks for reading. Check of these additional vehicle maintenance tips and tricks !
9 thoughts on “ How to Reset the “Oil Change Due” Light on a Dodge Journey ”
Add Comment
I’d wager those it’s not working for are stoping at the accessory position and not going to the run position. Press the start/stop 2x without your foot on any pedal- the car won’t crank without your foot on the brake. Then press accelerator 3x within 10 seconds then start stop again. It works, I promise!
Thanks for the comment, good tip!
We’ve tried this a million times, different speeds and it isn’t working, any other options?
Hi Michelle, sorry it’s not working for you.
Some other things to consider are that other factors can also play a role. For example, if the headlights are on, it may not work. Also, the emergency brake. Try to think of things like that, that could be affecting it.
Wish I had a better answer for you! Good luck!
Doesn’t work. Tried it 5 different times
Thanks. Very simple to do.
You’re welcome, glad to help!
I have been trying this and it will not go off. I just had an oil change. Is there any other tips on how to get it to turn off
Leave a comment Cancel reply

- Already have a WordPress.com account? Log in now.
- Subscribe Subscribed
- Copy shortlink
- Report this content
- View post in Reader
- Manage subscriptions
- Collapse this bar
How to Quickly Reset Oil Change Light in Dodge Journey: Expert Tips
Regular oil changes are crucial to maintaining the performance and longevity of your Dodge Journey. However, after getting an oil change, you may notice that the oil change light on your dashboard is still illuminated. This can be a bit frustrating, but fear not! In this article, we will guide you through the steps to reset the oil change light in your Dodge Journey, ensuring you have a smooth and hassle-free driving experience.
Step 1: Preparation
Before resetting the oil change light, make sure you have completed the oil change process and the engine is turned off. It is also a good idea to have a clean cloth or a paper towel handy in case you need to clean any oil residue.
Step 2: Locate the Controls
The location of the controls may vary depending on the year and model of your Dodge Journey. In most cases, you can find the control buttons on the steering wheel or the dashboard. Look for a cluster of buttons with symbols or labels, including ones for controlling the trip information or the settings of your vehicle.
Step 3: Turn on the Ignition
Insert your key into the ignition and turn it to the “ON” position without starting the engine. Make sure all the warning lights on the dashboard illuminate, and the radio or any other electrical accessories are turned off.
Step 4: Access the Settings
Now that the ignition is on, locate the button or buttons related to vehicle settings. These buttons are often labeled with a picture of a wrench or a gear. Press and hold the button until you see a menu or a sub-menu appear on the instrument cluster display.
Step 5: Navigate the Menu
Using the arrow buttons or the directional pad on your steering wheel, navigate through the menu until you find the “Oil Life” or “Oil Change” option. Select this option to proceed to the next step.
Step 6: Reset the Oil Change Light
Once you have selected the “Oil Life” or “Oil Change” option, you will see a prompt asking if you want to reset the oil change light. Choose “Yes” or “Reset” to confirm your action. In some models, you may need to press and hold the reset button for a few seconds to clear the oil change light.
Step 7: Verify the Reset
After resetting the oil change light, ensure that the light has turned off. You may need to restart your vehicle to allow the changes to take effect. If the light persists, repeat the process or consult your vehicle’s manual for further assistance.
Tips and Precautions
Here are some additional tips and precautions to keep in mind:
- Always refer to your Dodge Journey’s owner’s manual for model-specific instructions and information.
- Double-check that you have completed the oil change process before attempting to reset the oil change light.
- If you are uncertain about any steps or encounter any issues, seek professional help from a certified Dodge technician.
- Regularly scheduling oil changes as recommended by your vehicle’s manufacturer will help keep your engine running smoothly and prevent potential damage.
By following these steps and taking the necessary precautions, you can easily reset the oil change light in your Dodge Journey. Keeping up with regular oil changes and maintenance will ensure the optimal performance and longevity of your vehicle, giving you peace of mind on the road.
Frequently Asked Questions Of How To Quickly Reset Oil Change Light In Dodge Journey: Expert Tips
How do i reset the oil change light on my dodge journey.
To reset the oil change light on your Dodge Journey, follow these simple steps: 1. Turn your ignition key to the “ON” position without starting the engine. 2. Press the accelerator pedal three times within 10 seconds. 3. Turn the ignition off and then start the engine to ensure the oil change light is reset.
How Often Should I Reset The Oil Change Light On My Dodge Journey?
You should reset the oil change light on your Dodge Journey every time you change the oil, which is typically recommended every 3,000 to 5,000 miles.
Why Is My Oil Change Light Still On After Resetting It On My Dodge Journey?
If the oil change light on your Dodge Journey is still on after resetting it, it could indicate a potential issue with the oil level or the oil pressure. It is recommended to check the oil level and consult a mechanic if the light persists.
Can I Reset The Oil Change Light On My Dodge Journey Myself?
Yes, you can reset the oil change light on your Dodge Journey yourself by following the steps mentioned in the user manual or referring to online guides specific to your vehicle model.
Related posts:
- How to Quickly Reset Oil Change Light on Dodge Journey: Step-by-Step Guide
- How to Quickly Reset 2018 Dodge Journey Oil Light: Expert Guide
- How to Easily Reset Dodge Journey Oil Change Light: Complete Guide
- How to Quickly Reset Oil Light Dodge Grand Caravan: Expert Guide
Leave a Comment Cancel reply
Save my name, email, and website in this browser for the next time I comment.
Reset Oil Light Dodge Journey: The Ultimate Guide to Clearing the Oil Change Reminder
Last Updated on September 29, 2023 by Albert Duke
To reset the oil light on a Dodge Journey, start by turning the vehicle off. Then, press and hold the OK button while using the right arrow button to navigate to the “Oil Life” submenu screen.
Finally, release the OK button to reset the oil life.
Understanding The Oil Change Indicator System
To reset the oil light on a Dodge Journey, start the vehicle, turn it off, and repeat the process three times. This simple procedure will clear the oil change indicator system and ensure you stay on top of your vehicle’s maintenance needs without any hassle.
The Oil Change Indicator System in a Dodge Journey is an important feature that helps you keep track of when your vehicle needs an oil change. This system uses various sensors and algorithms to determine the condition of your oil and calculate when it needs to be changed.
Here’s how it works:
- The system constantly monitors factors such as engine speed, temperature, and driving conditions to assess the oil’s quality.
- It takes into account factors like mileage and time since the last oil change to determine when the oil is due for a change.
- When it’s time for an oil change, the system will display a warning message on the dashboard, typically saying “Oil Change Required” or displaying an oil can icon.
- Some newer Dodge Journey models may also provide a specific oil change percentage or countdown indicator.
How Does The Oil Change Indicator System Work?
The Oil Change Indicator System works by analyzing data from various sensors and algorithms to determine the condition of the oil, including factors like mileage, time since the last oil change, and engine performance. Here’s a breakdown of the process:
- The system uses sensors to monitor engine speed, temperature, and driving conditions, which helps assess the quality and condition of the oil.
- It takes into account factors like mileage and time since the last oil change to calculate how the oil is deteriorating.
- The data is processed by the system’s algorithm, which determines when the oil has reached a point where it needs to be changed.
- Once the system determines that the oil change is due, it will display a warning message or indicator on the dashboard to notify the driver.
Importance Of Servicing The Oil Change Reminder
Servicing the oil change reminder in your Dodge Journey is crucial to ensure the longevity and performance of your vehicle’s engine. Here’s why it’s important:
- Regular oil changes help keep your engine lubricated, reducing friction and wear between moving parts.
- Fresh oil helps remove contaminants and debris from the engine, preventing the buildup of sludge and improving engine performance.
- Neglecting the oil change reminder can lead to increased engine wear, reduced fuel efficiency, and potential engine damage.
- Maintaining a regular oil change schedule can help extend the life of your engine and improve overall vehicle reliability.
Remember to always follow your vehicle’s recommended oil change intervals and utilize your Dodge Journey’s Oil Change Indicator System as a helpful tool to keep your engine running smoothly.

Credit: www.wikihow.com
Steps To Reset Oil Light On Dodge Journey
To reset the oil light on a Dodge Journey, first, turn the vehicle off. Then, turn the vehicle back on and the oil light should be cleared.
To reset the oil light on your Dodge Journey, follow these simple steps:
Step 1: Start The Ignition
- Start your Dodge Journey by turning the ignition key or pressing the start button.
Step 2: Access The Settings Menu
- Locate and access the Settings menu on your Dodge Journey’s dashboard.
Step 3: Navigate To The Vehicle Info Submenu
- Inside the Settings menu, find and select the Vehicle Info submenu.
Step 4: Locate The Oil Life Option
- Look for the Oil Life option within the Vehicle Info submenu. It may be labeled differently on different models.
Step 5: Select The Oil Life Reset Option
- Once you’ve found the Oil Life option, select it to proceed with resetting the oil light.
Step 6: Confirm The Reset
- You will be prompted to confirm the oil light reset. Follow the on-screen instructions or press a designated button to confirm.
Step 7: Turn Off The Ignition
- Finally, turn off the ignition of your Dodge Journey to complete the oil light reset process.
By following these steps, you can easily reset the oil light on your Dodge Journey and ensure accurate maintenance reminders. Remember to consult your vehicle’s manual for specific instructions or contact a professional if you encounter any issues.
Frequently Asked Questions About Resetting The Oil Light
To reset the oil light in a Dodge Journey, start the vehicle, turn it off, then repeat the process two more times. This simple procedure will clear the oil change reminder message and ensure proper maintenance.
Can I Reset The Oil Light Without A Special Tool?
- Yes, you can reset the oil light on a Dodge Journey without needing a special tool. Here’s how:
- Start by turning the ignition key to the “ON” position without starting the engine.
- Fully depress the accelerator pedal slowly three times within a span of 10 seconds.
- Turn the ignition key to the “OFF” position.
- Start the engine to see if the oil light has been reset.
What Happens If I Don’T Reset The Oil Light?
- If you don’t reset the oil light on your Dodge Journey, it will continue to display the “Oil Change Due” message even after you have changed the oil. Here are the consequences of not resetting the oil light:
- You may not receive accurate maintenance reminders for future oil changes.
- Your vehicle’s performance monitoring systems may not function properly.
- Your Dodge Journey’s engine may be at risk of running with improper oil levels, potentially causing damage.
How Frequently Should I Reset The Oil Light?
- It’s important to reset the oil light after each oil change on your Dodge Journey to ensure accurate maintenance reminders. Here’s the recommended frequency for resetting the oil light:
- Reset the oil light every time you change the oil in your vehicle.
- If you are unsure about when to change the oil, refer to your vehicle’s owner’s manual for recommended maintenance intervals.
- Following the manufacturer’s recommendations will help keep your Dodge Journey running smoothly and maintain optimal engine performance.
Frequently Asked Questions Of Reset Oil Light Dodge Journey
How do you reset the oil light on a 2016 dodge journey.
To reset the oil light on a 2016 Dodge Journey, follow these steps: 1. Find the “Oil Life” submenu screen using the right arrow button. 2. Push and hold the OK button to reset the oil life. 3. The gauge and numeric display will reset.
4. The oil light should now be cleared. Note: Make sure to perform this reset after performing the scheduled maintenance.
How Do You Reset The Oil Light On A 2014 Dodge Journey?
To reset the oil light on a 2014 Dodge Journey, follow these steps: 1. Turn the vehicle off. 2. Press and hold the OK button. 3. Use the right arrow button to find the “Oil Life” submenu screen. 4. Release the OK button.
5. Push and hold the OK button to reset the oil life. 6. The gauge and numeric display should reset, indicating the oil light has been reset.
How Do You Reset The Oil Change Light On A 2009 Dodge Journey?
To reset the oil change light on a 2009 Dodge Journey, follow these steps: 1. Turn on the vehicle. 2. Use the right arrow button to find the “Oil Life” submenu screen. 3. Press and hold the OK button to reset the oil life.
4. The gauge and numeric display will reset, clearing the oil change message.
How Do I Reset My 2015 Dodge Journey?
To reset the oil light on your 2015 Dodge Journey, follow these simple steps. First, turn off the vehicle. Then, press and hold the OK button while using the right arrow button to find the “Oil Life” submenu screen. Finally, release the OK button to reset the oil life.
Resetting the oil light on your Dodge Journey is a simple process that can save you time and money. By following the steps outlined in this blog post, you can easily reset the oil light and ensure that your vehicle is running smoothly.
Remember to always consult your vehicle’s manual for specific instructions and guidelines. Regular oil changes are essential for maintaining the performance and longevity of your engine, so it’s important to stay on top of this maintenance task. With the information provided in this post, you can confidently reset the oil light on your Dodge Journey and keep your vehicle running smoothly for miles to come.
Don’t forget to bookmark this post for future reference and share it with others who may find it helpful. Keep your Journey on the road and enjoy your next adventure hassle-free.

View all posts
Leave a Comment Cancel reply
Save my name, email, and website in this browser for the next time I comment.
2020 Lomita Blvd, Torrance, CA 90101 United States
Proudly powered by WordPress

- Skip to primary navigation
- Skip to main content
- Skip to primary sidebar
Reset Your Oil Change Light
Oil Change Light Reset Procedures
Oil Change Light Reset Dodge Journey 2016 2017
The Oil Change Light Reset Dodge Journey 2016 2017 will need to be performed after every oil change. If it is not reset the system will be unable to properly track when your next oil change is due.
Below is the Oil Change Light Reset procedure for the Dodge Journey 2009 2010 2011 2012 2013 2014 2015 . Follow the steps below to reset the oil life monitor after each oil change.

Oil Change Light Reset Dodge Journey 2016 2017 Procedure
- Turn the ignition to the “RUN” position.
- Immediately press and release the accelerator pedal 3 times within 10 seconds.
- Turn the ignition off.
Oil Viscosity and Capacity
The 2.4 liter engine holds approximately 4.5 quarts (4.3 liters) of 5W-20 oil when the engine oil and filter are changed.
The 3.5 liter engine holds approximately 5.5 quarts (5.2 liters) of 10W-30 oil when the engine oil and filter are changed.
The 3.6 liter engine holds approximately 5.9 quarts (5.6 liters) of 5W-20 oil when the engine oil and filter are changed.
Not Working?
If the oil change light reset procedure is not working to reset your oil life monitor, make sure you are following each of the steps exactly and in the order displayed in the Oil Change Light Reset Dodge Journey 2016 2017 procedure above. If this is not the oil life monitor reset procedure for your vehicle, restart your oil light reset procedure search HERE
Oil Life Monitor Reset Procedure Frequently Asked Questions
If you are still having trouble with visit the Oil Life Monitor Reset Procedure Frequently Asked Questions (FAQ) page for more information.
Due to the wide range of vehicles makes and models, this is general information and should not be taken as specific to any vehicle. Please consult the vehicle manufacturer for the correct specifications and repair procedures for your vehicle. This information is meant to be used as a guideline only.
Choose country
- United Kingdom
- United States
Search results
Find a manual, oil change dodge journey 2008 - 2017 | haynes manuals, you are here.
 Petrol")
Dodge Journey


How to Reset Oil Life: Dodge Journey 2009-2016

Introduction: How to Reset Oil Life: Dodge Journey 2009-2016

This video will show you step by step instructions on how to reset your oil life indicator on a Dodge Journey 2009-20016
If you liked this video and found it helpful feel free to like, share, and comment to help us bring even better content. For more oil reset and DIY maintenance, make sure to subscribe to our channel!
For any question or suggestion, post a comment below or send us an email to: [email protected]
1-Turn the ignition to run (second position)
2-Press slowly the accelerator pedal all the way down three times within 10 sec.
3-Turn ignition OFF
4-Then turn the ignition to RUN or start the engine to verify if the oil life has been reset.

Recommendations

Paper and Cardboard Contest

Text Contest

Big and Small Contest

- Schedule an Appointment
2017 Dodge Journey Scheduled Maintenance
Get started.
- Find A Store
Get Work Done on Your Dodge Journey
Don’t let unexpected car trouble get the best of you. Stay ahead of potential problems and schedule a routine Dodge Journey maintenance appointment today.
Scheduled Maintenance for Your 2017 Dodge Journey
What is the recommended maintenance schedule for the 2017 Dodge Journey?
What to Know About 2017 Dodge Journey Scheduled Maintenance
Take care of your Dodge Journey and it'll take care of you. If you put in the effort to keep up with proper maintenance , your Journey could be on the road well past the 200,000 mile mark. So, you want to care for your car, but you’re not sure when to get certain services. It can be overwhelming, but fortunately, there’s a resource that takes the guesswork out of routine Journey maintenance. Rely on the recommended maintenance schedule that’s been created just for your 2017 Dodge Journey!
Dodge knows your vehicle inside and out (they made it, after all!), so they’ve designed this schedule with your car’s unique needs in mind. Driving conditions, climate variations, and other variables can affect which scheduled maintenance services you’ll need; however, recommended maintenance usually includes services like fluid exchanges, filter changes, new brake pads, oil changes, and tire rotations. Staying on track with routine service appointments can help your Journey perform better, increase your vehicle safety, and prevent common 2017 Dodge Journey problems.
Essential Maintenance to Keep Your Dodge Journey Running Newer, Longer
Come to Firestone Complete Auto Care for manufacturer-recommended routine maintenance on your 2017 Dodge Journey and a skilled technician will start the appointment with a Courtesy Check. A Courtesy Check helps "set the stage" for your service and catch any small problems before they turn into big repairs. Every Courtesy Check will include a visual inspection of your Journey. We’ll check your head and tail lights, fluid levels, filters, tires (and their alignment!), and windshield wiper blades. We’ll also perform a free battery check to determine your battery’s charge level.
Maybe it's time to find a new auto battery for your 2017 Dodge Journey. If your current battery is more than three years old, it may be time for a replacement (batteries typically last somewhere between three and five years). Depending on the climate where you live and your habits while driving, your Journey may need a replacement battery sooner. Short trips and extreme temperatures can shorten the overall life expectancy of your Dodge Journey battery. Sure, you could wait until your battery is completely dead, but it’s a much wiser decision to replace it before you need to. If you keep driving on a battery that can't hold a charge, you run the risk of being stranded when your battery finally gives out (and no one can predict where that might be!). Your Dodge Journey won’t even be able to start with a weak battery, much less get you where you need to go.
Staying on schedule for battery replacements and motor oil changes can support your engine’s overall performance and keep your 2017 Dodge Journey running newer, longer. To learn how often Dodge recommends you have the oil changed in your 2017 Journey, check out the information table at the beginning of this page. Don’t forget, though, that weather conditions in your area or your personal driving habits can affect this interval. Talk to a Firestone Complete Auto Care technician to know when to change your oil. We'll also help you understand what type of oil to use for your 2017 Dodge Journey.
Periodic service to the steering system in your Dodge Journey can not only ensure a smooth ride; it can also help you maintain control of your car in compromised road conditions. Don’t let a misalignment or pulling steering wheel put you in danger. You can count on Firestone Complete Auto Care’s trained technicians to inspect this system and, if needed, provide Dodge Journey steering and suspension services including wheel alignment, strut replacement, power steering fluid changes, ball joint lubrication, and wheel bearing replacement. Prevent damage or premature wear and tear on your Dodge Journey's steering system with regular maintenance.
If you skip recommended Dodge Journey services, you might find yourself with a hot mess on your hands – quite literally. A damaged A/C system is never fun, and an overheated engine can cause significant issues (like a total car breakdown!). We can help you with all those issues. Our technicians have the knowledge and tools to repair and maintain the heating and cooling systems for your Dodge Journey’s engine, and we can service your A/C system, too. Is your Dodge Journey radiator in need of replacement? We got it. A/C smelling musty? We'll fix it. Firestone Complete Auto Care is the place to go for 2017 Dodge Journey maintenance.
Don’t wait until something goes wrong with your car. Visit your nearest location for proactive maintenance today.
2017 Dodge Journey Maintenance Questions
Take an active role in maintaining your 2017 Dodge Journey. Get answers to common Dodge Journey maintenance questions and learn more about caring for your vehicle.
- When should I have Dodge Journey alignment checked? Watch out for pothole damage. If your 2017 Journey is pulling to one side or the other, your tires or suspension system could be calling out for help.
- When should I use high mileage oil in my Dodge Journey? If your Dodge Journey has ticked past 75,000 miles, consider switching to high mileage oil at your next oil change to give your engine what it needs to go another 75,000 (or more!). High mileage oil: make it a high priority!
- Can Dodge dashboard warning lights wait? Don't ignore dashboard warning lights! Bring your Dodge Journey in for a diagnostic code scan as soon as a dashboard warning light flashes on, whether it's your check engine or battery light. Dashboard lights alert you to trouble under the hood.
Erwin Salarda
Sales and Technical Support : 0915 568 4578

HOW TO RESET: Dodge Journey Oil Change Reminder Reset
Dodge journey oil change due reminder reset.
Easy to follow tutorial on HOW TO RESET the Oil Change Due Reminder Indicator on Dodge Journey (Crew, Crossroad, Express, GT, Limited, Lux, Mainstreet, R/T, SE, SE Value, SE/AVP, SXT) from year 2009-2010-2011-2012-2013-2014-2015-2016-2017-2018-2019-2020.

- Shift the gearbox to Park Position.
- Close all doors.
- Push the start button to RUN Position (Ignition On) Don’t start the engine.
- Fully depress the GAS PEDAL slowly three times within 10 seconds Make sure to depress the pedal all the way down.
- Turn the ignition off and start the engine to verify the indicator has been reset. Repeat this procedure, if the message still illuminates when you start the engine.
Warning: Reset only the Oil Life after Oil Change.
About Dodge Journey
The Dodge Journey is a mid-size crossover SUV manufactured and marketed by FCA’s Dodge brand since model year 2009, with a facelift for the 2011 model year. With styling by Ryan Nagode, the Journey is marketed globally in both left and right hand drive. In many markets, the SUV was marketed as the Fiat Freemont. (source:wiki)
The 2011 reworking brought a much nicer interior and a better V6, but the lack of agility and still-mediocre fuel economy keep it out of the top ranks. Plus it was more expensive than many better rivals.
Dodge Journey 3.6L V6 Engine Oil Change Guide How to change the motor oil and replace the filter in a 2011 to 2014 Dodge Journey with the Pentastar 3.6L V6 engine.
Copyright 2024 � PaulsTravelPictures.com All Rights Reserved �
Privacy Policy About Paul & Author Contact Info

- Dodge Manuals
- JOURNEY 2019
- User manual
Dodge JOURNEY 2019 User Manual
- Quick reference manual (17 pages)
- page of 212 Go / 212
Table of Contents
- How to Find Your Owner'smanual Online
- How to Use this Manual
- Essential Information
- Warnings and Cautions
- Graphical Table of Contents
- Instrument Panel
- Ignition Switch
- Keyless Push Button Ignition
- Remote Start - if Equipped
- How to Use Remote Start
- To Enter Remote Start Mode
- General Information
- Vehicle Security Alarm - if Equipped
- To Arm the System
- To Disarm the System
- Keyless Enter-N-Go - Passive Entry (if Equipped)
- Child-Protection Door Lock System
- Manual Adjustment (Rear Seats)
- Front Heated Seats
- Head Restraints
- Supplemental Active Head Restraints (AHR) - Front Seats
- Rear Head Restraint Adjustment
- Rear Head Restraint Removal
- Steering Wheel
- Tilt/Telescoping Steering Column
- Heated Steering Wheel - if Equipped
- Exterior Lights
- Multifunction Lever
- Daytime Running Lights (DRL)
- High/Low Beam Switch
- Flash-To-Pass
- Automatic Headlights
- Headlights on with Wipers (Available with Automatic Headlights Only)
- Headlight Time Delay
- Fog Lights - if Equipped
- Turn Signals
- Wipers and Washers
- Windshield Wiper Operation
- Rear Window Wiper/Washer
- Climate Controls
- Automatic Climate Controls Overview
- Climate Control Functions
- Automatic Temperature Control (ATC) - if Equipped
- Operating Tips
- Power Windows
- Wind Buffeting
- Power Sunroof - if Equipped
- Opening Sunroof
- Closing Sunroof
- Sunshade Operation
- Anti Pinch Protect Feature
- Sunroof Maintenance
- Ignition off Operation
- Universal Garage Door Opener (Homelink)
- Before You Begin Programming Homelink
- Erasing All the Homelink Channels
- Identifying Whether You Have a Rolling Code or Non-Rolling Code Device
- Programming Homelink to a Garage Door Opener
- Programming Homelink to a Miscellaneous Device
- Reprogramming a Single Homelink Button
- Internal Equipment
- Power Outlets
- Power Inverter - if Equipped
- Roof Luggage Rack - if Equipped
- Instrument Cluster Display
- Instrument Cluster Display Location and Controls
- Oil Change Due
- Instrument Cluster Display Selectable Menu Items
- Battery Saver On/Battery Saver Mode Message - Electrical Load Reduction Actions - if Equipped
- Warning Lights and Messages
- Red Warning Lights
- Yellow Warning Lights
- Green Indicator Lights
- White Indicator Lights
- Blue Indicator Lights
- Onboard Diagnostic System - Obd II
- Onboard Diagnostic System (OBD II) Cybersecurity
- Auxiliary Driving Systems
- Tire Pressure Monitoring System (TPMS)
- Occupant Restraint Systems
- Occupant Restraint Systems Features
- Important Safety Precautions
- Seat Belt Systems
- Supplemental Restraint Systems (SRS)
- Child Restraints
- Transporting Pets
- Safety Tips
- Transporting Passengers
- Exhaust Gas
- Safety Checks You Should Make Inside the Vehicle
- Periodic Safety Checks You Should Make Outside the Vehicle
- Engine Break-In Recommendations - Gasoline Engine
- Speed Control - if Equipped
- To Activate
- To Set a Desired Speed
- To Vary the Speed Setting
- To Accelerate for Passing
- To Resume Speed
- To Deactivate
- PARKSENSE REAR PARK ASSIST - if EQUIPPED Parksense Sensors
- Parksense Warning Display
- Enabling and Disabling Parksense
- Parksense System Usage Precautions
- Parkview Rear Back up Camera
- Refueling the Vehicle
- Loose Fuel Filler Cap Message
- Materials Added to Fuel
- Trailer Towing
- Trailer Towing Weights (Maximum Trailer Weight Ratings)
- Recreational Towing (Behind Motorhome, Etc.)
- Towing this Vehicle Behind Another Vehicle
- Bulb Replacement
- Replacement Bulbs
- Interior Fuses
- Underhood Fuses (Power Distribution Center)
- Jacking and Tire Changing
- Jack Location
- Spare Tire Location and Removal
- Preparations for Jacking
- Jacking Instructions
- Road Tire Installation
- Spare Tire Stowage
- Jump Starting
- Preparations for Jump Start
- Jump Starting Procedure
- If Your Engine Overheats
- 2.4L Engine - if Equipped
- Gear Selector Override
- Freeing a Stuck Vehicle
- Towing a Disabled Vehicle
- All-Wheel Drive (AWD) Models
- Front-Wheel Drive (FWD) Models
- Enhanced Accident Response System (Ears)
- Event Data Recorder (Edr)
- Scheduled Servicing
- Maintenance Plan
- Engine Compartment
- 2.4L Engine
- Raising the Vehicle
- Tire Safety Information
- Tires - General Information
- Spare Tires - if Equipped
- Wheel and Wheel Trim Care
- Department of Transportation Uniform Tire Quality Grades
- Traction Grades
- Temperature Grades
- Wheel and Tire Torque Specifications
- Torque Specifications
- Flexible Fuel (3.6L Engine Only)
- E-85 General Information
- Fluid Capacities
- Fluids and Lubricants
- Mopar Accessories
- Authentic Accessories by Mopar
- Cybersecurity
- Radio 4.3 & 4.3S
- Radio 4.3 & 4.3S at a Glance
- Uconnect 3/3 Nav with 8.4-Inch Display
- Uconnect 3/3 NAV at a Glance
- Uconnect Settings
- Steering Wheel Audio Controls
- Left Switch
- Right Switch
- Playing Ipod/Usb/Mp3 Devices
- Audio Jack (AUX)
- SD Card (3/3 NAV Only)
- Bluetooth Streaming Audio
- Video Entertainment System (Ves)
- System Operation
- Operation of the Remote
- Auxiliary Audio/Video Input Jacks
- Navigation Overview
- Main Navigation Menu
- Following Your Route
- Siriusxm Travel Link (3 NAV Only)
- Uconnect Phone
- Uconnect Phone (Bluetooth Hands Free Calling)
- Pairing a Phone
- Making a Phone Call
- Receiving a Call - Accept (and End)
- Common Phone Commands (Examples)
- Mute (or Unmute) Microphone During Call
- Transfer Ongoing Call between Handset and Vehicle
- Voice Command Tips (3/3 NAV Only)
- Changing the Volume
- Voice Text Reply
- Uconnect Voice Command (3/3 Nav Only)
- Common Voice Commands (Examples)
- Common Navigation Voice Commands
- If You Need Assistance
- FCA US LLC Customer Center
- FCA Canada Inc. Customer Center
- In Mexico Contact
- Puerto Rico and U.S. Virgin Islands
- Customer Assistance for the Hearing or Speech Impaired (TDD/TTY)
- Service Contract
- Reporting Safety Defects
- In the 50 United States and Washington
- Publication Order Forms
Advertisement
Quick Links
Related manuals for dodge journey 2019.

Summary of Contents for Dodge JOURNEY 2019
- Page 1 2019 JOURNEY USER GUIDE...
- Page 2 I M P O R T A N T Get warranty and othe r informati on online – you ca n revi ew an d prin t or d o wn lo a d a c op y o f t h e Ow n er ’s M a n u a l, Na viga ti on/U connect manuals and the limited warra n ti es p rovi d ed b y FCA US L LC f or y ou r ve h ic le b y vi si tin g w ww.mopar.com (U.S.) or www.owners.mopar.ca (Ca n ad a ).
Page 3: How To Find Your Owner'smanual Online
Page 4: how to use this manual, page 5: graphical table of contents, page 6: table of contents.
- Page 7 To Accelerate For Passing ... . . 114 Jump Starting Procedure ... . . 135 WARNING LIGHTS AND MESSAGES ..60 Red Warning Lights .
- Page 8 E-85 General Information ... . . 164 USB Port ..... 181 Voice Text Reply .
Page 9: Instrument Panel
Page 10: interior, page 11: keys.
- Page 12 The Panic Alarm will stay on for three minutes To Lock The Doors And Liftgate Backup Starting Method unless you turn it off by either pushing the Panic In case the ignition switch does not change with Push and release the lock button on the key fob button a second time or drive the vehicle at a the push of a button, the key fob may have a low to lock all doors and liftgate.
Page 13: Ignition Switch
Page 14: remote start - if equipped, page 15: general information, page 16: to disarm the system.
- Page 17 • If the vehicle is unlocked by Passive Entry and To Unlock From The Passenger Side: no door is opened within 60 seconds, the With a valid Passive Entry key fob within 5 ft vehicle will re-lock and if equipped will arm (1.5 m) of the passenger door handle, grab the the security alarm.
- Page 18 If one of the vehicle doors is open and the vehicle is locked with a door panel switch, key fob button or door handle button, once all open doors have been closed the vehicle checks the inside and outside of the vehicle for any valid Passive Entry key fobs.
Page 19: Child-Protection Door Lock System
Page 20: seats, page 21: manual adjustment (rear seats).
- Page 22 2. Place one hand on the seatback and apply a Manual Folding Second Row Seat WARNING! gentle pressure. To Fold The Seat Do not drive the vehicle with the seat in this 3. Lift the control lever with the other hand, position, as it is only intended for entering and allow the seatback to move forward slightly, exiting the third row seats.
- Page 23 The seatback can also be locked in the reclined To Unfold The Seat To Fold The Seatback position. To do so, pull the latch release-loop Raise the seatback and lock it in place. Pull the latch release-loop located at the top of located at the top of the seatback upward, allow the seatback upward, push the seatback for- the seatback to recline, and release the...
Page 24: Front Heated Seats
Page 25: supplemental active head restraints (ahr) - front seats, page 26: rear head restraint adjustment, page 27: rear head restraint removal, page 28: exterior lights, page 29: daytime running lights (drl), page 30: headlights on with wipers (available with automatic headlights only), page 31: wipers and washers, page 32: rear window wiper/washer, page 33: climate controls.
- Page 34 Automatic Climate Controls Descriptions Icon Description MAX A/C Button Press the button on the touchscreen to change the current setting, the indicator illuminates when MAX A/C is on. Pressing it again turns the MAX A/C operation to switch into manual mode and the MAX A/C indicator turns off. NOTE: The MAX A/C button is only available on the touchscreen.
- Page 35 Icon Description Rear Defrost Button The Rear Defrost Control button turns on the rear window defroster and the heated outside mirrors (if equipped). An indicator will illuminate when the rear window defroster is on. The rear window defroster automatically turns off after ten minutes. Rear Climate Control Button Press and release this button to access the rear climate controls.
- Page 36 Icon Description Faceplate Knob Blower Control Blower Control is used to regulate the amount of air forced through the climate system. There are seven blower speeds avail- able. The speeds can be selected using either the blower control knob on the faceplate or the buttons on the touchscreen. •...
- Page 37 Icon Description Floor Mode Floor Mode Air comes from the floor outlets. A slight amount of air is directed through the defrost and side window demister outlets. Mix Mode Mix Mode Air is directed through the floor, defrost, and side window demister outlets. This setting works best in cold or snowy conditions that require extra heat to the windshield.
- Page 38 Icon Description Rear Auto Button Automatically controls the rear interior cabin temperature by adjusting airflow distribution and amount. Performing this func- tion will cause the system to switch between manual mode and automatic modes. Refer to "Automatic Operation" within this section for more information.
- Page 39 Icon Description Blower Control Blower Control is used to regulate the amount of air forced through the climate system. There are seven blower speeds avail- able. Adjusting the blower will cause automatic mode to switch to manual operation. The speeds can be selected using the buttons on the touchscreen.
- Page 40 1. Adjust the Rear Blower, Rear Temperature Rear Automatic Temperature Control (ATC) NOTE: and the Rear Modes to suit your comfort • It is not necessary to move the temperature needs. settings. The system automatically adjusts the temperature, mode and fan speed to pro- 2.
- Page 41 Icon Description Bi-Level Mode Bi-Level Mode Air comes from both the headliner outlets and the floor outlets. NOTE: In many temperature positions, the Bi-Level mode is designed to provide cooler air out of the headliner outlets and warmer air from the floor outlets. Floor Mode Floor Mode Air comes from the floor outlets.
Page 42: Climate Control Functions
Page 43: automatic temperature control (atc) - if equipped, page 44: windows.
- Page 45 To close the window part way, pull the window Auto-Down Feature Window Lockout Switch switch up to the first detent and release it when The driver's power window switch has an Auto- The window lockout switch on the driver's door you want the window to stop.
Page 46: Wind Buffeting
Page 47: opening sunroof, page 48: hood, page 49: universal garage door opener (homelink), page 50: before you begin programming homelink, page 51: programming homelink to a garage door opener, page 52: programming homelink to a miscellaneous device, page 53: internal equipment.
- Page 54 CAUTION! • Do not exceed the maximum power of 160 Watts (13 Amps) at 12 Volts. If the 160 Watt (13 Amp) power rating is ex- ceeded the fuse protecting the system will need to be replaced. • The power outlet on the bottom of the center console shares the fuse with the power outlet on the back of the console.
- Page 55 Power Outlet Fuses 1 — F103 20 Amp Yellow — Power Outlet Console Bin And Power Outlet Console Rear 2 — F102 20 Amp Yellow — Cigar Lighter Instrument Panel And Power Outlet Left Rear Cargo Area...
Page 56: Power Inverter - If Equipped
Page 57: roof luggage rack - if equipped.
- Page 58 2. Relocate the crossbars, aligning the crossbar The tie down holes on the crossbar ends CAUTION! stanchions (end pieces) with one of the ver- should always be used to tie down the load. • Crossbars should remain equally spaced or tical marks on the outboard surface of the Check the straps frequently to be sure that the parallel at any roof rack position for proper...
Page 59: Instrument Cluster Display
Page 60: oil change due.
- Page 61 Load reduction is only active when the engine is The electrical loads that may be switched off (if • Unusual driving cycles (short trips separated running. It will display a message if there is a equipped), and vehicle functions which can be by long parking periods).
Page 62: Warning Lights And Messages
- Page 63 Warning Light, which will turn on when the Operation of the Brake Warning Light can be — Engine Coolant Temperature Warn- brake fluid level in the master cylinder has checked by turning the ignition switch from the ing Light dropped below a specified level. OFF position to the ON/RUN position.
- Page 64 transmission in PARK or NEUTRAL, until the This indicates a possible problem with the elec- turn off. If the light remains on with the vehicle light turns off. Once the light turns off, you may trical system or a related component. running, your vehicle will usually be drivable;...
Page 65: Yellow Warning Lights
- Page 66 — Electronic Stability Control (ESC) — Electronic Stability Control (ESC) Off CAUTION! Active Warning Light — If Equipped Warning Light — If Equipped steering. If a tire puncture occurs, repair This warning light will indicate when the Elec- This warning light indicates the Electronic Sta- immediately using the dedicated tire repair tronic Stability Control system is Active.
- Page 67 tire failure. Under-inflation also reduces fuel vehicle that prevent the TPMS from functioning — Anti-Lock Brake (ABS) Warning efficiency and tire tread life, and may affect the properly. Always check the TPMS malfunction Light vehicle’s handling and stopping ability. telltale after replacing one or more tires or This warning light monitors the Anti-Lock Brake wheels on your vehicle to ensure that the re- Please note that the TPMS is not a substitute for...
Page 68: Green Indicator Lights
Page 69: onboard diagnostic system (obd ii) cybersecurity, page 70: auxiliary driving systems.
- Page 71 Warning Light. Driving the vehicle may cause • The TPMS is not a substitute for proper tire CAUTION! maintenance, and it is the driver’s responsibil- the tire pressure to rise to approximately 28 psi • Using aftermarket tire sealants may cause ity to maintain correct tire pressure using an (193 kPa), but the Tire Pressure Monitoring the Tire Pressure Monitoring System...
- Page 72 The TPMS consists of the following compo- NOTE: nents: When filling warm tires, the tire pressure may need to be increased up to an additional 4 psi • Receiver module (28 kPa) above the recommended cold placard • Four tire pressure monitoring sensors pressure in order to turn the Tire Pressure Moni- toring System Warning Light off.
- Page 73 TEM" message will no longer display, and a chime will sound. In addition, the graphic in display a new pressure value instead of dashes the instrument cluster will still display a pres- (- -), as long as no tire pressure is below the pressure value will display in place of the sure value in a different color and an "Inflate low-pressure warning limit in any of the four...
Page 74: Occupant Restraint Systems
Page 75: seat belt systems.
- Page 76 The outboard front passenger seat BeltAlert is Enhanced Seat Belt Use Reminder System BeltAlert Warning Sequence not active when the outboard front passenger (BeltAlert) The BeltAlert warning sequence is activated seat is unoccupied. BeltAlert may be triggered when the vehicle is moving above a specified Driver and Passenger BeltAlert (if equipped) when an animal or other items are placed on the vehicle speed range and the driver or outboard...
- Page 77 Lap/Shoulder Belts WARNING! WARNING! All seating positions in your vehicle are • It is dangerous to ride in a cargo area, lap/shoulder belt or a lap belt for more than equipped with lap/shoulder belts. inside or outside of a vehicle. In a collision, one person, no matter what their size.
- Page 78 1. Enter the vehicle and close the door. Sit WARNING! WARNING! back and adjust the seat. • A seat belt that is too loose will not protect modify the seat belt system. Seat belt 2. The seat belt latch plate is above the back of you properly.
- Page 79 6. To release the seat belt, push the red button belt away from your neck. Push or squeeze the NOTE: anchorage button to release the anchorage, and The adjustable upper shoulder belt anchorage is on the buckle. The seat belt will automati- move it up or down to the position that serves equipped with an Easy Up feature.
- Page 80 Position the lap belt snug and low below the Seat Belt Extender WARNING! abdomen and across the strong bones of the If a seat belt is not long enough to fit properly, long enough and only use in the recom- hips.
- Page 81 essary to comfortably wrap around the occu- Energy Management Feature — If Equipped pant’s mid-section. Slide the latch plate into the The front outboard seat belt system is equipped buckle until you hear a "click." and the second row outboard seat belt system In Automatic Locking Mode, the shoulder belt is may be equipped with an Energy Management automatically pre-locked.
- Page 82 How To Engage The Automatic Locking Mode How The Active Head Restraints (AHR) Work WARNING! 1. Buckle the combination lap and shoulder The Occupant Restraint Controller (ORC) deter- • Failure to replace the seat belt assembly belt. mines whether the severity or type of rear im- could increase the risk of injury in colli- pact will require the Active Head Restraints sions.
- Page 83 Active Head Restraint (AHR) Components: NOTE: WARNING! For more information on properly adjusting and positioning the head restraint, refer to “Head • All occupants, including the driver, should Restraints” in “Getting To Know Your Vehicle.” not operate a vehicle or sit in a vehicle’s seat until the head restraints are placed in Resetting Active Head Restraints (AHR) their proper positions in order to minimize...
Page 84: Supplemental Restraint Systems (Srs)
- Page 85 • The Air Bag Warning Light remains on after Front Air Bags the four to eight-second interval. This vehicle has front air bags and lap/shoulder • The Air Bag Warning Light comes on intermit- belts for both the driver and front passenger. tently or remains on while driving.
- Page 86 Driver And Passenger Front Air Bag WARNING! WARNING! Features • Being too close to the steering wheel or • No objects should be placed over or near The Advanced Front Air Bag system has multi- instrument panel during front air bag de- the air bag on the instrument panel or stage driver and front passenger air bags.
- Page 87 When the ORC detects a collision requiring the Front Air Bag Operation Supplemental Driver Knee Air Bag front air bags, it signals the inflator units. A Front Air Bags are designed to provide addi- This vehicle is equipped with a Supplemental large quantity of non-toxic gas is generated to tional protection by supplementing the seat Driver Knee Air Bag mounted in the instrument...
- Page 88 The SABs may help to reduce the risk of occu- the door. The SAB moves at a very high speed pant injury during certain side impacts, in ad- and with such a high force that it could injure dition to the injury reduction potential provided occupants if they are not seated properly, or if by the seat belts and body structure.
- Page 89 The SABIC deploys downward, covering the side The Side Air Bags will not deploy in all side WARNING! windows. An inflating SABIC pushes the out- collisions, including some collisions at certain vehicle. Do not add roof racks that require side edge of the headliner out of the way and angles, or some side collisions that do not im- permanent attachments (bolts or screws) covers the window.
- Page 90 Air Bag System Components Rollover Events WARNING! Side Air Bags are designed to activate in certain NOTE: seat belts properly and sit upright with rollover events. The ORC determines whether The Occupant Restraint Controller (ORC) moni- their backs against the seats. Children the deployment of the Side Air Bags in a par- tors the internal circuits and interconnecting must be properly restrained in a child re-...
- Page 91 irritation, rinse the area with cool water. For If A Deployment Occurs Enhanced Accident Response System nose or throat irritation, move to fresh air. If The front air bags are designed to deflate imme- In the event of an impact, if the communication the irritation continues, see your doctor.
- Page 92 • Cut off battery power to the: Enhanced Accident Response System Reset WARNING! – Engine Procedure • It is dangerous to try to repair any part of – Electric Motor (if equipped) In order to reset the Enhanced Accident Re- the air bag system yourself.
Page 93: Child Restraints
- Page 94 Before buying any restraint system, make sure • Canadian residents should refer to Transport NOTE: that it has a label certifying that it meets all Canada’s website for additional information: • For additional information, refer to http:// applicable Safety Standards. You should also http://www.tc.gc.ca/eng/motorvehiclesafety/ www.nhtsa.gov/parents-and-caregivers or call: make sure that you can install it in the vehicle...
- Page 95 Infant And Child Restraints WARNING! WARNING! Safety experts recommend that children ride Do not install a rear-facing car seat using a • Never place a rear-facing child restraint in rear-facing in the vehicle until they are two years rear support leg in this vehicle. The floor of front of an air bag.
- Page 96 Older Children And Child Restraints Integrated Child Booster Seat — If WARNING! Equipped Children who are two years old or who have • Improper installation can lead to failure of The Integrated Child Booster Seat is located in outgrown their rear-facing convertible child seat an infant or child restraint.
- Page 97 To position a child into the Integrated Child 3. Lift the seat cushion up and push back to 6. Slide the latch plate up the webbing as far as lock it in the booster seat position. Booster Seat follow these steps: necessary to allow the seat belt to go around the child’s lap.
- Page 98 If the answer to any of these questions was Children Too Large For Booster Seats WARNING! “no,” then the child still needs to use a booster Children who are large enough to wear the seat in this vehicle. If the child is using the In a severe collision, the booster seat may be shoulder belt comfortably, and whose legs are lap/shoulder belt, check seat belt fit periodically...
- Page 99 Recommendations For Attaching Child Restraints Restraint Type Combined Weight of the Use Any Attachment Method Shown With An “X” Below Child + Child Restraint LATCH – Lower Anchors Seat Belt Only LATCH – Lower Anchors Seat Belt + Top Tether Only + Top Tether Anchor Anchor...
- Page 100 Your vehicle is equipped with the child restraint Lower Anchors And Tethers For CHildren LATCH Positions For Installing Child anchorage system called LATCH, which stands Restraints In This Vehicle (LATCH) Restraint System for Lower Anchors and Tethers for CHildren. The LATCH system has three vehicle anchor points for installing LATCH-equipped child seats.
- Page 101 Frequently Asked Questions About Installing Child Restraints With LATCH Use the LATCH anchorage system until the combined weight of the child What is the weight limit (child’s weight + weight and the child restraint is 65 lbs (29.5 kg). Use the seat belt and tether an- of the child restraint) for using the LATCH anchor- 65 lbs (29.5 kg) chor instead of the LATCH system once the combined weight is more than...
- Page 102 facing child restraints will also be equipped Locating The LATCH Anchorages Locating The Upper Tether Anchorages with a tether strap. The tether strap will have a hook at the end to attach to the top tether The lower anchorages are round bars that are There are tether strap anchorages behind each anchorage and a way to tighten the strap after it found at the rear of the seat cushion where it...
- Page 103 2. Left outboard and center seating positions WARNING! (3 and 2): Install the first child seat in the • If you are installing three child restraints left outboard seating position using lower next to each other, you must use the seat anchorages D and E.
- Page 104 1. Loosen the adjusters on the lower straps and 5. Tighten all of the straps as you push the child straint installation, instead of buckling it behind on the tether strap of the child seat so that restraint rearward and downward into the seat. the child restraint, route the seat belt through you can more easily attach the hooks or Remove slack in the straps according to the...
- Page 105 are designed to keep the lap portion of the seat Installing Child Restraints Using The Ve- Lap/Shoulder Belt Systems For Installing belt tight around the child restraint so that it is hicle Seat Belt Child Restraints In This Vehicle not necessary to use a locking clip. The ALR Child restraint systems are designed to be se- retractor can be “switched”...
- Page 106 Frequently Asked Questions About Installing Child Restraints With Seat Belts What is the weight limit (child’s weight + weight Always use the tether anchor when using the seat belt to install a forward of the child restraint) for using the Tether Anchor Weight limit of the facing child restraint, up to the recommended weight limit of the child re- with the seat belt to attach a forward facing child...
- Page 107 2. Pull enough of the seat belt webbing from 7. Finally, pull up on any excess webbing to Installing A Child Restraint With A Cinching the retractor to pass it through the belt path tighten the lap portion around the child re- Latch Plate (CINCH) —...
- Page 108 2. Next, pull enough of the seat belt webbing Any seat belt system will loosen with time, so Installing Child Restraints Using The Top from the retractor to pass it through the belt check the belt occasionally, and pull it tight if Tether Anchorage path of the child restraint.
- Page 109 1. Look behind the seating position where you 2. Route the tether strap to provide the most plan to install the child restraint to find the direct path for the strap between the anchor tether anchorage. You may need to move the and the child seat.
Page 110: Transporting Pets
Page 111: safety checks you should make inside the vehicle, page 112: periodic safety checks you should make outside the vehicle.
- Page 113 Door Latches Check for proper closing, latching, and locking. Fluid Leaks Check area under the vehicle after overnight parking for fuel, coolant, oil, or other fluid leaks. Also, if gasoline fumes are detected or if fuel, or brake fluid leaks are suspected. The cause should be located and corrected immediately.
Page 114: Engine Break-In Recommendations - Gasoline Engine
Page 115: to activate, page 116: to accelerate for passing, page 117: parksense rear park assist - if equipped parksense sensors.
- Page 118 • Jackhammers, large trucks, and other vibra- can result in the system misinterpreting a WARNING! close object as a sensor problem, causing the tions could affect the performance of mount and hitch ball assembly, depending “SERVICE PARK ASSIST SYSTEM” message ParkSense.
Page 119: Parkview Rear Back Up Camera
Page 120: refueling the vehicle, page 121: loose fuel filler cap message, page 122: trailer towing, page 123: recreational towing (behind motorhome, etc.), page 124: bulb replacement, page 125: fuses, page 126: interior fuses, page 127: underhood fuses (power distribution center).
- Page 128 Cavity Cartridge Fuse Mini-Fuse Description F139 40 Amp Green – Climate Control System Blower F140 30 Amp Pink – Power Locks F141 40 Amp Green – Anti-Lock Brake System F142 40 Amp Green – Glow Plugs – If Equipped F143 40 Amp Green –...
- Page 129 Cavity Cartridge Fuse Mini-Fuse Description F163 50 Amp Red – Cabin Heater #2 – If Equipped F164 – 25 Amp Clear Powertrain Auto Shutdown F165 – 20 Amp Yellow Powertrain Shutdown F166 – 20 Amp Yellow Spare F167 – 30 Amp Green Powertrain Shutdown F168 –...
Page 130: Jacking And Tire Changing
Page 131: preparations for jacking.
- Page 132 WARNING! • Turn on the Hazard Warning flasher. • Block the wheel diagonally opposite the wheel to be raised. • Apply the parking brake firmly and set the transmission in PARK. • Never start or run the engine with the vehicle on a jack.
- Page 133 3. Place the jack in the notches underneath the WARNING! lift area that is closest to the flat tire. Center the jack saddle between the drain flute for- Raising the vehicle higher than necessary mations on the sill flange. Turn the jack can make the vehicle less stable.
- Page 134 7. Install the wheel nuts with the cone-shaped 10. Lower the jack to its fully closed position. end of the nut toward the wheel. Lightly 11. Place the deflated (flat) tire in the cargo tighten the wheel nuts. area. Do not stow the deflated tire in the spare tire stowage location.
Page 135: Road Tire Installation
Page 136: spare tire stowage, page 137: jump starting procedure, page 138: if your engine overheats, page 139: 2.4l engine - if equipped, page 140: towing a disabled vehicle, page 141: all-wheel drive (awd) models, page 142: enhanced accident response system (ears), page 143: scheduled servicing, page 144: maintenance plan.
- Page 145 Mileage or time passed (whichever comes first) Or Years: Or Kilometers: Additional Inspections Inspect the CV joints. Inspect front suspension, tie rod ends, and replace if necessary. Inspect the brake linings, parking brake function. Additional Maintenance Replace engine air filter. Replace air conditioning filter.
- Page 146 ** The spark plug change interval is mileage Heavy Duty Use Of The Vehicle based only, yearly intervals do not apply. Change engine oil at 4,000 miles (6,500 km) or 350 hours of engine run time if the vehicle is WARNING! operated in a dusty and off road environment or is operated predominately at idle or only very...
Page 147: Engine Compartment
Page 148: l engine, page 149: raising the vehicle.
- Page 150 Tire Sizing Chart EXAMPLE: Example Size Designation: P215/65R15XL 95H, 215/65R15 96H, LT235/85R16C, T145/80D18 103M, 31x10.5 R15 LT P = Passenger car tire size based on U.S. design standards, or "..blank.." = Passenger car tire based on European design standards, or LT = Light truck tire based on U.S.
- Page 151 EXAMPLE: Load Identification: Absence of the following load identification symbols on the sidewall of the tire indicates a Standard Load (SL) tire: • XL = Extra load (or reinforced) tire, or • LL = Light load tire or • C, D, E, F, G = Load range associated with the maximum load a tire can carry at a specified pressure Maximum Load –...
- Page 152 EXAMPLE: 01 = Number representing the year in which the tire was manufactured (two digits) • 01 means the year 2001 • Prior to July 2000, tire manufacturers were only required to have one number to represent the year in which the tire was manufactured. Example: 031 could represent the 3rd week of 1981 or 1991 Tire Terminology And Definitions Term...
- Page 153 This placard tells you important information Tire Loading And Tire Pressure about the: NOTE: 1. Number of people that can be carried in the The proper cold tire inflation pressure is listed vehicle. on the driver’s side B-Pillar or the rear edge of the driver's side door.
- Page 154 (4) The resulting figure equals the avail- To determine the maximum loading conditions Metric Example For Load Limit of your vehicle, locate the statement “The com- able amount of cargo and luggage load For example, if “XXX” amount equals 635 kg bined weight of occupants and cargo should capacity.
Page 156: Tires - General Information
- Page 157 three hours, or driven less than 1 mile (1.6 km) Tire Inflation Pressures Tire Pressures For High Speed Operation after sitting for a minimum of three hours. The The proper cold tire inflation pressure is listed The manufacturer advocates driving at safe cold tire inflation pressure must not exceed the on the driver's side B-Pillar or rear edge of the speeds and within posted speed limits.
- Page 158 Radial Ply Tires Run Flat Tires — If Equipped Tire Spinning Run Flat tires allow you the capability to drive When stuck in mud, sand, snow, or ice condi- WARNING! 50 miles (80 km) at 50 mph (80 km/h) after a tions, do not spin your vehicle's wheels above rapid loss of inflation pressure.
- Page 159 • Tire pressure - Improper cold tire inflation Keep dismounted tires in a cool, dry place with pressures can cause uneven wear patterns to as little exposure to light as possible. Protect develop across the tire tread. These abnormal tires from contact with oil, grease, and gasoline. wear patterns will reduce tread life, resulting Replacement Tires in the need for earlier tire replacement.
Page 160: Tire Types
Page 161: spare tires - if equipped.
- Page 162 Inflate collapsible tire only after the wheel is Compact Spare Tire — If Equipped WARNING! properly installed to the vehicle. Inflate the The compact spare is for temporary emergency collapsible tire using the electric air pump be- Compact and collapsible spares are for tem- use only.
Page 163: Wheel And Wheel Trim Care
Page 164: department of transportation uniform tire quality grades, page 165: traction grades, page 166: wheel and tire torque specifications, page 167: fluid capacities, page 168: fluids and lubricants, page 169: chassis.
- Page 170 EXTERIOR: • Fog Lights • Molded Splash Guards • Front Air Deflector • Hitch Receiver INTERIOR: • Cargo Tray • Slush Mats • Door Sill Guards • Premium Carpet Floor Mats • Katzkin Leather Interiors ELECTRONICS: • Park Assist • Mopar Web (Wi-Fi) •...
Page 171: Cybersecurity
Page 172: radio 4.3 & 4.3s.
- Page 173 Displaying The Time Audio Settings Balance/Fade • If the time is not currently displayed at the top • Push the SETTINGS button on the faceplate • Press the “Balance/Fade” button on the of the screen when in Radio mode, push the on the right side of the unit.
Page 174: Radio
- Page 175 • To access the Radio mode, push the RADIO Store Radio Presets Manually button on the upper left side of the faceplate. Your radio can store 12 total preset stations. They are shown at the top of your screen. To see Selecting Radio Stations all 12 stations, press the “All”...
Page 176: Media
- Page 177 • The iPod/CD/AUX controls are accessed by NOTE: pushing the PLAYER button on the faceplate Uconnect will usually automatically switch to to enter the Player main screen, then press the the appropriate mode when something is first “Source” button on the touchscreen and connected or inserted into the system.
Page 178: Uconnect 3/3 Nav With 8.4-Inch Display
- Page 179 • Press “+” or “–” next to Set Time Hours and Displaying The Time Equalizer Set Time Minutes to adjust the time. • If the time is not currently displayed on the • Press the “Equalizer” button on the touch- radio or player main page, press the “More”...
Page 180: Radio
Page 181: media, page 182: uconnect settings, page 183: steering wheel audio controls, page 184: sd card (3/3 nav only), page 185: operation of the remote, page 186: main navigation menu.
- Page 187 Acquiring Satellites Finding A Place By Spelling The Name Setting Or Changing Your Home Location • The GPS Satellite strength bars indicate the • From the Main Navigation Menu press “Where • Press the “Nav” button on the touchscreen in strength of your satellite reception.
Page 188: Following Your Route
Page 189: siriusxm travel link (3 nav only), page 190: uconnect phone.
- Page 191 Start Pairing Procedure On Mobile Phone NOTE: Keep in mind that software updates – either on • Search for available devices on your Bluetooth your phone or Uconnect system – may interfere enabled mobile phone. This is usually within with the Bluetooth connection. If this happens, Settings or Options under “Bluetooth.”...
- Page 192 Phone Menu Screen — Radio 4.3 & 4.3S 1 — Redial Last Number 7 — Manage Paired Phones 2 — Phone Signal 8 — Conference Call 3 — Current Phone 9 — Direct Dial 4 — Phone Battery Level 10 — Recent Call List 5 —...
- Page 193 Phone Menu Screen — Uconnect 3/3 NAV 1 — Favorite Phonebook Entries 8 — Manage Paired Phones 2 — Phone Battery Level 9 — SMS (text messaging) 3 — Current Phone 10 — Direct Dial 4 — Phone Signal 11 — Recent Call List 5 —...
Page 194: Making A Phone Call
Page 195: voice text reply, page 196: uconnect voice command (3/3 nav only).
- Page 197 • Locating an address can be given as a one The following chart lists the navigation voice WARNING! commands that may be available. shot entry. For example, after saying “Find Address” and the system is ready, you can say Any voice commanded system should be Navigation Voice Commands: the entire address in one command, used only in safe driving conditions following...
Page 198: If You Need Assistance
Page 199: customer assistance for the hearing or speech impaired (tdd/tty), page 200: reporting safety defects, page 201: index.
- Page 202 Compact Spare Tire ... . .160 Towing ....138 Flexible Fuel Vehicles Engine .....145 Contract, Service .
- Page 203 Headlights iPod/USB/MP3 Control ..174, 179, 181 Air Bag ....60, 82, 109 Automatic ....27 Bluetooth Streaming Audio .
- Page 204 Loading Vehicle Octane Rating, Gasoline (Fuel) ..166 Inverter ....54 Tires ....151 Oil, Engine .
- Page 205 Panic Alarm ....10 Lap/Shoulder Belt Untwisting ..77 Spark Plugs ....166 Replacement Bulbs .
- Page 206 Tires ... .110, 154, 159, 162 Tire Safety Information... .147 Vehicle Storage ....41 Aging (Life Of Tires) .
- Page 211 D O D G E . C O M ( U . S . ) D R I V I N G A N D The driver’s pri ma ry r es p on si b ili ty i s th e safe opera ti on of th e ve h icl e.
- Page 212 Dodge brand vehicle. Simply download the app, select your make and model and enjoy the ride. To get this app, go...
Rename the bookmark
Delete bookmark, delete from my manuals, upload manual.
2017 Dodge Journey Oil Type
All 2017 Dodge Journey trims appear to use the same type of oil: 5W/20
Acceptable Oil Types

Engine Code: ED3
Change Period: 10000 miles/ 12 months
Oil Capacity
Engine Code: Pentastar FlexFuel
Dodge Journey

- Manufacturer: Dodge
- Model: Dodge Journey
For the 2017 model year Dodge Journey we have found 3 trims and their corresponding recommended oil type.
Click on the name of the trim to open up the panel and learn more about the oil type, volume and change period.
Similar Years
OilType.co is a free online resource where volunteers catalogue the most popular cars and their oil types.
Along with the oil types we also keep track of the oil capacities, including the filter capacities (if available).
Just browse to the home page and use the drop-down menu to find the car you are looking for.
All information shown on this site is to be taken as advice only.
We have done our best to ensure that it is as accurate as possible.
Find Your Way
- Car Manufacturers
- Privacy Policy
IMAGES
VIDEO
COMMENTS
In this video I will show you how to reset the oil life on a 2016 and 2017 Dodge Journey Van. If you have any questions or comments, feel free to ask.Here ar...
Learn how to reset the oil life indicator on your 2017 Dodge Journey after an oil change service. Follow these simple steps: turn the ignition, depress the accelerator pedal, and start the engine.
In order to reset the "Oil Change Due" light, DON'T press the brake pedal with your foot. Simply press the "Start" button twice, slowly, to get it into the "RUN" position. Once in the "RUN" position, with your foot, press the accelerator pedal (gas pedal) all the way to the floor, then release. Repeat this a total of 3 times ...
A video tutorial on how to reset the oil life light on a 2011 - 2022 Dodge Journey. This reset procedure will also clear the Oil Change Due message. After ...
13mm to take off drain plug 24mm to take off filter and 6qts of oil needed
To reset the oil change light on your Dodge Journey, follow these simple steps: 1. Insert the key into the ignition and turn it to the "on" position, without starting the engine. 2. Fully press the accelerator pedal three times within 10 seconds. 3. Turn the ignition off, then start the engine to see if the oil change light has been reset.
Step 5: Turn off the Ignition. Finally, turn off the ignition and then start your Dodge Journey normally. The oil change light should no longer be illuminated, indicating that the reset was successful. If the light is still on, repeat the steps again to ensure the reset process was done correctly. It's important to note that the exact steps ...
To reset the oil change light on your Dodge Journey, follow these simple steps: 1. Turn your ignition key to the "ON" position without starting the engine. 2. Press the accelerator pedal three times within 10 seconds. 3. Turn the ignition off and then start the engine to ensure the oil change light is reset.
Press the Accelerator all the way down slowly 3 times within a 10-second interval. Turn the ignition to " OFF/LOCK .". For push-button start models, press the " Engine Start/Stop " button once without holding the brake pedal to turn the electronics off. If the steps were performed correctly, the "Oil Change Due" light should be ...
To reset the oil change light on a 2009 Dodge Journey, follow these steps: 1. Turn on the vehicle. 2. Use the right arrow button to find the "Oil Life" submenu screen. 3. Press and hold the OK button to reset the oil life. 4. The gauge and numeric display will reset, clearing the oil change message.
After your oil change and servicing is complete, you might need to reset the Oil Change Indicator system in your Dodge. Learn how to do this by following the directions below: Step 1: Insert key into the ignition and turn key to "ON" without starting the engine. Step 2: Slowly depress the accelerator pedal three times in succession in under ...
Learn how to reset the oil life monitor after each oil change for your Dodge Journey 2016 2017. Follow the simple steps and check the oil viscosity and capacity for your engine.
Your 2017 Dodge Journey features an automatic oil change message to let you know when an oil change is required. This feature will help you know how often to...
20 minutes. Here's the sump plug. Don't forget to have a suitably sized receiving tray in place. With an oil catchment tray in position, use a 13mm spanner or socket to carefully remove the sump plug and fully drain the oil. When the sump has emptied, wipe clean the sump plug area with a paper towel and refit the sump plug and washer.
Step 4: 4-Then turn the ignition to RUN or start the engine to verify if the oil life has been reset. How to Reset Oil Life: Dodge Journey 2009-2016: This video will show you step by step instructions on how to reset your oil life indicator on a Dodge Journey 2009-20016 If you liked this video and found it helpful feel free to like, share, and ...
Your local Firestone Complete Auto Care has some of the best motor oil for Dodge Journeys. We'll take care of you quickly, with the right engine oil at a competitive price. Call ahead to find out how much oil changes cost for 2017 Dodge Journeys. Let the experts take care of your Journey's engine by making an oil change appointment today.
Bring your Dodge Journey in for a diagnostic code scan as soon as a dashboard warning light flashes on, whether it's your check engine or battery light. Dashboard lights alert you to trouble under the hood. View your 2017 Dodge Journey maintenance schedule, including manufacturer recommendations for oil changes, batteries, brakes, A/C service ...
Dodge Journey Oil Change Due Reminder Reset. Easy to follow tutorial on HOW TO RESET the Oil Change Due Reminder Indicator on Dodge Journey (Crew, Crossroad, Express, GT, Limited, Lux, Mainstreet, R/T, SE, SE Value, SE/AVP, SXT) from year 2009-2010-2011-2012-2013-2014-2015-2016-2017-2018-2019-2020.
DODGE JOURNEY OIL LIGHT RESET. HOW TO RESET OIL LIFE. OIL Change Due ResetIf you need to reset the oil light or clear the Oil Change Due message on Dodge Jou...
To reset the "Oil Change Due" or "Oil Change Required" message on the display, follow these steps: 1. Turn the ignition to the "Run" position (or press the "Engine Start/Stop" button twice) but do not start the engine. 2. Press the accelerator (gas) pedal down to the floor 3 times within 10 seconds. 3.
Automobile Dodge journey 2017 Owner's Manual (524 pages) Automobile Dodge Journey 2017 User Manual (180 pages) Automobile Dodge Journey2017 Quick Reference Manual ... At Every Oil Change Interval As Indicated By Oil Change Indicator System: • Change oil and filter. • Rotate the tires. Rotate at the first sign of irregular wear, even if it ...
I change the oil in our 2017 Dodge Journey.If you'd like to donate to me outside of this platform, there are several ways you can do so.LiberaPay: https://li...
Cars. Dodge. Journey. 2017. All 2017 Dodge Journey trims appear to use the same type of oil: 5W/20. Journey 2.4 16V Expand. Journey 3.6 V6 Expand. Journey 3.6 V6 AWD Expand.