Where to Find Downloaded Files in Safari on a Mac and How to Manage Them
After downloading a file, it's not always easy to find where it saved. Here's how to find and manage Safari downloads on your Mac.
While browsing the web in Safari, it’s common to need to download files from different websites. But sometimes it can be a challenge to find where these Safari downloads are saved.
Below are several ways to find and manage Safari downloads on your Mac.

How to Download Files Using Safari
There are different ways to save items from Safari to your Mac , depending on the type of item you want to save. While some items in webpages can’t be downloaded, files, images, software, and apps often come with a dedicated download button. Otherwise, Control-click or two-finger tap an item to save or download it.
It’s best not to download software or apps if they aren’t from a trusted source.
Where to Find Safari Downloads on a Mac
Unless you’ve chosen otherwise, items that you’ve downloaded from Safari automatically go to your Downloads folder. To find this, open Finder and click Downloads from the sidebar or press Cmd + Option + L .
You can change where your downloaded files save, if you want:
- Head to Safari > Preferences .
- Click the General tab. Go to File download location , then choose from the popup. Select Ask for each download if you want to be in more control of each download.
- If you want to select a specific destination, click Other and select your desired folder.
Use the Downloads Button in Safari
Quickly access your downloads in Safari by clicking the Downloads button, a downward arrow enclosed in a circle icon on the top-right of the Safari window. Note that this won’t appear unless you’ve recently downloaded an item.
Open the Downloads Stack in the Dock
Another way to immediately access your downloaded files is through the Dock. Your recent downloads are often found on the right side of the Dock in a stack. Hover over it to preview the contents or click to expand it.
Open the Downloads Folder in Finder
As we already mentioned, you can also find your Safari downloads using Finder. This is a valuable utility to locate items on our Mac. Simply click the magnifying button on your menu bar and type "downloads," or go to your Dock and click Finder to open the Finder window.
You can usually find the Downloads folder in the sidebar, under Favorites.
How to Manage Your Safari Downloads
There are several ways to manage your in-progress or completed downloads in Safari. To perform these actions, open the Downloads menu in Safari itself. Here’s what you can do:
- Pause Downloads: If you’re currently downloading, click the stop button beside the file name to pause the download, then click the resume button to resume it again.
- Remove a downloaded item: If you want to remove a single item from the list, Control-click the item and select Remove from List . You can also remove all your recently downloaded items by clicking Clear in the top right of the popup.
By default, Safari automatically deletes downloaded items after a day. If you want to change this:
- Go to Safari > Preferences .
- Click General , then go to Remove download list items . Choose from After one day , When Safari quits , Upon successful download , or Manually .
Manage Your Safari Downloads
There is a lot of content you can download on the web, and simply knowing how to download it is usually half the battle. But once you’ve done that, you can use the tips in this guide to find and manage your Safari downloads with ease, even customizing your download preferences to get fuller control over where your files save and when they get deleted.

We explain and teach technology, solve tech problems and help you make gadget buying decisions.
How to view and Manage Safari downloads on iPhone and iPad
Dilum Senevirathne is a freelance tech writer specializing in topics related to iOS, iPadOS, macOS, Microsoft Windows, and Google web apps. Besides Guiding Tech, you can read his work at iPhone Hacks, Online Tech Tips, Help Desk Geek, MakeUseOf, and Switching to Mac.
Arshmeet has been a tech tinkerer since childhood, but she realized her love for technology and writing about 5 years ago. Since then, she has been honing her skills and helping people figure out how things work, troubleshoot problems, choose the right app and products, and dig deep into the new and old concepts of technology. She is a self-professed Apple Enthusiast who loves debating what’s good and what’s not. It is her passion for finding techniques, hacks, apps, and products that make everyday life simpler.
Safari is usually easygoing, whether using Safari Tabs , Private browsing , or even changing the default search engine . However, finding and managing Safari downloads may not be immediately apparent to most users. But why fear, when you have this guide by your side?
Now, effectively managing Safari downloads on iPhone or iPad is crucial for organizing files and optimizing storage space. It’s wiser to understand where the downloads are saved, how to change the download location, how to clear the download history and more. So, just read along.
How to Download Files On iPhone From Safari
While the process might differ slightly depending on the website’s UI, the overall premise is the same. Browse to the file you want to download → tap the download icon → tap Download to confirm the action.
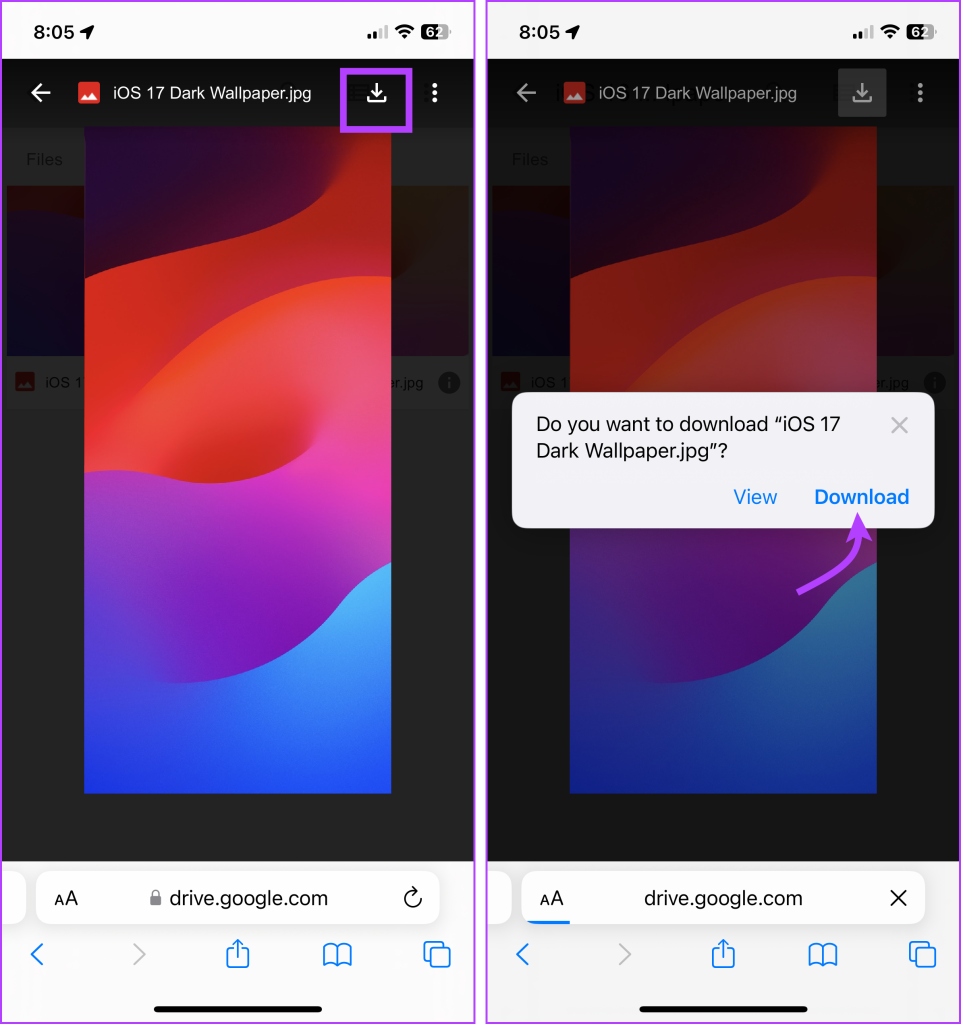
A downloading icon will appear next to the address bar as the download starts. You can click on it to see the download status.
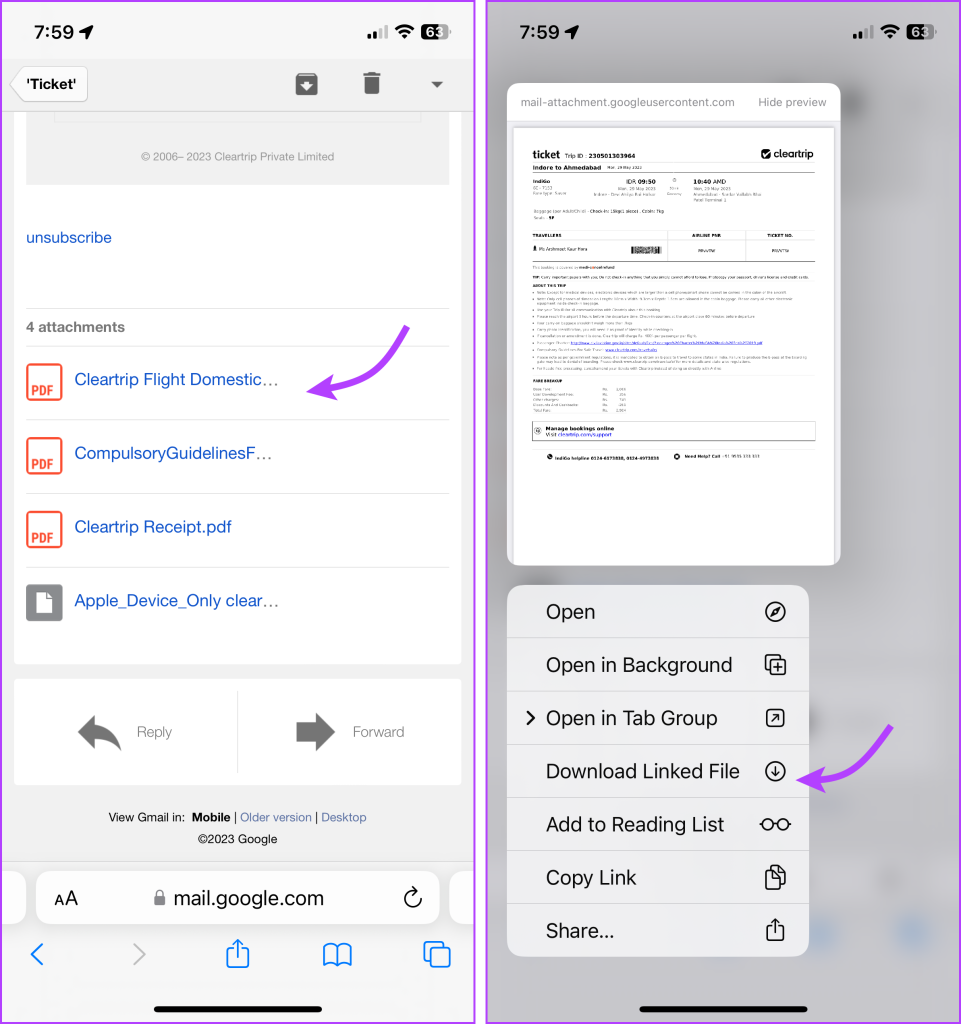
Although if you don’t have to have an actual download link or button to initiate a download in the first place. For instance, you came across a link to a PDF that you can open in the browser. Instead of downloading using the Share Sheet, you can simply hold and press the link or image and then select Download Linked File.
Pause or Resume the download
Downloading a big file can make a severe dent in cellular data. However, the great news is that you can pause the download and resume it once you have a Wi-Fi connection, saving your precious mobile data .
To pause a download, tap the Download button → select Downloads → tap the X icon next to the downloading file. And to resume, simply tap the refresh icon.
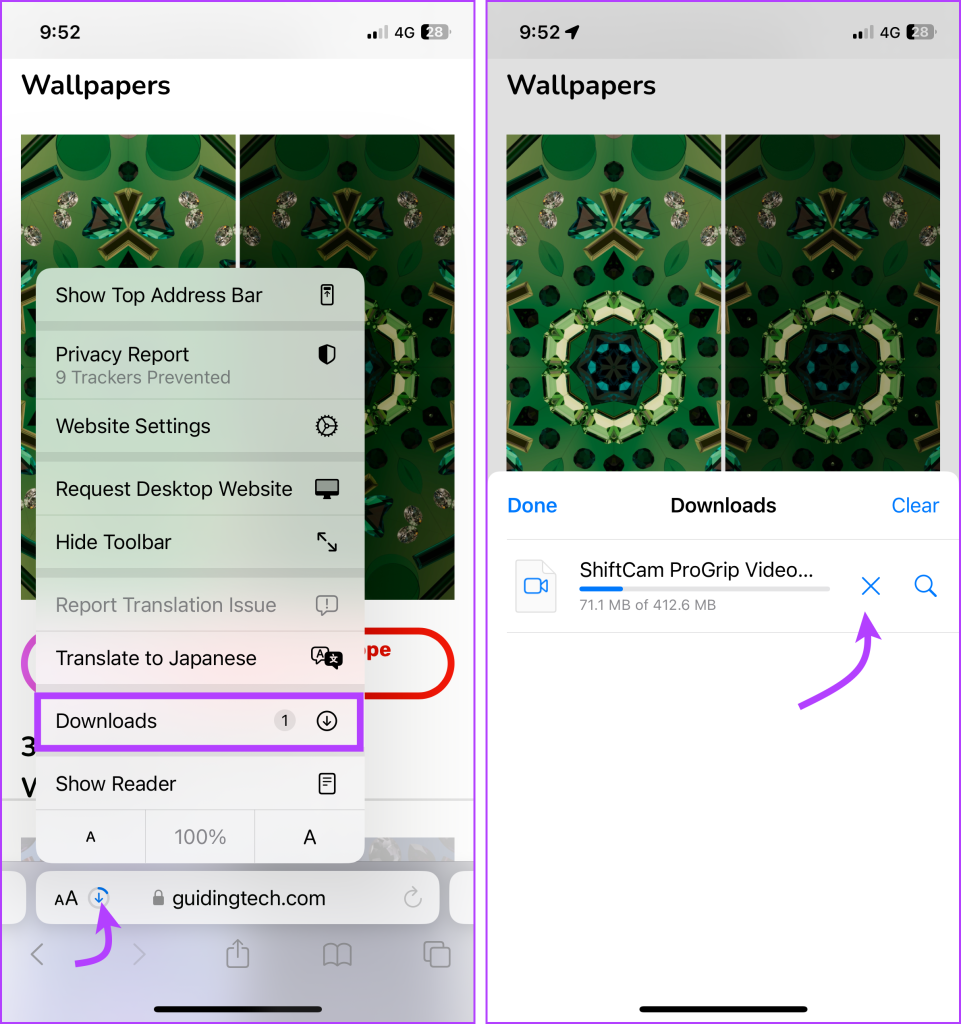
Note : Do not close the original Safari window as then you’ll have trouble resuming the download.
Where Do Safari Downloads Go On iPhone
The first order of business after downloading a file from Safari is to check where your files are downloaded. To do so, tap the download icon or AA icon from the status bar → select download → tap the search icon next to the downloaded file.
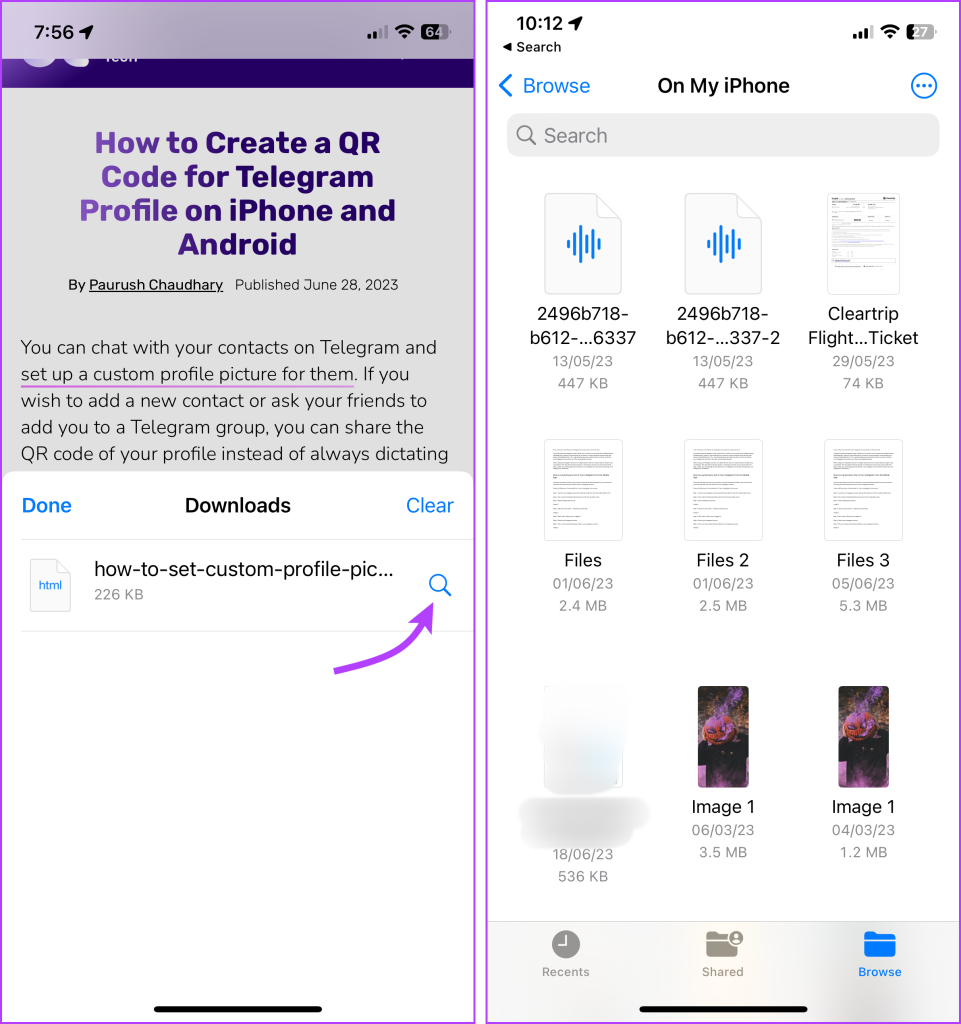
By default, Safari download manager on iPhone stores the files in the Download folder in the Files app. So, to see your downloaded files, go to Files → Browse → Downloads.
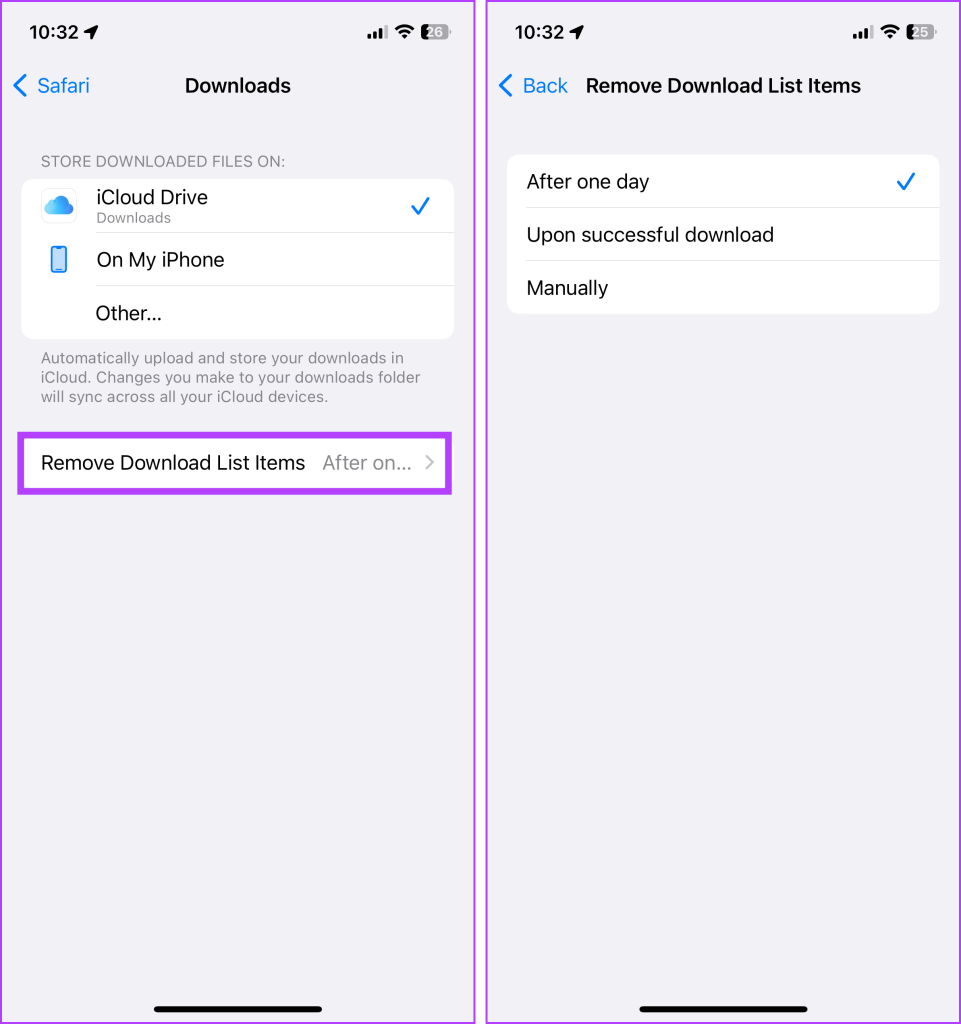
Alternatively, to confirm or to customize the Safari download location , you can go to Settings → Safari → Downloads. Notably, if you prefer saving downloaded files to a different location, simply select a preferred option.
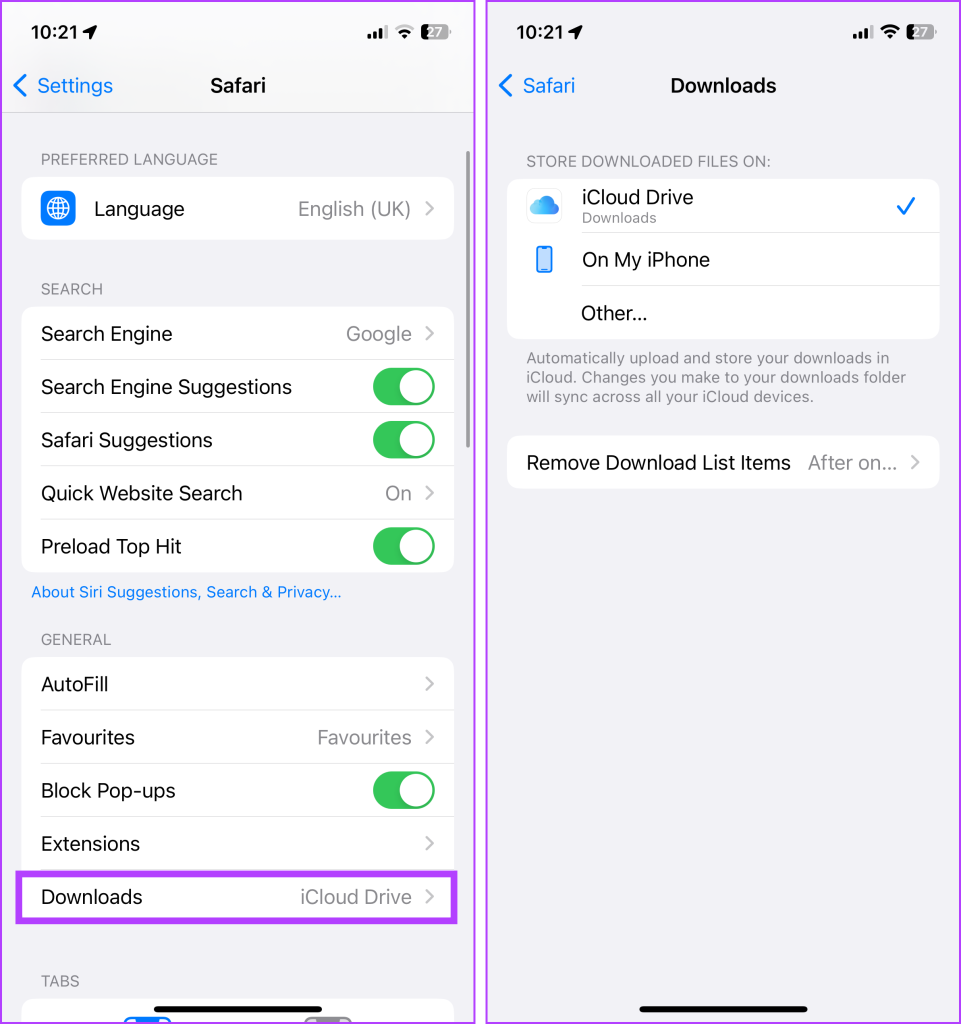
View Safari Download History on iPhone
Whether to find a previously downloaded item or to keep track of your downloaded files, here’s how you can access Safari downloader history on iPhone or iPad.
Open the Safari browser, tap the AA icon or the download icon → select Downloads → here, you’ll see a complete list of files downloaded recently.
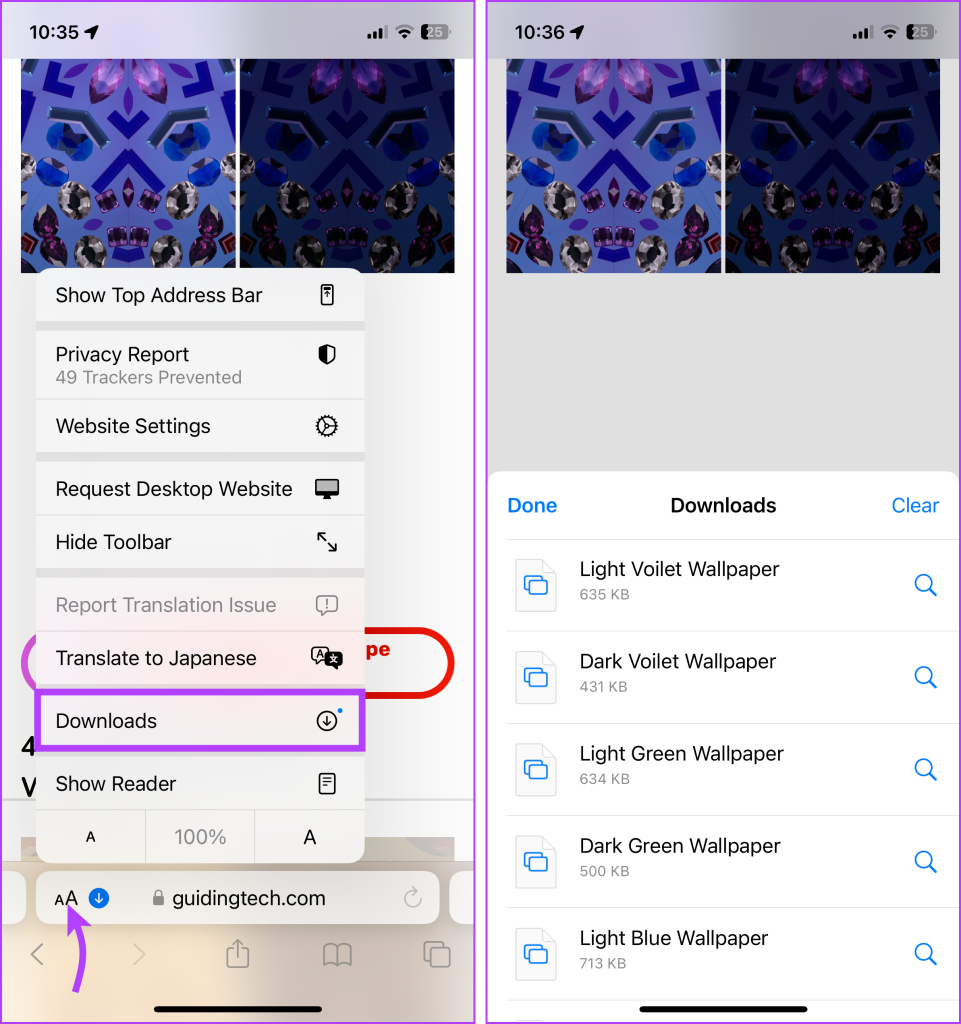
Clear Download History
There are multiple ways to remove all or individual files from your Safari download history.
- Delete individual files – Launch Safari → AA icon → Downloads → Slide left the file you want to delete → Delete.
- Clear all your download history – Launch Safari → AA icon → Downloads → Clear.
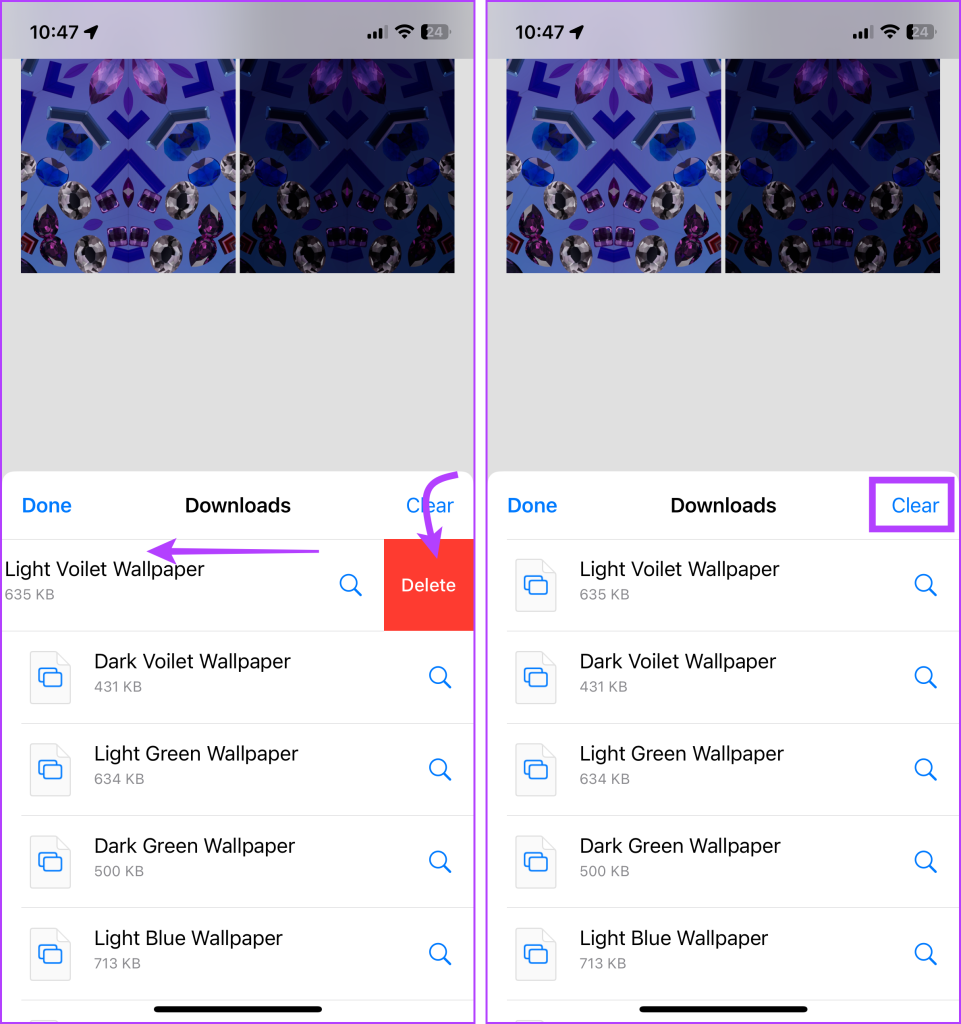
Note : This is just deleting the download history, not the actual files from your iPhone. So, don’t expect much space saving after the history is cleared.
Auto-Delete Safari Download List
If you don’t want the hassle of manually deleting the Safari Download list, you can automate the process. To do so, go to Settings → Safari → Downloads → select ‘Remove Download list items’ → select a preferred option.
FAQs For Safari Download Manager on iPhone and iPad
Yes, you can download various types of files in Safari on your iPhone, including documents, images, videos, audio files, and more. Safari supports a wide range of file formats for downloading.
In most cases, you can download files from any website using Safari on your iPhone. However, some websites may have restrictions or prevent file downloads for security or copyright reasons.
Safari displays the download progress in the address bar as a circular icon that fills up as the download completes. You can monitor the progress of your download by keeping an eye on this icon.
Yes, Safari supports simultaneous downloads. You can initiate multiple file downloads and monitor their progress individually.
See, Find, and View Downloads on iPhone
Here, now that we have made it easier to manage Safari downloads on iPhone and iPad, we hope it’s a smooth sailing experience ahead. In case you have any other questions regarding Safari and any of its features, feel free to connect with us via the comments section.
Was this helpful?
Last updated on 01 July, 2023
The above article may contain affiliate links which help support Guiding Tech. However, it does not affect our editorial integrity. The content remains unbiased and authentic.
The article above may contain affiliate links which help support Guiding Tech. The content remains unbiased and authentic and will never affect our editorial integrity.
DID YOU KNOW
Dilum Senevirathne
More in ios.

How to Mute Someone in FaceTime on iPhone, iPad, and Mac
What Happens When You Block Someone on an iPhone
Join the newsletter.
Get Guiding Tech articles delivered to your inbox.
How to view and clear your web browsing history in Safari on iPhone or iPad
Easily wipe your browsing history in Apple's Safari web browser in seconds.

How to find your web-browsing history
How to clear your web browsing history.
Clearing your browsing history on iPhone and iPad in Safari has been a straightforward affair for years now.
Sometimes, you may want a fresh start with your web browsing — perhaps to get rid of some history that may bring up a memory you'd rather forget as you type in a website URL in the address bar.
Apple makes this feature very easy to access on both the iPhone and iPad by offering two ways to clear your history. So with this in mind, here's how you can do just that and make a fresh start in Safari .
Viewing your web history in iOS 17 and iPadOS 17 is very easy to do — and it's all done from Safari.
- In Safari, tap the Bookmarks button in the toolbar that's below the address bar.
- Tap the History icon in the upper right corner. Here, you can view your entire web history.
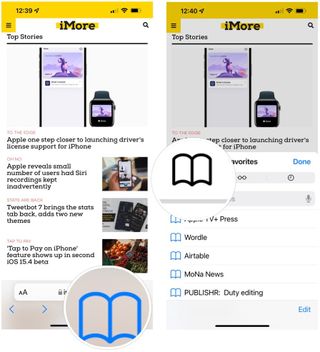
- Use the History search bar to find previously viewed pages.
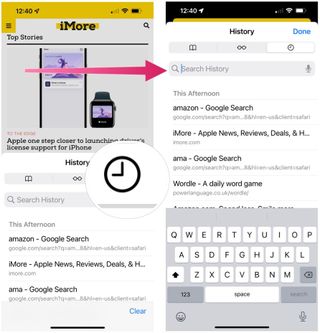
If the time calls to wipe most or all of your web browsing history in Safari, here's how to do it on both iPhone and iPad.
To note, the below steps will be the same if you attempt to wipe your web browsing history on an iPhone 15 Pro Max , and an iPad Mini 6 for example.
- In Safari, tap the Bookmarks button.
- Select the History icon in the upper right corner.
- Tap Clear and select how much history you'd like to clear: the last hour, the last day, 48 hours' worth, or all recorded history.
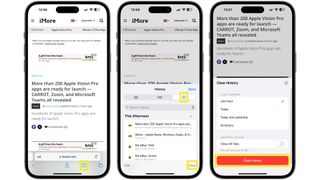
One more thing… A feature no one talks about
Privacy on the web matters more than ever in these modern times. Websites store the pages you click on, especially when you sign into a page that can contain personal information about you.
Master your iPhone in minutes
iMore offers spot-on advice and guidance from our team of experts, with decades of Apple device experience to lean on. Learn more with iMore!
It's great to have a feature like this in Safari — but it would be good to have this automated. To tell Apple's web browser to automatically clear history after 24 hours would be very useful, as you wouldn't leave a trail behind.
Regardless, it's still a good feature, and one you should use every week.

Daryl is iMore's Features Editor, overseeing long-form and in-depth articles and op-eds. Daryl loves using his experience as both a journalist and Apple fan to tell stories about Apple's products and its community, from the apps we use everyday to the products that have been long forgotten in the Cupertino archives.
Previously Software & Downloads Writer at TechRadar, and Deputy Editor at StealthOptional, he's also written a book, ' The Making of Tomb Raider ', which tells the story of the beginnings of Lara Croft and the series' early development. He's also written for many other publications including WIRED, MacFormat, Bloody Disgusting, VGC, GamesRadar, Nintendo Life, VRV Blog, The Loop Magazine, SUPER JUMP, Gizmodo, Film Stories, TopTenReviews, Miketendo64 and Daily Star.
- Bryan M Wolfe Staff Writer
Apple unveils new iOS 18 accessibility features including Eye Tracking and Live Captions for Vision Pro
Five Gemini AI features Apple should steal from Google's I/O 2024 lineup
Macs will get support for the upcoming Assassin's Creed Shadows RPG game
Most Popular
- 2 Comcast just invented cable — a new money-saving bundle will include Apple TV Plus, Netflix, and Peacock
- 3 Apple unveils new iOS 18 accessibility features including Eye Tracking and Live Captions for Vision Pro
- 4 This weird iOS 17.5 bug could restore years-old deleted iPhone photos whether you want it to or not, and there's nothing you can do to stop it
- 5 This iPhone app is designed to help people with ADHD manage their time and habits
- I Tried Both: Apple Watch 9 vs Fitbit Charge 6
- Best Places to Print Photos Online
How to Manage Your Browsing History in Safari
Revisit websites or remove them from your Safari search history
:max_bytes(150000):strip_icc():format(webp)/ScottOrgera-f7aca23cc84a4ea9a3f9e2ebd93bd690.jpg)
In This Article
Jump to a Section
- Step-by-Step: Manage History on macOS
- Use Private Browsing in Safari
- Step-by-Step: Manage History on iOS Devices
- Use Private Browsing on iOS
The Apple Safari web browser keeps a log of your search history and the websites that you visit. Learn how to manage your browsing history in Safari and how to browse privately.
Instructions in this article apply to Safari for Mac computers with OS X Yosemite (10.10) through macOS Catalina (10.15) and Apple mobile devices with iOS 8 through iOS 14.
How to Manage Safari History on macOS
Safari has long been the standard web browser for macOS . Here's how to manage Safari's history on a Mac:
Open the Safari browser and select History in the menu bar located at the top of the screen.
You'll see a drop-down menu with the titles of the web pages you visited recently. Select a website to load the respective page or select one of the previous days at the bottom of the menu to see more options.
To clear your Safari browsing history and other site-specific data that's stored locally, choose Clear History at the bottom of the History drop-down menu.
If you want to keep website data (like saved passwords and other autofill information), go to History > Show All History . Press Cmd + A to select everything, then press Delete to remove your browser history while retaining website data.
Select the period you want to clear from the drop-down menu. Options include the last hour , today , today and yesterday , and all history .
Select Clear History to delete the list of sites.
If you sync your Safari data with any Apple mobile devices using iCloud , the history on those devices is cleared as well.
How to Use Private Browsing in Safari
To prevent websites from appearing in the browser history, use Private Browsing. To open a private window in Safari, go to File > New Private Window , or use the keyboard shortcut Shift + Command + N .
When you close the private window, Safari doesn't remember your search history, the web pages you visited, or any autofill information. The only distinguishing feature of the new window is that the address bar is tinted dark gray. The browsing history for all tabs in this window remains private.
In Safari for Windows , select the settings gear and choose Private Browsing from the drop-down menu.
How to Manage History in Safari on iOS Devices
The Safari app is part of the iOS operating system used in the Apple iPhone , iPad, and iPod touch . To manage the Safari browsing history on an iOS device:
Tap the Safari app to open it.
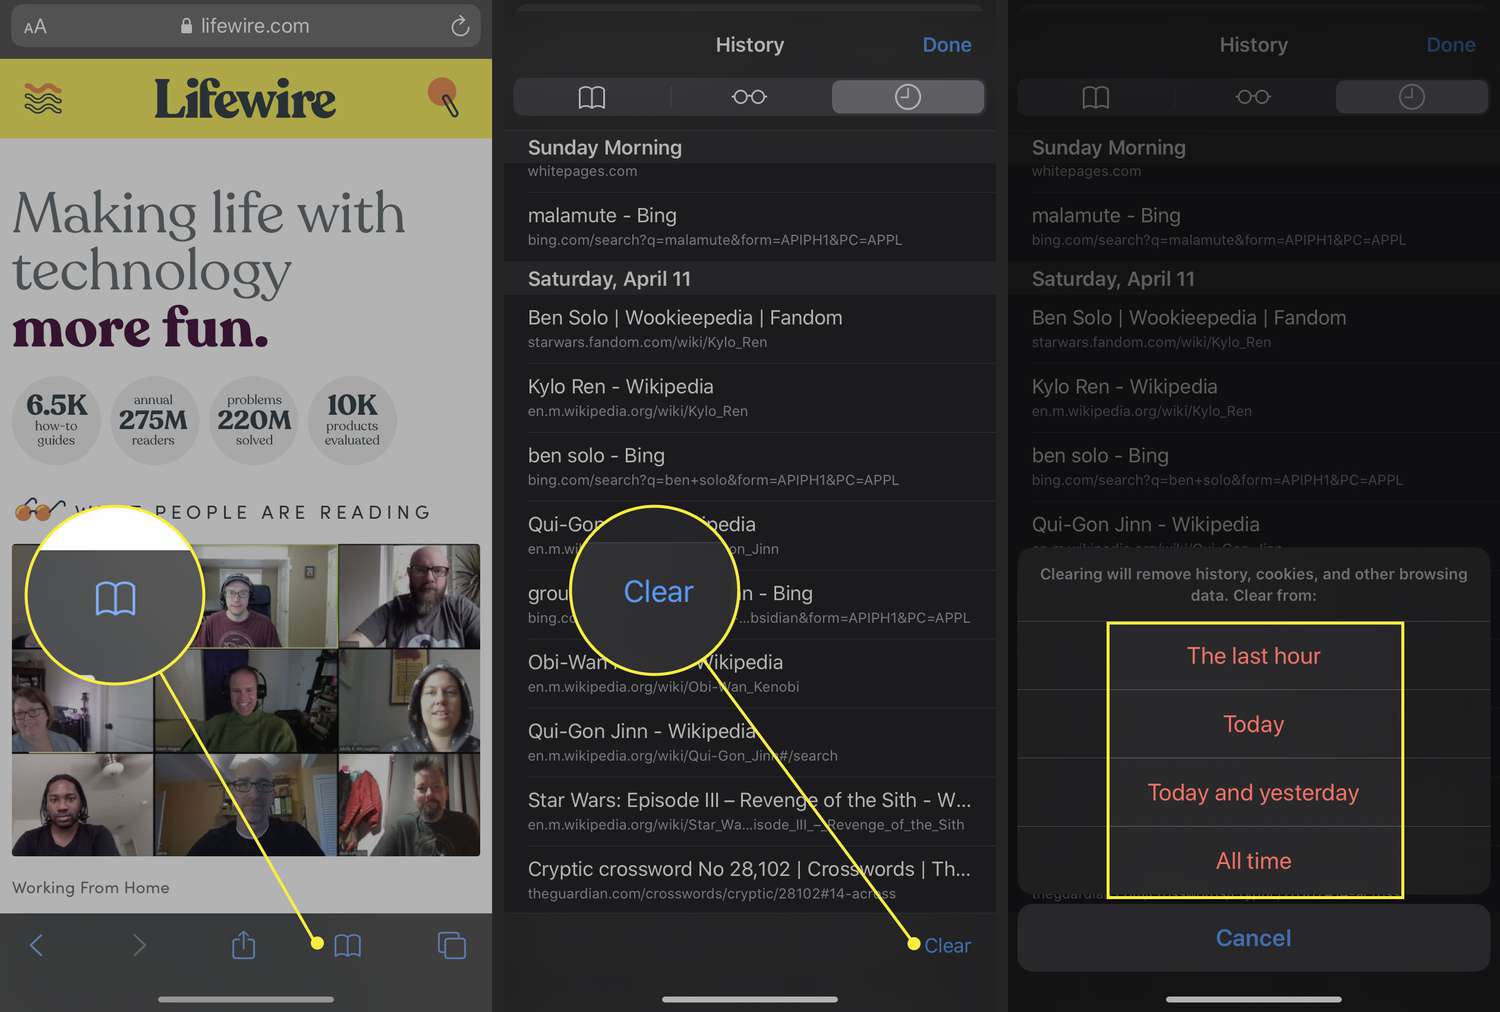
Tap the Bookmarks icon at the bottom of the screen. It resembles an open book.
Tap the History icon at the top of the screen that opens. It resembles a clock face.
Scroll through the screen for a website to open. Tap an entry to open the page in Safari.
To clear the browsing history, tap Clear at the bottom of the History screen.
Choose one of the four options: The last hour , Today , Today and yesterday , and All time .
Clearing your Safari history also removes cookies and other browsing data. If your iOS device is signed into your iCloud account, the browsing history is removed from other devices that are signed in.
Tap Done to exit the screen and return to the browser page.
If you only want to remove individual sites from your Safari history, swipe left on the entry, then tap Delete .
How to Use Private Browsing in Safari on iOS Devices
You can also use Private Browsing in iOS to prevent your Safari search history and web data from being saved:
Open the Safari app and then press and hold the tabs icon (the two overlapping boxes) at the bottom of the screen.
Tap Private .
Tap the plus sign to open a private browsing window.
When you are in private browsing, the background of the URL address bar is black instead of light gray. Enter a URL or search term as usual.
When you are ready to go back to regular browsing, tap the tabs icon and then tap Private to turn off private browsing.
Get the Latest Tech News Delivered Every Day
- How to Clear Search History on iPhone
- Search History: How to View or Delete It
- How to Manage Browsing History on Safari for iPad
- How to Clear Your Search Bar History
- Managing History and Other Private Data in Safari for macOS
- How to Manage History and Browsing Data on iPhone
- How to Clear Private Data, Caches, and Cookies on Mac
- How to Use Private Browsing on iPhone
- Manage Browsing History and Private Data in Firefox
- How to Turn Off Private Browsing Mode on iPad
- How to Turn On Private Browsing in Safari for iOS
- How to Turn on Private Browsing on Your iPad
- How to Change Settings in iOS Dolphin
- Speed Up Safari With These Tuneup Tips
- How to Reset Safari to Default Settings
- How to Delete and Clear Cookies on an iPhone
- PC & Mobile
How To View History in Safari on a PC, Tablet, or Mobile Device
Lee Stanton Lee Stanton is a versatile writer with a concentration on the software landscape, covering both mobile and desktop applications as well as online technologies. Read more July 19, 2022
Device Links
- Device Missing?
Safari for iOS provides a convenient way to keep track of your browsing history. You can use it to call up web pages quickly you’ve visited. You can easily go down the rabbit hole when performing searches online. This makes it difficult to remember exactly where you found a valuable piece of information. Reviewing your browsing history can retrace your steps, saving you the arduous task of finding the data from scratch. This article covers how to see your history in Safari. Check out how to do that below.

How to View History in Safari on an iPhone
Safari stores your browser activity, making it possible to revisit sites at a later date. You could either view your most recent history or check out the entire list of previously visited websites. This is how to do that.

You have now accessed your recent history on Safari.
If you would like to view your complete Safari browsing history, here’s how to do that.

You’ve now accessed your Safari browsing history.
How to View History in Safari on an iPad
Safari allows users to keep track of their browsing history. This feature can then be used to revisit sites that might be of interest. You could either view recent history or peruse all your browsing data. The steps listed here detail how to do that.

You have now viewed the recent history on your iPad.
To view your complete browsing data, follow the steps outlined here.

How to View History in Safari on a Mac
Your Safari browsing history allows you to revisit sites you viewed in the past. You can even use the search tool so that you don’t have to scroll through the entire list of results to find what you are looking for. Here’s how to view your browsing history on an iPhone.

- Click on it to open the page in your browser.
You can now see your history in Safari. If you signed in to your device using the same Apple ID that you use on your other Apple devices, that history would also be displayed on your Mac.
Can You View History From Private Browsing?
Private Browsing is a feature that prevents Safari from storing information on sites you have visited. It ensures there’s no record of your online activity, including passwords or autofill information. It also prevents iCloud from storing data on any tabs that you open. To provide an additional layer of privacy, Safari prevents sites and content providers from tracking you. Any cookies you might have picked up are deleted once you close the tab.
This means that Safari doesn’t store your browsing history when you activate Private Browsing. You will therefore be unable to view it in the future.
How to Clear History in Safari
If your Apple device is lagging or otherwise misbehaving, you might consider clearing your browsing data. This is how to do that.

Your browsing data will now be removed from your device.
Retracing Your Steps
Like many web browsers, Safari stores information on websites you’ve visited. This data can come in handy when you want to go back to a particular site. This guide shows you how to retrieve the browsing history stored on your Apple devices.
Have you viewed your browsing history on Safari? What did you think of the process? Let us know in the comments below.
Related Posts

Disclaimer: Some pages on this site may include an affiliate link. This does not effect our editorial in any way.

Parth Shah February 29, 2024

Lee Stanton February 23, 2024

Lee Stanton February 19, 2024
Send To Someone
Missing device.
Please enable JavaScript to submit this form.
How To Delete Download History On IPhone

- How-To Guides
- Software Tutorials
Introduction
Welcome to our guide on how to delete download history on your iPhone. As you use your iPhone to browse the internet or download files, your device keeps a record of all the files you have downloaded. While this can be helpful for easy access to recent downloads, it can also take up valuable storage space and compromise your privacy. Whether you want to clear your download history for decluttering purposes or to maintain your privacy, we’ve got you covered.
In this article, we will provide you with a step-by-step guide on different methods to delete your download history on the iPhone. We’ll cover how to delete individual downloaded files, clear the download history in Safari, clear the download history within specific apps , and set up automatic clearing of download history using device settings. By following these methods, you will be able to free up storage space on your iPhone and ensure your downloaded files remain private.
Before we dive into the specific methods of deleting your download history, it’s important to note that clearing your download history will permanently remove the records of your downloaded files. Once deleted, you won’t be able to retrieve them. Therefore, it’s a good practice to backup any important files or documents before proceeding with the deletion process.
Now that you’re aware of the importance of backing up your files, let’s get started with the different methods to delete download history on your iPhone. Whether you’re using the latest iPhone model or have an older version, these methods will work across most iOS versions, so you can follow along regardless of your device.
Method 1: Deleting Individual Downloaded Files
If you want to delete specific downloaded files on your iPhone, you can follow these steps:
- Open the “Files” app on your iPhone. It’s a blue folder icon that comes pre-installed on your device.
- Navigate to the “Downloads” folder. This is where all your downloaded files are stored by default.
- Find the file you want to delete and swipe left on it.
- Tap on the “Delete” button that appears on the right.
- Alternatively, you can also tap on the file to open it, and then tap on the “…” (three dots) button in the top-right corner of the screen. From the options that appear, select “Delete”.
- A confirmation message will appear asking if you want to delete the file. Tap on “Delete” to proceed.
By following these steps, you can easily delete individual downloaded files from your iPhone. This method is useful when you only want to remove specific files instead of clearing the entire download history.
It’s worth mentioning that deleting a file from the “Downloads” folder will only remove it from your device’s local storage. If the file is stored in other cloud-based services or synced with other devices, it will still be available in those locations unless you delete it from there as well.
In the next section, we will cover how to clear your download history in Safari , the default web browser on your iPhone.
Method 2: Clearing Safari Download History
If you frequently use Safari as your web browser on your iPhone and want to clear the download history, you can follow these steps:
- Open the “Settings” app on your iPhone.
- Scroll down and tap on “Safari”.
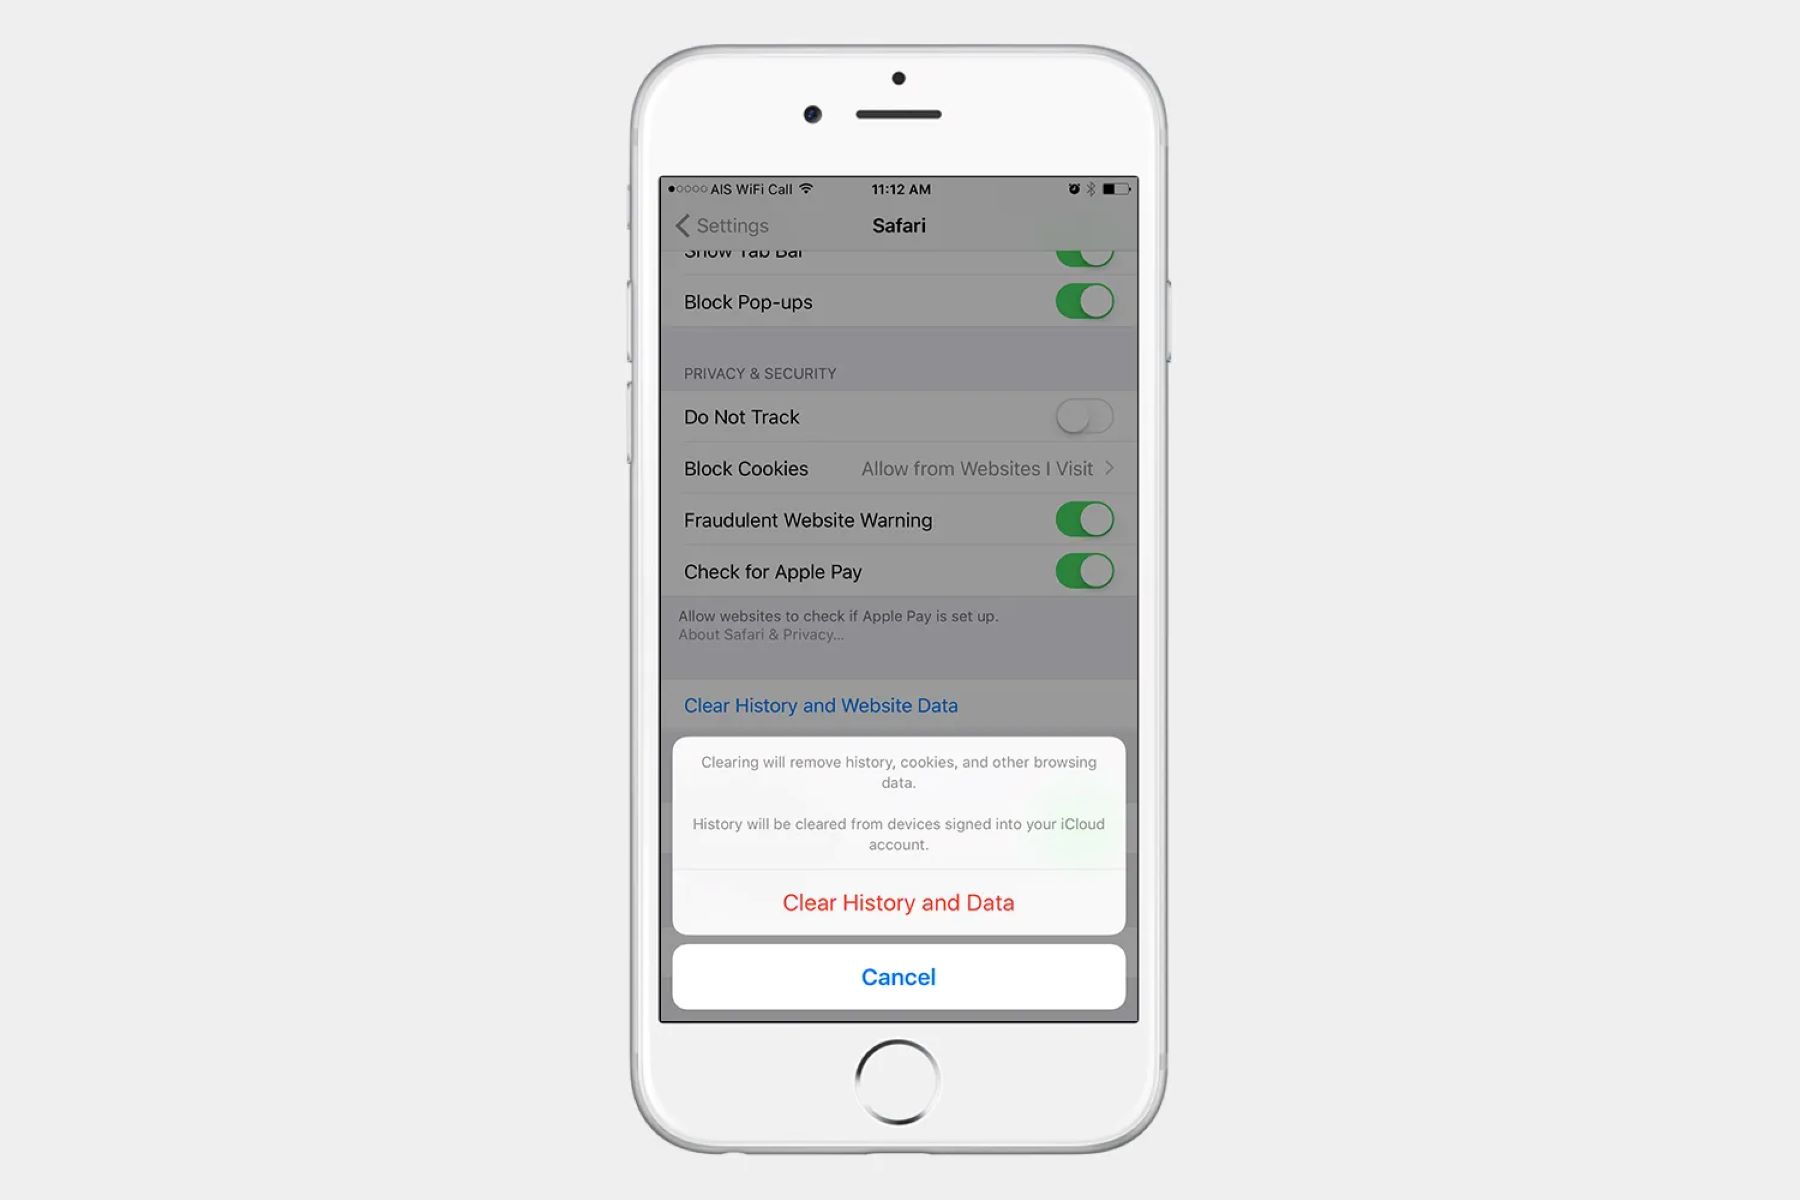
- Under the “Privacy & Security” section, tap on “Clear History and Website Data”.
- A pop-up will appear asking if you want to confirm the action. Tap on “Clear History and Data” to proceed.
This process will not only clear your download history, but it will also remove your browsing history, website data, and cookies within Safari.
After clearing your Safari history and data, your download history in Safari will be completely removed, providing you with a clean browsing and download history slate. It’s important to note that clearing your history and data will also log you out of any websites you were previously logged into using Safari. You will need to re-enter your credentials the next time you visit those websites.
In the following section, we will explain how to clear the download history within specific apps on your iPhone.
Method 3: Clearing App Download History
If you want to clear the download history within specific apps on your iPhone, you can follow these steps:
- Open the app for which you want to clear the download history.
- Look for a “Settings” or “Preferences” option within the app. This can typically be found in the app’s main menu or by tapping on your profile/avatar.
- Within the settings or preferences, look for an option related to “Downloads” or “History”. The exact terminology may differ depending on the app.
- Once you find the appropriate option, tap on it.
- Look for an option to clear or delete the download history. This may be a button, a checkbox, or a swipe gesture.
- Tap on the designated option to clear the download history within the app.
It’s important to note that the steps to clear the download history within specific apps may vary depending on the app itself. Some apps may not provide a direct option to clear the download history. In such cases, you can explore the app’s settings or contact the app’s support for further assistance.
By following these steps, you can effectively clear the download history within specific apps, freeing up storage space and maintaining privacy within those apps.
In the next section, we will discuss how to set up automatic clearing of download history using the device settings.
Method 4: Automatically Clearing Download History with Settings
If you want to automate the process of clearing your download history on your iPhone, you can leverage the device settings to do so. Here’s how:
- Scroll down and tap on “Safari” (for clearing Safari download history) or tap on the app name (for clearing app-specific download history).
- Look for an option called “Clear History and Website Data” or a similar setting.
- Tap on the option and configure it to clear history and data automatically.
- You may have the option to set it to clear history and data every day, week, month, or on exit.
Enabling automatic clearing of download history ensures that your device continuously clears the history and data, reducing the need for manual intervention. This is especially useful if you want a hands-off approach to managing your download history.
Remember that enabling automatic clearing of download history will erase not only your download history but also your browsing history, website data, and cookies within Safari (or app-specific data, depending on the setting). Be aware that enabling this feature will log you out of any websites you were previously logged into using Safari.
With this method, you can effortlessly maintain a clean download history and protect your privacy on your iPhone.
Now that you’ve learned various methods to delete download history on your iPhone, you can choose the method that suits your requirements best.
In this guide, we have explored different methods to delete download history on your iPhone. Whether you want to delete individual downloaded files, clear Safari download history, clear app-specific download history, or set up automatic clearing of download history, there are options available to suit your needs.
By clearing your download history, you can free up storage space on your device and maintain your privacy. It’s important to note that deleting your download history will permanently remove the records of your downloaded files, so it’s wise to backup any important files before proceeding.
Remember to always follow the specific steps outlined for each method to ensure a successful deletion of download history. Additionally, keep in mind that the steps might vary slightly depending on your iOS version and app settings.
Now that you have the knowledge to delete download history on your iPhone, you can enjoy a clutter-free device and have peace of mind knowing that your downloaded files remain private. Keep your device organized and optimize its performance by regularly deleting unnecessary download history.
We hope this guide was helpful to you. If you have any questions or encounter any difficulties while deleting your download history, feel free to consult the app’s support or reach out to Apple for further assistance.
Thank you for reading, and happy deleting!
Leave a Reply Cancel reply
Your email address will not be published. Required fields are marked *
Save my name, email, and website in this browser for the next time I comment.
- Crowdfunding
- Cryptocurrency
- Digital Banking
- Digital Payments
- Investments
- Console Gaming
- Mobile Gaming
- VR/AR Gaming
- Gadget Usage
- Gaming Tips
- Online Safety
- Tech Setup & Troubleshooting
- Buyer’s Guides
- Comparative Analysis
- Gadget Reviews
- Service Reviews
- Software Reviews
- Mobile Devices
- PCs & Laptops
- Smart Home Gadgets
- Content Creation Tools
- Digital Photography
- Video & Music Streaming
- Online Security
- Online Services
- Web Hosting
- WiFi & Ethernet
- Browsers & Extensions
- Communication Platforms
- Operating Systems
- Productivity Tools
- AI & Machine Learning
- Cybersecurity
- Emerging Tech
- IoT & Smart Devices
- Virtual & Augmented Reality
- Latest News
- AI Developments
- Fintech Updates
- Gaming News
- New Product Launches
How to Use Email Blasts Marketing To Take Control of Your Market
Learn to convert scanned documents into editable text with ocr, related post, how to make stairs planet coaster, how to rotate camera in planet coaster, how to make a good roller coaster in planet coaster, where is the minecraft folder, how to update minecraft windows, how to update minecraft education edition, related posts.
How To Delete Downloads On Safari
How To Find App Download History
How To See Downloads On Safari IPhone
How To Download Imessage History
How To Delete Browser History On iPhone
How To Delete Safari History On IPhone
How To Clear Up Storage On Apple Watch

How To Delete History On Safari On IPhone
Recent stories.

Top Mini Split Air Conditioner For Summer

Comfortable and Luxurious Family Life | Zero Gravity Massage Chair

Fintechs and Traditional Banks: Navigating the Future of Financial Services

AI Writing: How It’s Changing the Way We Create Content


How to Find the Best Midjourney Alternative in 2024: A Guide to AI Anime Generators

How to Know When it’s the Right Time to Buy Bitcoin

- Privacy Overview
- Strictly Necessary Cookies
This website uses cookies so that we can provide you with the best user experience possible. Cookie information is stored in your browser and performs functions such as recognising you when you return to our website and helping our team to understand which sections of the website you find most interesting and useful.
Strictly Necessary Cookie should be enabled at all times so that we can save your preferences for cookie settings.
If you disable this cookie, we will not be able to save your preferences. This means that every time you visit this website you will need to enable or disable cookies again.
- PRO Courses Guides New Tech Help Pro Expert Videos About wikiHow Pro Upgrade Sign In
- EDIT Edit this Article
- EXPLORE Tech Help Pro About Us Random Article Quizzes Request a New Article Community Dashboard This Or That Game Popular Categories Arts and Entertainment Artwork Books Movies Computers and Electronics Computers Phone Skills Technology Hacks Health Men's Health Mental Health Women's Health Relationships Dating Love Relationship Issues Hobbies and Crafts Crafts Drawing Games Education & Communication Communication Skills Personal Development Studying Personal Care and Style Fashion Hair Care Personal Hygiene Youth Personal Care School Stuff Dating All Categories Arts and Entertainment Finance and Business Home and Garden Relationship Quizzes Cars & Other Vehicles Food and Entertaining Personal Care and Style Sports and Fitness Computers and Electronics Health Pets and Animals Travel Education & Communication Hobbies and Crafts Philosophy and Religion Work World Family Life Holidays and Traditions Relationships Youth
- Browse Articles
- Learn Something New
- Quizzes Hot
- This Or That Game
- Train Your Brain
- Explore More
- Support wikiHow
- About wikiHow
- Log in / Sign up
- Computers and Electronics
- Internet Browsers
- Safari Browser
2 Simple Ways to Clear History in Safari
Last Updated: January 4, 2024
This article was co-authored by Luigi Oppido . Luigi Oppido is the Owner and Operator of Pleasure Point Computers in Santa Cruz, California. Luigi has over 25 years of experience in general computer repair, data recovery, virus removal, and upgrades. He is also the host of the Computer Man Show! broadcasted on KSQD covering central California for over two years. This article has been viewed 125,624 times.
You can delete all of your web browsing history or specific entries on both the OS X and the iOS versions of Safari. This can come in handy if you're on a public computer, or need to remove a certain website from your browsing history. No matter what system you're using, it will only take a few moments.
OS X (All History)

- If you're using an older version of Safari, click the "History" menu instead and select "Clear History".

- Note that this will delete history across all devices connected to your iCloud account.
OS X (Single Entries)

iOS (All History)

- If you want to delete a single entry, click here .

iOS (Single Entries)

Expert Q&A

You Might Also Like

- ↑ http://osxdaily.com/2014/11/28/clear-recent-web-history-safari-mac-os-x/
- ↑ http://osxdaily.com/2014/11/21/delete-specific-history-safari-ios/
About This Article

- Send fan mail to authors
Is this article up to date?

Featured Articles

Trending Articles

Watch Articles

- Terms of Use
- Privacy Policy
- Do Not Sell or Share My Info
- Not Selling Info
wikiHow Tech Help Pro:
Level up your tech skills and stay ahead of the curve
Data Management
D-Back for iOS/Win/Mac - Data Recovery HOT
Recover Deleted Data from iOS/Win/Mac
Data Recovery
D-Back Hard Drive Recovery - Hard Drive Data Recovery
Recover Deleted Data from PC/Mac
Windows/Mac Data Recovery
ChatsBack for WhatsApp - WhatsApp Recovery
Recover Deleted WhatsApp Messages
WhatsApp Messages Recovery
ChatsBack for LINE - LINE Recovery
Recover Deleted LINE Messages
LINE Messages Recovery
iMyTrans - Apps Data Transfer HOT
Transfer, Export, Backup, Restore WhatsApp Data with Ease
WhatsApp Data Transfer Tool
iTransor for LINE
Transfer, Export, Backup, Restore LINE Data with Ease
LINE Data Transfer Tool
Umate Pro - Secure iOS Data Eraser
Permanently Erase iPhone/iPad/iPod Data to Secure your privacy
iPhone Data Eraser
AllDrive - Multiple Cloud Storage Manager NEW
Manage All Cloud Drive Accounts in One Place
Multiple Cloud Storage Manager
AnyTo - Location Changer HOT
Best iOS/Android Location Changer
iOS/Android Location Changer
MirrorTo - Screen Mirror
Professional iOS/Android Screen Mirror
iOS/Android Screen Mirror
LockWiper for iOS - iPhone Passcode Unlocker HOT
Remove iPhone/iPad/iPod touch Password
iPhone Passcode Unlocker
LockWiper for Android - Android Passcode Unlocker
Unlock Android FRP Lock & All Screen Locks
Android Passcode Unlocker
Fixppo for iOS - iPhone System Repair HOT
Fix your iPhone/iPad/iPod touch/Apple TV without losing data
iPhone System Repair Tool
iBypasser - iCloud Activation Lock Bypasser
Bypass iCloud Activation Lock & Sim Lock
iCloud Activation Lock Bypasser
UltraRepair - File Repair
Fix damaged and corrupted videos/photos/files/audio
Repair Corrupt Video/Photo/File
Passper - Password Recovery Expert
Recover password for Excel/Word/PPT/PDF/RAR/ZIP/Windows
Office/Files/Windows Unlocker
FamiGuard - Reliable Parental Control App
Remotely Monitor Your Kid's Device and Activity
Reliable Parental Control App
VoxNote - AI Vocie Notes NEW
Transcribe real-time & recorded audio into text
Voice Notes with AI Summaries
Novi AI - AI Story-to-Video Generator NEW
Convert Your Story & Novel to Original Video Easily
Convert Story & Novel to Video
RewriteX - Al rewriter for anywhere NEW
Make Your Words Mistake-free And Clear
Mistake-free And Clear
EasifyAI - Life-Changing AI Toolkit NEW
Innovative AI Toolbox to Take All The Heavy Lifting Off
Innovative AI Toolbox
LokShorts - Locate best drama & short film NEW
Online Watching 1-minute Short Drama
Filme - The Best Video Editor
Video Editor and Fast Slide Show Maker
MagicMic - Real-Time Voice Changer HOT
Change Your Voice in Real-Time Easily
Real-Time Voice Changer
MarkGo - Effective Watermark Remover
Manage Your Video & Image Watermark Easily
Effective Watermark Remover
V2Audio - Video Convertor
Super Video Converter Makes Everything Easier
Super Video Converter

VoxBox - Ai Text-to-Speech Generator
Make Voiceover Easily with Cloning & TTS
Text-to-Speech Voice Generator
AnySmall - Video Compressor NEW
One Click to Compress Videos While Keeping High Quality
One-click Video Compressor
TopClipper - Video Downloader
Download Any Videos You Like from Any Platforms
Video Downloader from Any Platforms

TopMediai - Online AI Tools Collection
Discover how AI Transforms Image & audio editing
Online AI Tools Collection
MagicPic - AI Background Remover & Changer NEW
Remove and Change your Photo Background with Single Click
AI Background Remover & Changer
MusicAI - AI Music Generator NEW
All-in-one generator to make AI songs
AI Music Generator
Productivity
ChatArt : Chatbot & AI Writer HOT
Generate AI Painting, Write AI Article and Marketing Copy Easily
Chatbot & AI Writer
ZoeAI - Chat With Any PDF Document NEW
Start AI Conversation With PDF With One Click
The Best PDF AI Chat Assistant
FigCube - Free Website Builder
Create A Blog Website Within Minutes
Free Website Builder
PromptWink - AI Prompt Marketplace NEW
Get 1,000+ quality AI prompts from top prompt engineers
AI Prompt Marketplace
AI Tools : Complete Resource of AI Tools
Find The Exact AI Tool For Your Needs
AI Tools Navigation Page
iMyWork - Personal AI Work Assistant App NEW
Provide professional work advise and support
AI Work Assistant
QRShow - Professional QR Code Generator NEW
Create various static and dynamic QR codes for free
QR Code Generator
Support Center
Licenses, FAQs
Pre-Sales Inquiry, etc.
How-to Guides
Mobile/PC Issues Solutions
Product Center
iMyFone Products Free Trial
How to View iPhone Safari History on Computer
- How to Get Photos out of Locked iPhone (iOS 12 included)
- Top 5 iPhone Backup Readers for Windows & Mac
- How to Export & Save QQ Chat History from iPad/iPhone (2022)
- How to Save Text Messages from iPhone to Computer for Free without iTunes?
- How to Fullly Backup iPhone to MacBook Air Pro Big Sur without iTunes Free
Safari is the browsing app function in all iDevices. It is true that Safari browser can keep your years browsing history on MAC for a long time. Safari uses iCloud help to keep all your browsing history data on MAC devices as computers, laptops, and all other iOS devices. But, it will be saving all if Safari is turned on using iCloud preferences. Though, it is not always sure that your Safari app is saving all your years browsing data. Or your browsing history is secure on Safari? To know about these, we will provide three different methods to View Safari history on computer.
- View iPhone Safari History on Mac by Syncing It via iCloud
- View iPhone Safari History on Computer by Transferring Them by Email
- View iPhone Safari History on Computer by Using iMyFone D-Port
1 View iPhone Safari History on Mac by Syncing It via iCloud
If you want to view any Old browse history, but your Safari browser is not synchronized then it is a big trouble to view your required data. Though, Safari uses iCloud help to keep long times history. So you just need to perform some steps to synchronize your Safari history on Mac. iCloud can sync all Safari history from all iDevices which you have logged in with the same iCloud. Here are some steps to follow.
- Go to the terminal App in Applications and then Utilities on MAC devices.
- Tap on iCal menu and select Preferences.
- Before opening Terminal, You need to close or quite Safari browser first.
- After opening Terminal, Type this text "defaults write com.apple.Safari IncludeInternalDebugMenu 1" and then GO.
- Now, Go return and launch Safari, if finally, the above text worked. Then you will have a new "Debug" icon at the top of your Menu screen.
- It was hidden-Previously at the default setting. Now, you can click on the icon to launch this Debug.
- then click on "Sync iCloud history". Now your MAC device will perform the rest and will present sync history with one-two minutes.
- now again if you like to hide this Debug, Then simply type this "defaults write com.apple.Safari IncludeInternalDebugMenu 0" in Terminal and quite Safari before making his change.

You are done and can view your Safari history on Mac now!
2 View iPhone Safari History on Computer by Emailing Them
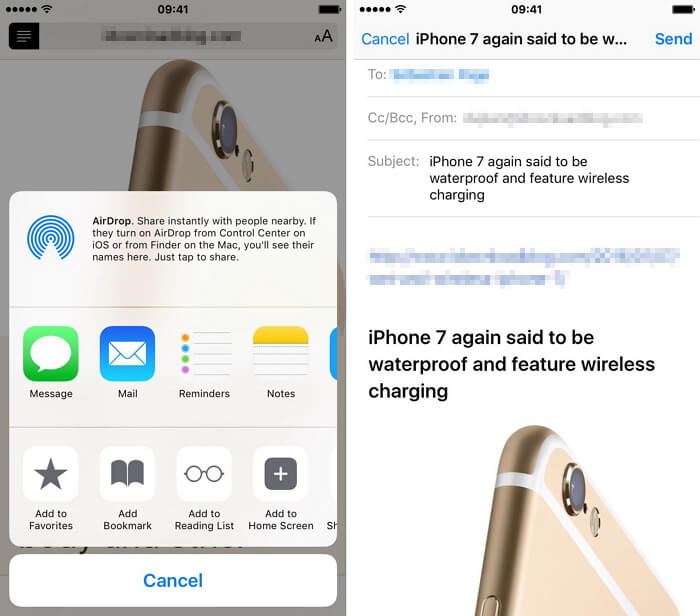
There is no any possible way to view your browsing history directly at your computer, however, we can refer a simple way and that is email you're interested web page to your e-mail. So, that you can view the previously required pages or can save your favorite sites for future. Follow these easy steps to acquire this method.
- Brows your interested web page on Safari.
- Click on the Upload icon at the bottom of the screen.
- Then simply click on Mail icon to send the link to yourself.
- You can open or browse that page directly on your computer anytime.
However, even though the above two methods are good, they are not helpful or too complicated if you use Windows computer or want to transfer lots of Safari history. So we bring the third solution for you to view iPhone Safari history on PC/Mac.
3 View iPhone Safari History on Computer by iMyFone D-Port
iMyFone D-Port iPhone Data Exporter is a smart iOS data exporter tool. You can easily export your Safari history from iOS device to computer and then view these important history anytime you want, even your iOS device is not at hand. This iPhone data exporter can do more than this. See its main features:
500,000+ Downloads
Key Features:
- Export data from iPad/iPhone/iPod touch, iTunes backup and iCloud backup.
- View data before exporting, select exactly your needed files.
- Smoothly export more than 18 types or versions of files. You can copy and share text messages from iPhone .
- Transfer WeChat messages from iPhone to computer .
- It can selectively or entirely back up your data.

How to Export Safari History from iPhone to Computer
As mentioned in start about three ways, here is the easiest and smooth way to transfer and view Safari history on computer with amazing more features. See how to operate the easy program.
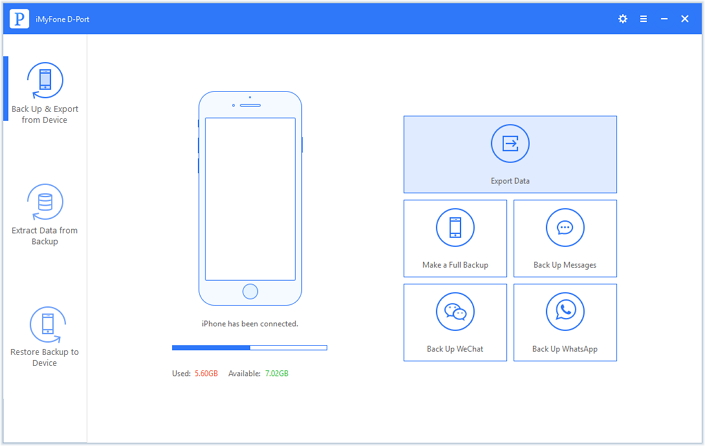
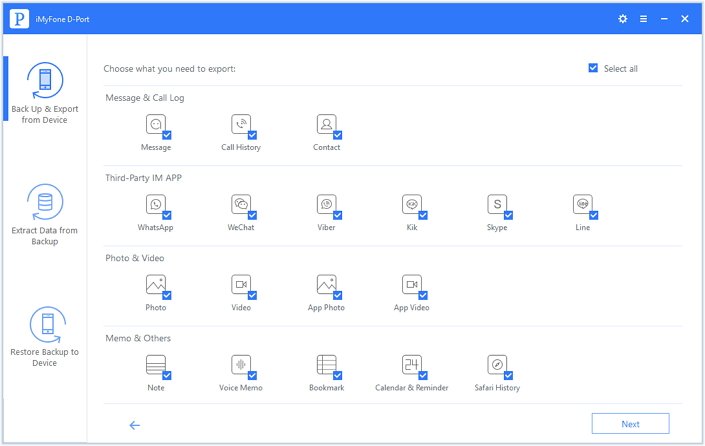
Step 1: Download iMyFone D-Port and launch it on your computer. Click Back Up & Export from Device to get process work and then select your Export Data.
Step 2: Then select the file types you need to export. Here you should click Safari History, or other types of files you want to export.
Step 3: After connecting iDevice to the computer, Click "Scan" and get all your files sorted on the front screen. Now, choose the Safari history you want to export and then click Export to choose a location to save them.
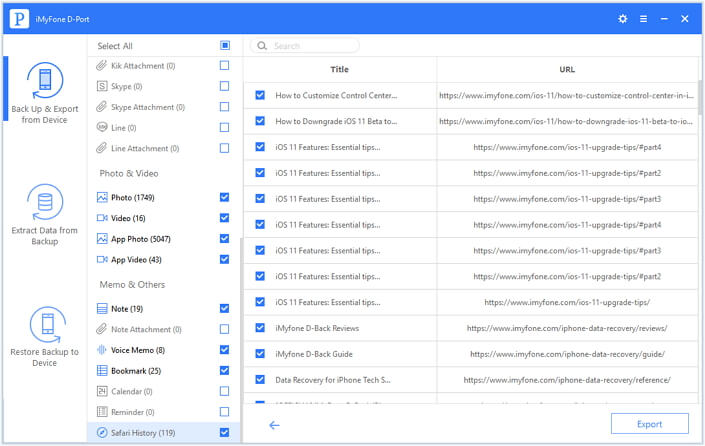
Finally you have all your Safari history on your computer and you can browse or use them on your computer.
In the verdict, we have a reference of all above details that iMyFone D-Port iPhone Data Exporter is the best way to extract, view and export your iDevices data to computer. It totally doesn't matter, if you have logged in same iCloud account on different iDevices. You can simply sync all your file types including Safari browsing history of years by iMyFone D-Port. It is not wrong to mention that iMy Fone D-Port has offered free trial version to iPhone users using Windows or Mac computer.
Francisco Spearman
(Click to rate this post)
Generally rated 5 ( 256 participated)
Rated successfully!
You have already rated this article, please do not repeat scoring!
More Resources
- Unlock iPhone
- Transfer WhatsApp
- iPhone Issues
- iOS Data Recovery
- Change Location
Home > Backup iPhone > How to View iPhone Safari History on Computer
- iPhone Data Recovery
- Android Data Recovery
- iPhone Passcode Unlocker
- iOS System Recovery
- iOS Location Changer
- Free iOS Backup & Restore
- Excel Password Recovery

- Data Recovery iPhone Data Recovery Android Data Recovery
- Unlock & Repair iPhone Passcode Unlocker iOS System Recovery
- Utilities iOS Location Changer Free iOS Backup & Restore Excel Password Recovery PDF Editor

5 Ways to View & Recover Deleted Safari History on iPhone/iPad
“Is it possible to recover deleted Safari history on iPhone? I want to retrieve deleted history from around 3 months earlier.”
Safari is the default browser for iOS devices and Mac computers, which is widely used among Apple users. While searching the internet with Safari, it usually keeps the browsing history and bookmarks for picking up what has been read.
What if you have accidentally deleted your browsing history, or it is suddenly gone without a record? Don't worry. You still have a chance to get back the deleted Safari history. Keep reading to find out how to recover deleted Safari history on iPhone with or without backup.
Can Safari History Be Recovered Once It Is Deleted?
Yes, you can recover deleted browsing history from Safari, but it's not guaranteed. When you clear your browsing history in Safari, it's not permanently erased from your iPhone or iPad. Instead, it's temporarily stored in a different part of your device's memory for a limited period. This storage period typically lasts around one month for iPhone/iPad and up to one year for Mac. If you act quickly, you sitll have a good chance to recover deleted Safari history.
Check iPhone Settings for Deleted Safari History
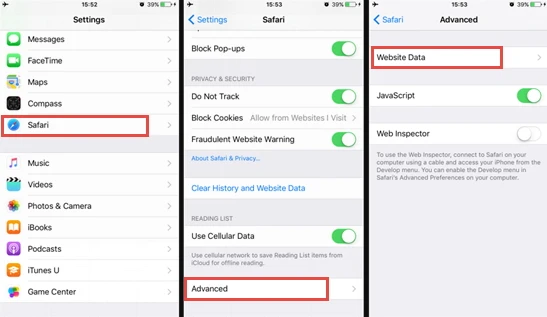
Before you try any other methods listed below, first check your iPhone itself. The simplest way of recovering your browsing history is to find them in Safari Website Data under Settings. Here's how to do it:
- On your iPhone, open the Settings app. Scroll down to find Safari and tap on it.
- On the next screen, scroll to the bottom and tap on the Advanced option.
- Now choose the Website Data and you'll view the domain of the deleted browsing history.
The drawback of this method:
This method will only show you the root domain of your visited sites. You won't be able to find a specific page you've viewed before. Also, this method only works as long as you don't clear cookies and history from Safari.
Recover Safari History on iPhone without Backup (Recommend)
If there is no backup of your deleted Safari history, FoneGeek iPhone Data Recovery is highly recommended to you. As the world's 1st iPhone and iPad data recovery software, it has helped tens of thousands of iOS users find deleted or lost data. What makes it so popular? The answer is its reliability and function:
- Offers 3 recovery modes, and you can choose the one that best fits your needs to recover deleted Safari history.
- Preview the deleted Safari history for free before the recovery process and selectively recover only the browsing history you need.
- Supports to recover many other types of data like messages, contacts, photos , videos, notes , WhatsApp messages, Viber, etc.
- Works well on all iPhone models and iOS versions, even the latest iPhone 15/14 and iOS 17/16.

Follow the steps below to recover deleted safari history on your iPhone without backup:
Step 1. Connect iPhone to Computer
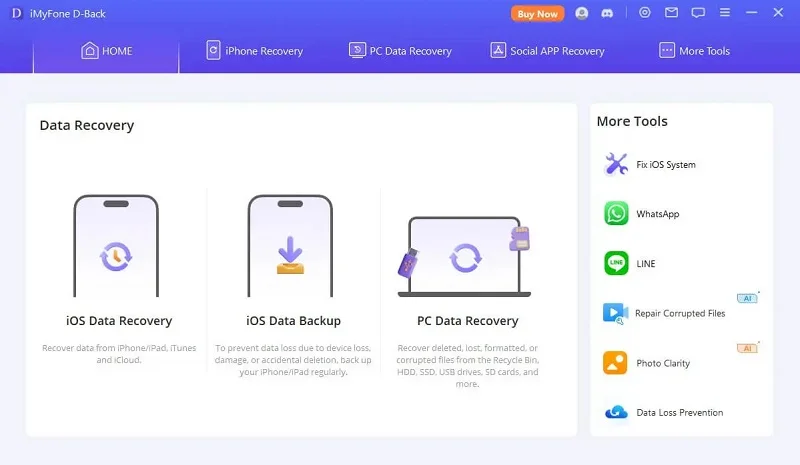
To start with, install the program on your Windows PC or Mac and launch it. Choose Recover Data from iOS Devices and then connect your iPhone to the computer using a USB cable.
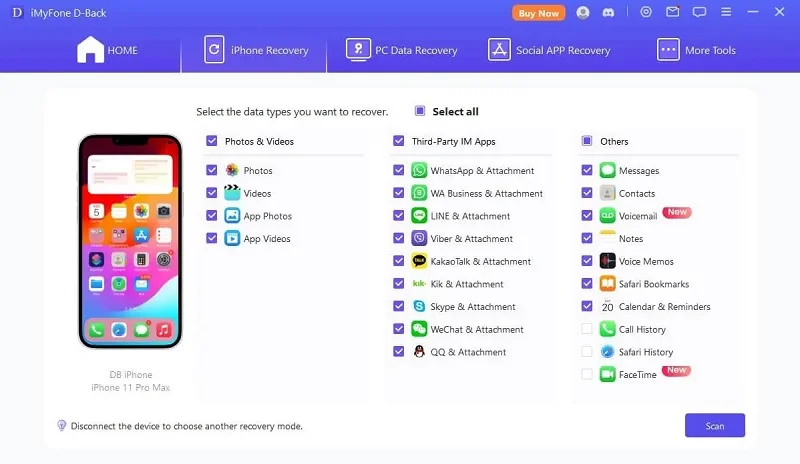
Step 2. Select Safari History to Scan
Once the program detects your iPhone, choose Safari History or any other type of files you would like to recover, and then click Scan to begin scanning.
Step 3. Recover Deleted Safari History
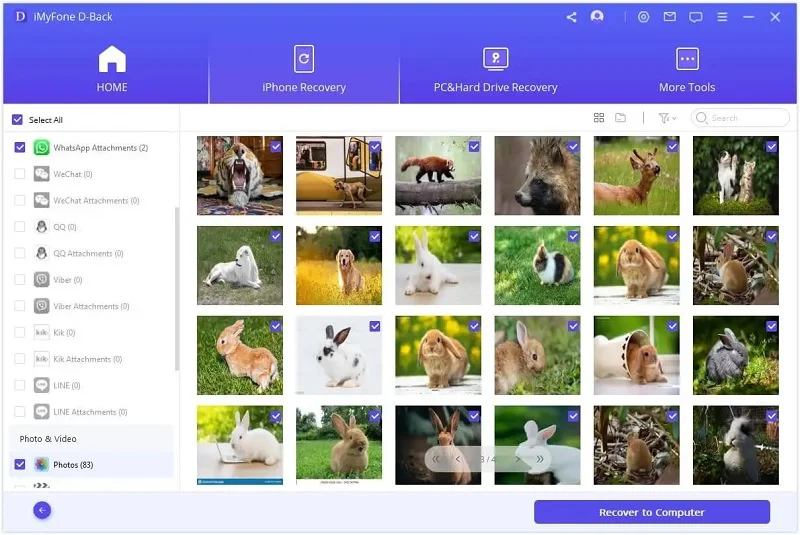
After the scan, click Safari History from the category list to preview the recoverable Safari history. Then select the ones you need and click the Recover to PC button to save the deleted Safari history to your computer.
Recover Deleted Safari History on iPhone from Backup
Option 1. recover safari history from icloud web.
You are allowed to recover only Safari history from iCloud's official site as long as you have turned on iCloud Auto Syncing on your iPhone. Follow these simple steps:
- Sign in to the iCloud official site from any browser using your iCloud account.
- Navigate to the Advanced option and scroll down to click Restore Bookmarks .
- Choose an archive of bookmarks you want and click on Restore .
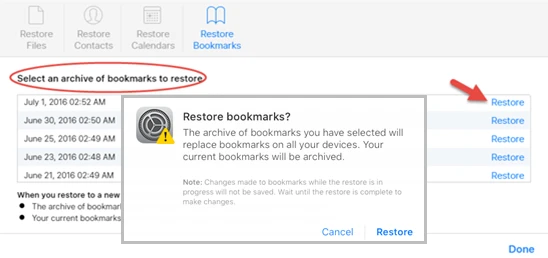
Only the deleted Safari history within the last 30 days can be retrieved. Also, the existing Safari bookmarks on your iPhone will be replaced and erased, which might cause new data loss.
Option 2. Restore iPhone Safari History from iCloud Backup
If you have backed up your iPhone to iCloud, restoring your iPhone from the iCloud backup is also one of the feasible choices you can try. Doing this will get back all the app data, including the deleted Safari history. But you need to factory reset the iPhone before performing the restore.
- Open Settings and click on General , scroll down to tap on " Transfer or Reset iPhone and select Erase All Content and Settings .
- Follow the instructions to set up your iPhone until you reach the page of Apps & Data . Then, choose Restore from iCloud Backup .
- Sign in to iCloud and choose a backup to restore the device. All data in the backup file, including the deleted Safari history, will come back.
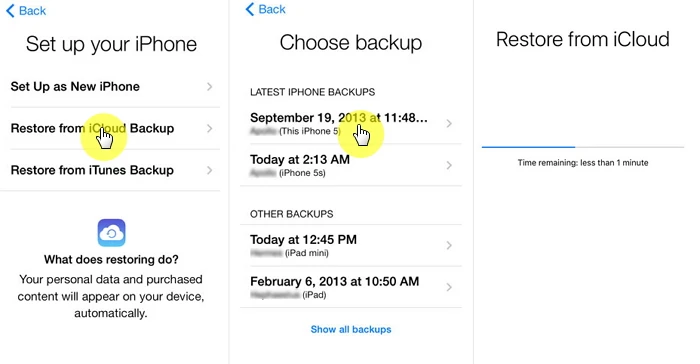
You're not allowed to preview the deleted files and selectively recover what you need only. What's worse, all the existing data on your iPhone will be erased and you'll lose your latest data that are not included in the iCloud backup.
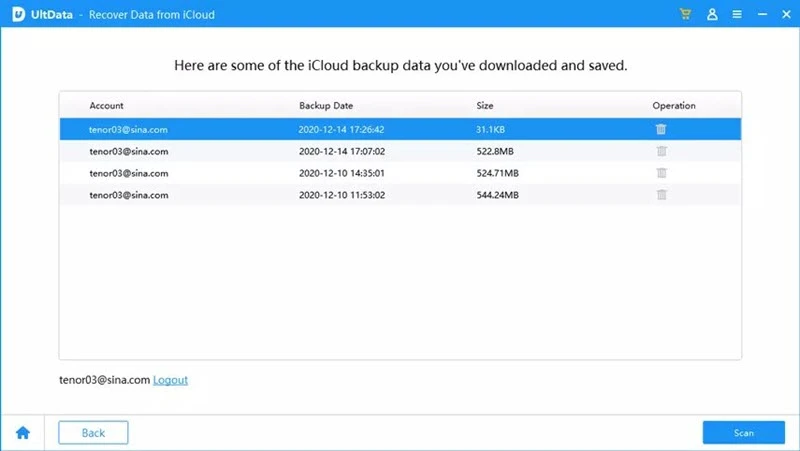
Selectively Recover Deleted Safari History on iPhone from iCloud Backup
With FoneGeek iPhone Data Recovery, you're able to preview and selectively recover deleted Safari history from iCloud backup.
- Run FoneGeek iPhone Data Recovery and switch to Recover Data from iCloud .
- Sign in to iCloud with your Apple ID and password. Then select the data types you want to restore and click on Scan .
- After you've downloaded the iCloud data, preview and select the data you need, then click on Recover to PC .
Option 3. Recover Deleted Safari History from iTunes Backup
If you have made an iTunes/Finder backup before you deleted the Safari history, you can also recover the deleted browsing history by restoring your iPhone from the backup. However, to restore the backed-up data, you will have to erase the existing data on your iPhone.
- Connect your iPhone to your computer and launch iTunes or Finder.
- Click on the iPhone icon when it shows up, and then choose Restore Backup .
- Select the backup file that contains your deleted Safari history and click on Restore .
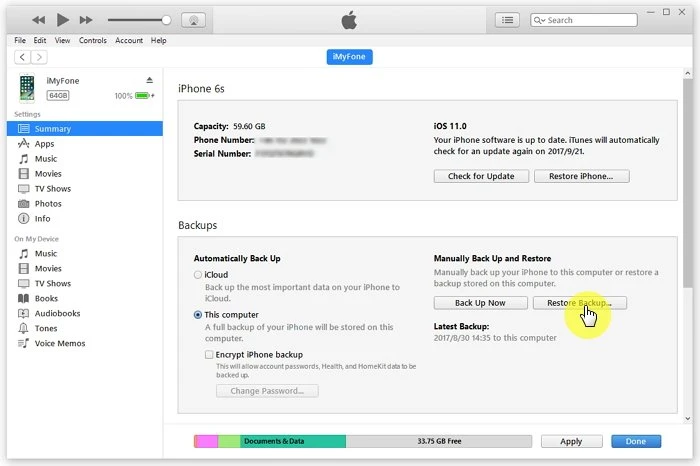
Same as iCloud, preview and selective recovery are not supported. Restoring from iTunes backup might also lead to data loss as any new files added to your iPhone since the backup will be replaced and overwritten.
Selectively Recover Deleted Safari History on iPhone from iTunes Backup
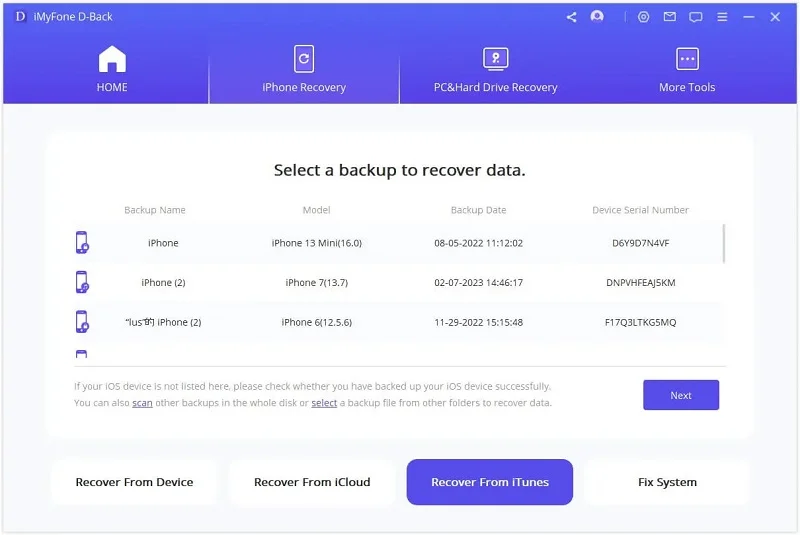
Again, we recommend you use FoneGeek iPhone Data Recovery to recover deleted Safari history from iTunes backup without erasing any data.
- Launch FoneGeek iPhone Data Recovery and choose the option of Recover Data from iTunes Backup .
- Select the iTunes backup file you want and click Next . Then select Safari History and click on Scan .
- After the scan, you can preview the Safari history and selectively recover those you need by clicking on Recover .
FAQs about iPhone Safari History Recovery
Q1. How long does Safari keep your browsing history?
This question has confused a lot of iPhone users. Actually, there is a definite answer to this question: your Mac can keep your browsing history for as long as a year, while iPhone and iPad keep browsing history for a month. This is what is demonstrated on Apple’s official site.
Q2. How to recover deleted Safari history on an iPad?
There are different methods for recovering deleted Safari history on your iPhone, most of which apply to iPads. You can try using FoneGeek iPhone Data Recovery, which is compatible with major iOS devices, including iPhone, iPad, and iPod touch.
Q3. Where is Safari history stored on your Mac?
All the Safari history you can see on your Mac is stored in the ~/Library/Safari/ folder.
- Just click on Finder > Go > Go to Folder .
- Then, enter the path in the textbox and click on OK to open the History.db file.
Q4. How to avoid losing Safari history?
To avoid the possible loss of Safari history, you can enable Safari in iCloud preferences. In this way, the Safari data will be backed up to the cloud automatically.
Besides that, you can also use some tools such as FoneGeek iOS Backup & Restore to back up iPhone data to your computer selectively or fully.
This article has outlined all feasible solutions to recover deleted Safari history on your iPhone. You can pick the one that works best for you. We strongly recommend FoneGeek iPhone Data Recovery for its easy-to-use interface and ablility to recover Safari history with or without backup.
Joan J. Mims is interested in researching all tips about iPhone, iPad and Android. He loves to share useful ideas with all users.
Leave a Reply
Your email address will not be published. Required fields are marked *
Table of Content
- 1 Can Safari History Be Recovered Once It Is Deleted?
- 2 Check iPhone Settings for Deleted Safari History
- 3 Recover Safari History on iPhone without Backup (Recommend) Hot
- 4 Recover Deleted Safari History on iPhone from Backup
- 5 FAQs about iPhone Safari History Recovery
- Company About us Contact us Privacy Policy Refund Policy Terms of Use EULA Cookie Policy
- Star Products iPhone Data Recovery Android Data Recovery iPhone Passcode Unlocker iOS System Recovery iOS Location Changer Free iOS Backup & Restore Excel Password Recovery PDF Editor
- Support Support Store How-to Tutorials Sitemap

- Privacy Policy
- Refund Policy
- Terms of Use
- Cookie Policy
- How-to Tutorials
Copyright © 2024 FoneGeek Software Co., Ltd. All Rights Reserved

How to clear the cache on your iPhone (and why you should)
How many tabs are open on your mobile browser right now? Go ahead, check -- you might be surprised by what you find.
Americans spend over five hours a day on their smartphones. That's over five hours of your phone potentially accessing, retrieving, and saving cache and cookies, which can negatively impact your iPhone's storage space .
What is cache?
Cache is the temporary storage of some data, like parts of a website from the last time you visited it, for example. Browser cache is content from a website that is stored on your phone during a browser session to help the browser execute faster the next time you visit that page.
Also: How to clear Google search cache on Android
Cache data can slow down your phone's overall browsing performance, however, since it takes up storage space on your device, so it's good to clear it out regularly. In this article, we mainly focus on clearing web browser cache on an iPhone, but you should know that other types of cache include mobile app cache and CPU cache.
How to clear cache on iPhone
What you'll need: Everything you need to clear your browser cache is within the iPhone's settings app or the Safari app, so grab your iPhone to get started.
Keep in mind that clearing the cache can clear private data, which can close all open tabs in Safari. This is also likely to log you out of all your websites, prompting you to sign in again the next time you open them.
How do I clear the cache from Chrome on iPhone?
If Google Chrome is your preferred browser, it may have a substantial amount of data stored on your device, which could also slow down performance.
To clear the cache in Chrome, open the Google Chrome app and follow these steps:
- Tap Settings .
- Go to Privacy and Security .
- Select Clear Browsing Data .
- Select the time from which to delete the data (if you want to delete all your browsing history, choose All Time ).
- Go through the items you'd like to delete, like your Browsing History, Cookies and Site Data, Cached Images and Files, Saved Passwords , and Autofill Data.
- Confirm by tapping Clear Browsing Data at the bottom of the screen.
- Tap Done when you've deleted the Chrome cache.
Also: Apple releases iOS 17.4 with podcast transcripts, new emojis, and EU app store changes
Clearing the browsing and cache data in Google Chrome doesn't close all open tabs, but it will refresh each tab and log you out of websites. Once you tap on one of the tabs you want to access, you'll have to log back in.
How can I browse on Safari without history?
If you're learning how to clear cache on an iPhone, you may also be wondering if there's a way to use Safari without saving any browsing history. You can turn on Private Browsing by following these steps:
- Open Safari .
- Tap on Tabs .
- Choose Private .
You can also enable private browsing by going to your iPhone Settings, finding Safari, and toggling on the private option.
How do I clear my app cache on my iPhone?
To clear the app cache from your iPhone Settings app, you can either delete the app and reinstall it, offload it, or try to clear the cache from within the app. Unfortunately, iOS apps don't have consistent settings across the board that would allow you to clear the cache of every app.
Also: Apple warns: Don't put your wet iPhone in rice. Do this instead
Apps like TikTok and CapCut, for example, have options to Clear Cache within their respective settings. Amazon lets users delete their browsing history, while the Reddit app can clear local history. It all depends on what the app's settings let you do.
Is "clear cache" the same as offloading?
Not exactly, though app offloading can help if your phone is slowed down by low storage. To offload an app means to uninstall an app without deleting any documents or data associated with it.
Also: Apple secures iMessage against threats from the future
To offload an app, go to Settings , then General , choose iPhone Storage and select the app to offload, then tap Offload App . If you ever download it again, you'll pick up where you left off for that app.
Are cookies and cache the same thing?
Cookies and cache are not the same. Cookies are data files that websites send to your phone, including things like saved passwords to keep you logged into an account or even the website preferences from the previous time you visited.
Also: I tested the best Mint alternatives, and this is my new favorite money app
Though they do sound harmless, cookies can also track how you browse the internet. They monitor patterns in your browsing and search history, even seeing what you clicked on or what your mouse hovered over. Ever made an innocuous search on Amazon only to find ads for it on all the apps you use? Cookies likely made that possible.
Can I block cookies on my iPhone?
While you can block cookies on Safari, the ranks are divided on whether you should. Blocking cookies entirely means that websites won't be able to get information from you, but it also means that some websites may not even work correctly on your browser. A lot of users actually enjoy a more personalized browsing experience, so cookies are a good thing for them.
If you'd like to block cookies in Safari, follow these steps:
- Go to Settings and select Safari .
- Tap on the toggle next to Block All Cookies .
There are also third-party extensions that help you block cookies and trackers in Google Chrome, like Ghostery and Disconnect .
How do I check iPhone storage?
On an iPhone, Settings can show you what's taking up most of your media storage, like photos, videos, and music. You can also see what each particular app's storage consumption is, which includes temporary data. To view the details of your iPhone's storage space, follow these steps:
- Go to the iPhone Settings .
- Tap on General .
- Select iPhone Storage .
- Scroll through to find the app you're looking for.
- Tap on the app to view storage status and options.
Unfortunately, you can't clear your iPhone cache for third-party apps by going into your Settings app, but this gives you a visual of your iPhone's storage and the option to delete or offload apps.
Also: Here's the fastest way to declutter your iPhone and free up Gigabytes of space
When you look at your device's storage space, you'll probably see recommended steps you can take to optimize your iPhone's storage, like offloading unused apps.
- How to better organize text messages on your iPhone, thanks to iOS 17
- How to transfer data from Android to an iPhone: 2 simple and fast ways
- How to turn on 80% charging limit on the iPhone 15 to save battery health
- How to leave a FaceTime voice or video message when your call goes unanswered
How-To Geek
I tried browsing the web with safari 1.0, here's how it went.
Hands-on with Apple's first web browser.
Key Takeaways
- Safari 1.0 was released in 2003 to replace Internet Explorer on the Mac.
- It was lacking some features compared to other web browsers, but it was fast and minimalist.
- Safari 1.0 is not compatible with most modern websites.
Safari was introduced in 2003 as Apple's replacement for Internet Explorer on the Mac, and it has continued to evolve since then as the default browser on all Apple devices. Let's take a deep dive into the browser that started it all: Safari 1.0.
The first version of Safari was released on June 23rd, 2003 , following a public beta that reached nearly five million downloads. The initial version was an optional download for Macs running Mac OS X 10.2 Jaguar , and it was later bundled with Mac OS X 10.3 Panther . Apple continued shipping Safari with every new Mac operating system, continuing to the present day with new releases of macOS.
Hello, Safari
Safari is a core system application on Mac computers, so you can't (easily) use older versions on newer operating systems that have a newer Safari version already installed. In the name of science, I fired up my trusty 1999 PowerMac G3, created a new drive partition, and installed a fresh copy of Mac OS X 10.3 Panther. That release shipped with Safari version 1.1, so this isn't technically the first public version, but it's close enough.
Safari 1.0 is a far cry from modern versions of Apple's web browser, but there are some familiar interface elements. The top bar has the back, forward, reload, and bookmark buttons that are still present in today's web browsers, but the address bar and web search are two separate text fields.
Google Chrome helped popularize the idea of a combined address and search bar when it was released in 2009, but before that, most web browsers had the same split text fields. On that note, Google is the default search engine, and I didn't see an option anywhere to change it.
Safari 1.0 isn't just minimalist by today's standards. This new Mac OS X installation also came with Internet Explorer 5 for Mac, which has a much more cluttered design with a sidebar, status bar, and more buttons at the top of the window. You could click a button on the sidebar to hide most of that for distraction-free browsing, but Safari is less complicated out of the box.
Most of the other browsers from this time, like Opera, Netscape, and the Mozilla Application Suite, were similarly feature-packed. The first version of Firefox arrived in 2004, the year after Safari, with a simplified feature set and a focus on web browsing. There is support for tabbed browsing in Safari 1.0, but it's not enabled by default.
There's also a bookmarks manager for organizing your favorite sites and pages, accessible from the menu bar or the bookmarks button in the bookmarks bar. The default bookmarks are a fun look back at the early-2000s internet, with links to Amazon, PayPal, BBC News, MapQuest, Monster.com, and other sites.
The preferences panel has some options for how windows open, where to save files and pages, turning on tabbed browsing, managing plugins, and deleting browsing cookies. There's also an AutoFill feature that can fill in web forms with information from your Address Book.
I also noticed this early version of Safari doesn't have an Inspect Element option, or seemingly any other web development features. You can view the HTML source code for a page, but that's it.
Surf Like It's 2003
So, what can you actually do with Safari 1.0 in 2024? Well, not a lot. This is a twenty-year-old web rendering engine, with no support for modern HTML and CSS layout features, HTML5 video, or most JavaScript features. Every site that loads over HTTPS (SSL) shows security warnings or refuses to load at all.
The main Google home page works, but the search results use a broken mobile layout. CNN, Apple.com, Wikipedia, eBay, and BBC News don't load at all. Amazon made the browser freeze for about a minute, complete with the spinning beachball of death, then loaded a page with just text and no styling or images.
There are a few websites designed specifically for older browsers, though. The FrogFind search engine created by Action Retro on YouTube works well here, which downgrades modern sites to simpler text-based layouts.
FrogFind doesn’t always work well, but it does turn websites like Wikipedia from completely unusable to readable.
Looking Back at Tomorrow
You can’t use Safari 1.0 for typical web browsing anymore, but it’s still a fascinating look at Apple’s vision for the future of web browsing. It wasn’t a feature-packed internet suite, like Netscape and Mozilla, or a super-customizable application like Opera. It was a fast, simple, and focused web browser, built on top of the modern KHTML engine from KDE’s Konqueror project.
Even though Safari wasn’t a perfect experience in its early days, the response from Mac owners was generally positive. Macworld said in 2003 , “Safari loaded pages faster than Internet Explorer in four out of five tests — in some cases, almost twice as fast.” The review from CNET for the 1.0 release said, “We encountered only minor bugs, usually related to JavaScript errors, though less so than the beta versions. Overall, Safari performed well.”
Safari went on to serve as the default browser for the iPhone and iPad, and there was a short-lived Windows version starting in 2007 . Safari’s underlying WebKit engine has also helped shape the internet we know today. WebKit was used by Google Chrome for years until Google forked it to create the Blink engine , which is now used by Microsoft Edge, Google Chrome, Vivaldi, and other web browsers.
For now, though, I’m happy to get back to a functioning modern web browser.
How to Remove Token Factory iFrame on Safari for Your Mac
Outlook is many users’ go-to email app, and while it often works without issues, Token Factory has appeared on some devices without warning. Fixing the issue is sometimes difficult, and unfortunately, it isn’t entirely in your hands. Today, I’ll reveal whether it’s possible to remove the Token Factory iFrame on your Mac. You’ll also learn what it is, and whether it’s something you should be worried about.
Is the Token Factory iFrame Dangerous?
Although Token Factory is hard to remove or stop, the good news is that it isn’t dangerous. If the file stays on your device, it’ll only consume space (though this can lead to performance issues if you use too much storage).
If you suspect that Token Factory keeps finding its way onto your device, but you can’t find the file, this guide outlining how to check storage on your Mac will help. You can also learn how to find large hidden files on your Mac .
Why Am I Seeing Token Factory?
Token Factory is usually a bug on Microsoft’s end in the Safari app. Microsoft has reported in the past that it has taken various steps to fix the problem, and most users should no longer see the download prompt.
Can I Remove Token Factory?
Although Token Factory is a problem that needs fixing on Microsoft’s end, you can limit its impact. For example, you can disable downloads for Outlook in Safari and try deleting and reinstalling the app.
Let’s now look at how to do both of these.
1. Disable Outlook Downloads in Safari
Revoking Outlook’s download permissions will normally stop the Token Factory download prompt from appearing. It’s only a temporary solution if you need this feature, but it’ll at least stop your immediate problems.
Here’s how to disable Outlook downloads in Safari:
Time needed: 2 minutes
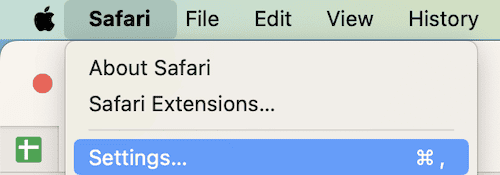
It’s up to Microsoft to ensure that you no longer see Token Factory when using Outlook in your browser, and the best you can do in most situations is wait for the problem to be fixed. However, as a temporary solution, it’s worth trying to disable downloads in Safari. Third-party software can also help.
Leave a Reply Cancel reply
You must be logged in to post a comment.
This site uses Akismet to reduce spam. Learn how your comment data is processed .
- Danny Maiorca
- Apple Watch
- Accessories
- Digital Magazine – Subscribe
- Digital Magazine – Info
- Smart Answers
- 11th-gen iPad
- New AirPods
- Best Mac antivirus
- Best Mac VPN
When you purchase through links in our articles, we may earn a small commission. This doesn't affect our editorial independence .
Convert YouTube videos to MP4 on Mac free (app & online)

After a long process of YouTube video downloading, it will be quite annoying to see a warning that the downloaded file format is not compatible with your Mac computer. When encountering this situation, you always need to download YouTube videos directly in a supported format.
When you download videos from YouTube, you will find that the suffix of the video file is not the common MOV, MKV, or MP4, which is quite annoying if you want to open it on a new Mac computer. That’s because YouTube will recode the video file to avoid users downloading the original MP4 file out of copyright consideration. But it’s legal for you to try a converter and convert YouTube videos to MP4 on Mac computers.
MP4 format is always the best choice as it is compatible with all devices and platforms. The following content will guide you on how to save YouTube videos in MP4 and watch them offline on Mac computers, including the newest version with M2.
Download YouTube Videos in MP4 Directly with EaseUS Video Downloader for Mac
The most recommended way is to use a free YouTube video downloader for Mac and save the YouTube video directly in the target format. One such product is the EaseUS Video Downloader for Mac . You may have heard of the brand EaseUS, as it has gained a good reputation in data recovery and backup since 2004. To keep up with users’ various needs, it released EaseUS Video Downloader to help download videos from more than 1,000 streaming sites.
- Compatibility: Mac OS 10.0.4 to macOS 14.4.1 (newest)
- Customer Service: 24*7 customer service
- Price: Free trial/$49.99 for lifetime use with a 30-day refund policy
- More reasons to choose: download videos with subtitles and thumbnails, equipped with a built-in converter to convert YouTube videos to MP3 format as well, save the live stream to your Mac as long as you get the URL, and download video with quality up to 4K/HD/8K.
Here are the specific steps on how to use it to transfer YouTube videos to MP4:
Step 1. Download and install EaseUS Video Downloader on your Mac computer.
Step 2. Use its built-in browser to find the target YouTube video you’d like to convert. You can also try to copy the video’s link and paste it to the software.
Step 3. Both methods above will lead you to the download interface. Now, click the blue “ Download ” button, and you can choose the target format and quality. You can choose to download the video file in MP3/MP4/MOV/WMV etc. Don’t forget to choose the file location as well.
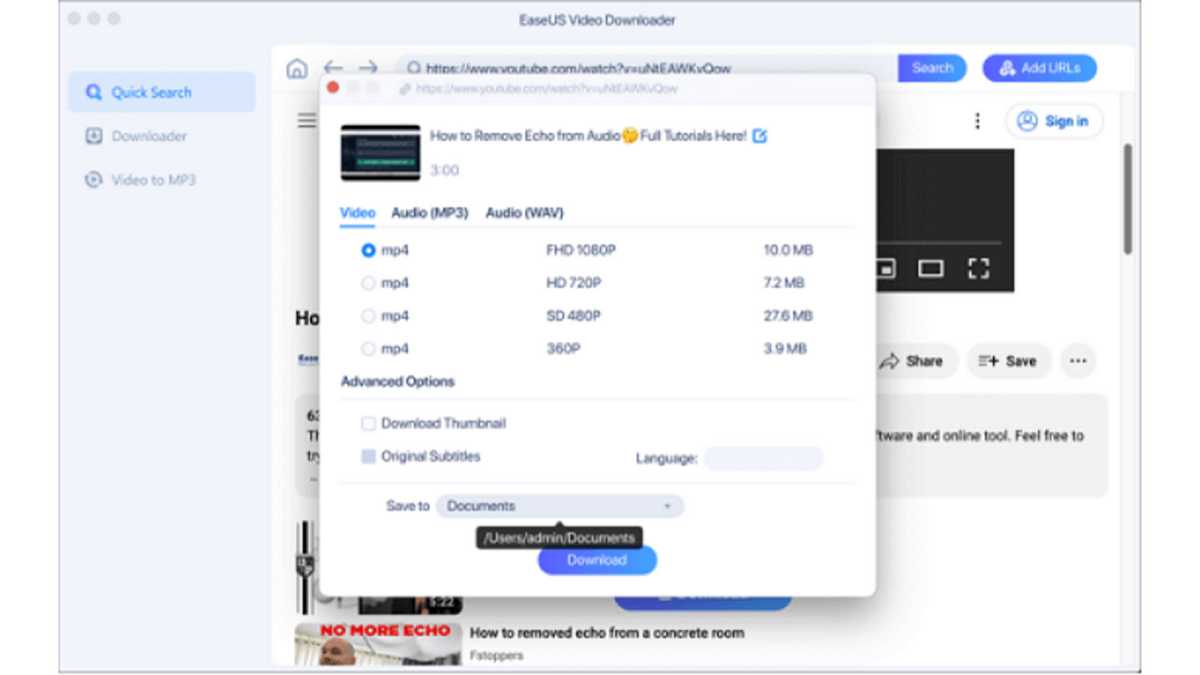
Step 4. After all settings are down, click “ Download ” again to start downloading.
This download tool is also equipped with the function of a converter. You can use it to convert audio to MP3 on a Mac as well.
But there are other options.
Save YouTube Videos in MP4 VLC Media Player for Mac
Another YouTube video downloader for Mac you can try is VLC Media Player, an open-source media player that downloads and converts videos. This tool can also download YouTube videos in MP4. One of its useful features is that there are no pop-up ads so you have no need to worry about security.
Follow the steps below to see how to convert YouTube videos into MP4:
Step 1. Open the YouTube video and copy the video’s URL. Then, open VLC Media Player on your Macbook Air/Macbook Pro.
Step 2. You can press command + N to “ Open Network Stream ”. Then, click the “ Open ” button.
Step 3. Double-click the video to play it. Go to “ Windows ” > “ Media Information ” from the top bar.
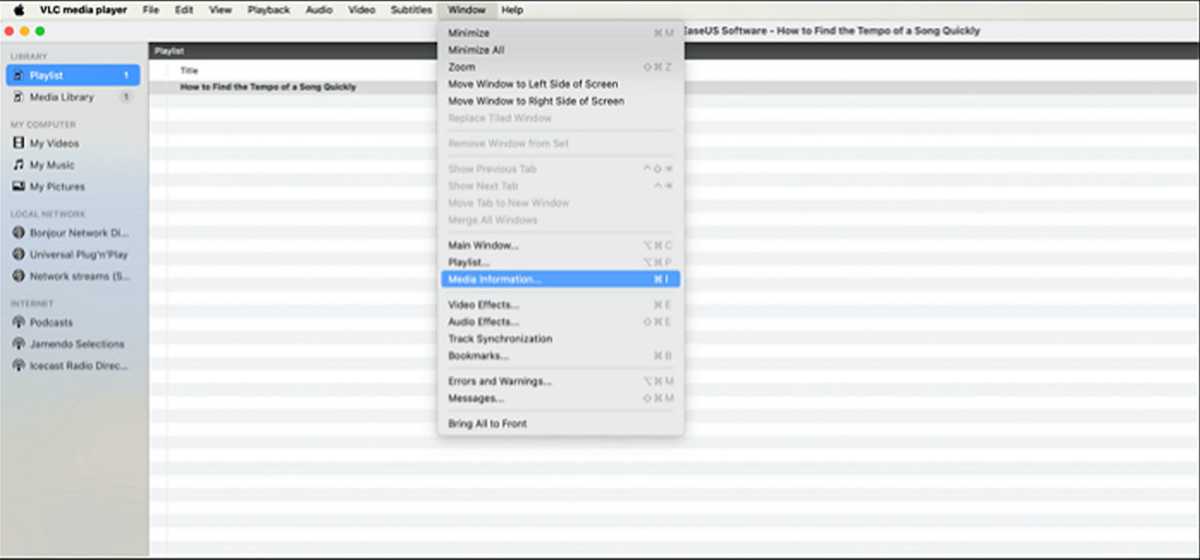
Step 4. A window will pop out to show you the video’s location. Copy that and open it in a new browser tab.
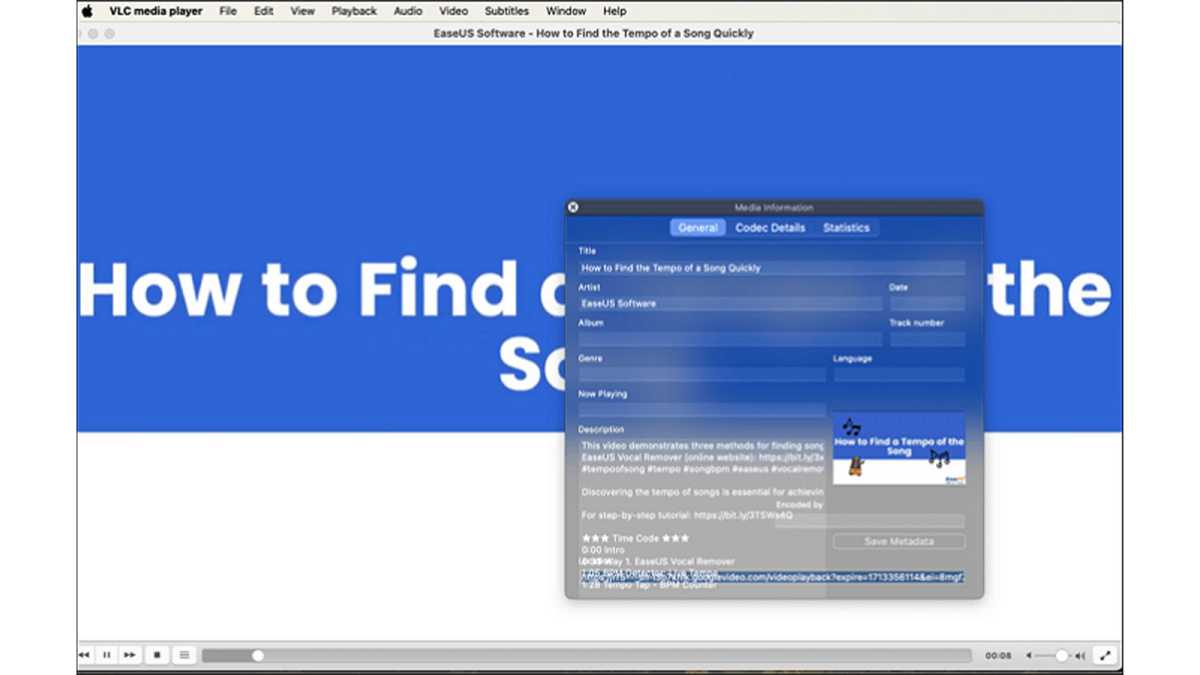
Step 5. Right-click the video and choose “ Download Video As… ”. Now, you can change the video’s name and file location to save a YouTube video in MP4 format.
Convert YouTube Videos to MP4 on Mac with a Safari Extension
For your information, if you don’t want to take up too much space on your Mac computer, you can consider using a browser extension to convert or download YouTube videos. This is also a good choice. You can choose to download YouTube videos on a Mac with a Safari video download extension.
To save your time and effort, the following steps will be described in detail with a well-known extension, Airy Video Downloader.
Now, follow these steps to transfer online videos from YouTube to MP4 with a Safari extension:
Step 1. Open the YouTube Video page you’d like to download on Safari and copy the video’s link.
Step 2. Install Airy Video Downloader Extension on your Mac Safari, and open it. Paste the video link to the bar.
Step 3. Then, choose the video format, such as MP4, and the quality from 144p to Ultra HD.
Step 4. After all settings are done, click the red button to start downloading YouTube videos in MP4 format. You can find the downloaded files in Finder on your Mac.
Convert YouTube Videos to MP4 on Mac Free Online
If you don’t want to download extra software, an online YouTube video converter will be more suitable for you. The steps of using any online video converter resemble each other. Before guiding you on how to manage this goal, you should know that there is no security guarantee for using websites. It’s better for you to try the desktop version if you are not in an emergency situation.
This part will use YTconverter as an example to show you the detailed steps to managing this goal. You can also search for other URL-to-MP4 Converter websites on Google Chrome.
The specific steps of how to convert videos from YouTube to MP4 with an online converter are listed below:
Step 1. Open the official site of the online converter. Then, open the target video page you’d like to convert with.
Step 2. Copy and paste the video’s URL to the blank sheet of the online converter, as the pic below shows.
Step 3. Click “ Convert ”, and a window of the format will show up for you to choose from. You can choose to convert the video to MP4 up to 1080p. The quality may differ according to the original video.
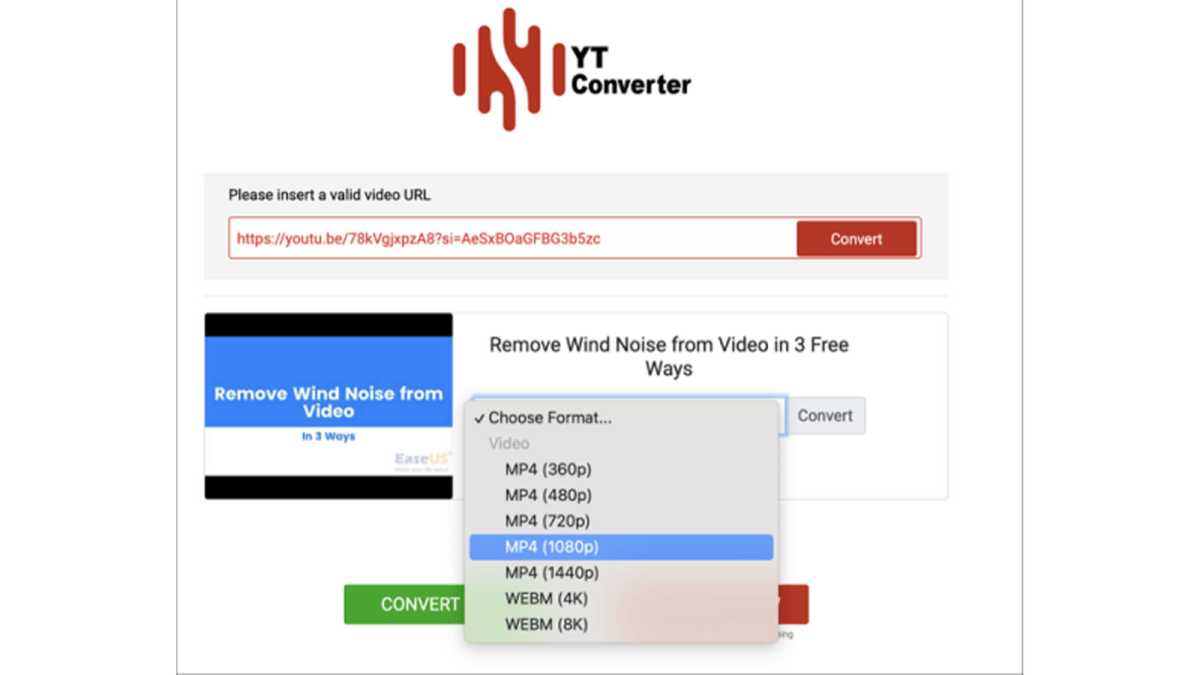
Step 4. Then, click “ Convert ”, and the website will download the video in the format and quality. You can find the downloaded files in the browser’s download file.
MP4 is always the best video format as it is compatible with all devices and platforms, while the default video format for Mac computers is MOV. That’s why most users seek ways how to convert videos from YouTube to MP4 on Mac.
This post has provided 4 proven ways to help you manage this goal. To sum up, the easiest and most convenient way is to download videos from YouTube directly in MP4 format with EaseUS Video Downloader . Just install this great YouTube video converter and downloader on your iMac/Macbook, and you won’t regret its installation.
iPhone User Guide
- iPhone models compatible with iOS 17
- R ' class='toc-item' data-ss-analytics-link-url='https://support.apple.com/guide/iphone/iphone-xr-iph017302841/ios' data-ajax-endpoint='https://support.apple.com/guide/iphone/iphone-xr-iph017302841/ios' data-ss-analytics-event="acs.link_click" href='https://support.apple.com/guide/iphone/iphone-xr-iph017302841/ios' id='toc-item-IPH017302841' data-tocid='IPH017302841' > iPhone X R
- S ' class='toc-item' data-ss-analytics-link-url='https://support.apple.com/guide/iphone/iphone-xs-iphc00446242/ios' data-ajax-endpoint='https://support.apple.com/guide/iphone/iphone-xs-iphc00446242/ios' data-ss-analytics-event="acs.link_click" href='https://support.apple.com/guide/iphone/iphone-xs-iphc00446242/ios' id='toc-item-IPHC00446242' data-tocid='IPHC00446242' > iPhone X S
- S Max' class='toc-item' data-ss-analytics-link-url='https://support.apple.com/guide/iphone/iphone-xs-max-iphcd2066870/ios' data-ajax-endpoint='https://support.apple.com/guide/iphone/iphone-xs-max-iphcd2066870/ios' data-ss-analytics-event="acs.link_click" href='https://support.apple.com/guide/iphone/iphone-xs-max-iphcd2066870/ios' id='toc-item-IPHCD2066870' data-tocid='IPHCD2066870' > iPhone X S Max
- iPhone 11 Pro
- iPhone 11 Pro Max
- iPhone SE (2nd generation)
- iPhone 12 mini
- iPhone 12 Pro
- iPhone 12 Pro Max
- iPhone 13 mini
- iPhone 13 Pro
- iPhone 13 Pro Max
- iPhone SE (3rd generation)
- iPhone 14 Plus
- iPhone 14 Pro
- iPhone 14 Pro Max
- iPhone 15 Plus
- iPhone 15 Pro
- iPhone 15 Pro Max
- Setup basics
- Make your iPhone your own
- Take great photos and videos
- Keep in touch with friends and family
- Share features with your family
- Use iPhone for your daily routines
- Expert advice from Apple Support
- What’s new in iOS 17
- Turn on and set up iPhone
- Wake, unlock, and lock
- Set up cellular service
- Use Dual SIM
- Connect to the internet
- Sign in with Apple ID
- Subscribe to iCloud+
- Find settings
- Set up mail, contacts, and calendar accounts
- Learn the meaning of the status icons
- Charge the battery
- Charge with cleaner energy sources
- Show the battery percentage
- Check battery health and usage
- Use Low Power Mode
- Read and bookmark the user guide
- Learn basic gestures
- Learn gestures for iPhone models with Face ID
- Adjust the volume
- Silence iPhone
- Find your apps in App Library
- Switch between open apps
- Quit and reopen an app
- Multitask with Picture in Picture
- Access features from the Lock Screen
- Use the Dynamic Island
- Perform quick actions
- Search on iPhone
- Get information about your iPhone
- View or change cellular data settings
- Travel with iPhone
- Change sounds and vibrations
- Use the Action button on iPhone 15 Pro and iPhone 15 Pro Max
- Create a custom Lock Screen
- Change the wallpaper
- Adjust the screen brightness and color balance
- Keep the iPhone display on longer
- Use StandBy
- Customize the text size and zoom setting
- Change the name of your iPhone
- Change the date and time
- Change the language and region
- Organize your apps in folders
- Add, edit, and remove widgets
- Move apps and widgets on the Home Screen
- Remove or delete apps
- Use and customize Control Center
- Change or lock the screen orientation
- View and respond to notifications
- Change notification settings
- Set up a Focus
- Allow or silence notifications for a Focus
- Turn a Focus on or off
- Stay focused while driving
- Customize sharing options
- Type with the onscreen keyboard
- Dictate text
- Select and edit text
- Use predictive text
- Use text replacements
- Add or change keyboards
- Add emoji and stickers
- Take a screenshot
- Take a screen recording
- Draw in documents
- Add text, shapes, signatures, and more
- Fill out forms and sign documents
- Use Live Text to interact with content in a photo or video
- Use Visual Look Up to identify objects in your photos and videos
- Lift a subject from the photo background
- Subscribe to Apple Arcade
- Play with friends in Game Center
- Connect a game controller
- Use App Clips
- Update apps
- View or cancel subscriptions
- Manage purchases, settings, and restrictions
- Install and manage fonts
- Buy books and audiobooks
- Annotate books
- Access books on other Apple devices
- Listen to audiobooks
- Set reading goals
- Organize books
- Create and edit events in Calendar
- Send invitations
- Reply to invitations
- Change how you view events
- Search for events
- Change calendar and event settings
- Schedule or display events in a different time zone
- Keep track of events
- Use multiple calendars
- Use the Holidays calendar
- Share iCloud calendars
- Camera basics
- Set up your shot
- Apply Photographic Styles
- Take Live Photos
- Take Burst mode shots
- Take a selfie
- Take panoramic photos
- Take macro photos and videos
- Take portraits
- Take Night mode photos
- Take Apple ProRAW photos
- Adjust the shutter volume
- Adjust HDR camera settings
- Record videos
- Record spatial videos for Apple Vision Pro
- Record ProRes videos
- Record videos in Cinematic mode
- Change video recording settings
- Save camera settings
- Customize the Main camera lens
- Change advanced camera settings
- View, share, and print photos
- Use Live Text
- Scan a QR code
- See the world clock
- Set an alarm
- Change the next wake up alarm
- Use the stopwatch
- Use multiple timers
- Add and use contact information
- Edit contacts
- Add your contact info
- Use NameDrop on iPhone to share your contact info
- Use other contact accounts
- Use Contacts from the Phone app
- Merge or hide duplicate contacts
- Export contacts
- Get started with FaceTime
- Make FaceTime calls
- Receive FaceTime calls
- Create a FaceTime link
- Take a Live Photo
- Turn on Live Captions in a FaceTime call
- Use other apps during a call
- Make a Group FaceTime call
- View participants in a grid
- Use SharePlay to watch, listen, and play together
- Share your screen in a FaceTime call
- Collaborate on a document in FaceTime
- Use video conferencing features
- Hand off a FaceTime call to another Apple device
- Change the FaceTime video settings
- Change the FaceTime audio settings
- Change your appearance
- Leave a call or switch to Messages
- Block unwanted callers
- Report a call as spam
- Connect external devices or servers
- Modify files, folders, and downloads
- Search for files and folders
- Organize files and folders
- Set up iCloud Drive
- Share files and folders in iCloud Drive
- Use an external storage device, a file server, or a cloud storage service
- Share your location
- Meet up with a friend
- Send your location via satellite
- Add or remove a friend
- Locate a friend
- Get notified when friends change their location
- Notify a friend when your location changes
- Turn off Find My
- Add your iPhone
- Add your iPhone Wallet with MagSafe
- Get notified if you leave a device behind
- Locate a device
- Mark a device as lost
- Erase a device
- Remove a device
- Add an AirTag
- Share an AirTag or other item in Find My on iPhone
- Add a third-party item
- Get notified if you leave an item behind
- Locate an item
- Mark an item as lost
- Remove an item
- Adjust map settings
- Get started with Fitness
- Track daily activity and change your move goal
- See your activity summary
- Sync a third-party workout app
- Change fitness notifications
- Share your activity
- Subscribe to Apple Fitness+
- Find Apple Fitness+ workouts and meditations
- Start an Apple Fitness+ workout or meditation
- Create a Custom Plan in Apple Fitness+
- Work out together using SharePlay
- Change what’s on the screen during an Apple Fitness+ workout or meditation
- Download an Apple Fitness+ workout or meditation
- Get started with Freeform
- Create a Freeform board
- Draw or handwrite
- Apply consistent styles
- Position items on a board
- Search Freeform boards
- Share and collaborate
- Delete and recover boards
- Get started with Health
- Fill out your Health Details
- Intro to Health data
- View your health data
- Share your health data
- View health data shared by others
- Download health records
- View health records
- Monitor your walking steadiness
- Log menstrual cycle information
- View menstrual cycle predictions and history
- Track your medications
- Learn more about your medications
- Log your state of mind
- Take a mental health assessment
- Set up a schedule for a Sleep Focus
- Turn off alarms and delete sleep schedules
- Add or change sleep schedules
- Turn Sleep Focus on or off
- Change your wind down period, sleep goal, and more
- View your sleep history
- Check your headphone levels
- Use audiogram data
- Register as an organ donor
- Back up your Health data
- Intro to Home
- Upgrade to the new Home architecture
- Set up accessories
- Control accessories
- Control your home using Siri
- Use Grid Forecast to plan your energy usage
- Set up HomePod
- Control your home remotely
- Create and use scenes
- Use automations
- Set up security cameras
- Use Face Recognition
- Unlock your door with a home key
- Configure a router
- Invite others to control accessories
- Add more homes
- Get music, movies, and TV shows
- Get ringtones
- Manage purchases and settings
- Get started with Journal
- Write in your journal
- Review your past journal entries
- Change Journal settings
- Magnify nearby objects
- Change settings
- Detect people around you
- Detect doors around you
- Receive image descriptions of your surroundings
- Read aloud text and labels around you
- Set up shortcuts for Detection Mode
- Add and remove email accounts
- Set up a custom email domain
- Check your email
- Unsend email with Undo Send
- Reply to and forward emails
- Save an email draft
- Add email attachments
- Download email attachments
- Annotate email attachments
- Set email notifications
- Search for email
- Organize email in mailboxes
- Flag or block emails
- Filter emails
- Use Hide My Email
- Use Mail Privacy Protection
- Change email settings
- Delete and recover emails
- Add a Mail widget to your Home Screen
- Print emails
- Get travel directions
- Select other route options
- Find stops along your route
- View a route overview or a list of turns
- Change settings for spoken directions
- Get driving directions
- Get directions to your parked car
- Set up electric vehicle routing
- Report traffic incidents
- Get cycling directions
- Get walking directions
- Get transit directions
- Delete recent directions
- Get traffic and weather info
- Estimate travel time and ETA
- Download offline maps
- Search for places
- Find nearby attractions, restaurants, and services
- Get information about places
- Mark places
- Share places
- Rate places
- Save favorite places
- Explore new places with Guides
- Organize places in My Guides
- Clear location history
- Look around places
- Take Flyover tours
- Find your Maps settings
- Measure dimensions
- View and save measurements
- Measure a person’s height
- Use the level
- Set up Messages
- About iMessage
- Send and reply to messages
- Unsend and edit messages
- Keep track of messages
- Forward and share messages
- Group conversations
- Watch, listen, or play together using SharePlay
- Collaborate on projects
- Use iMessage apps
- Take and edit photos or videos
- Share photos, links, and more
- Send stickers
- Request, send, and receive payments
- Send and receive audio messages
- Animate messages
- Send and save GIFs
- Turn read receipts on or off
- Change notifications
- Block, filter, and report messages
- Delete messages and attachments
- Recover deleted messages
- View albums, playlists, and more
- Show song credits and lyrics
- Queue up your music
- Listen to broadcast radio
- Subscribe to Apple Music
- Play music together in the car with iPhone
- Listen to lossless music
- Listen to Dolby Atmos music
- Apple Music Sing
- Find new music
- Add music and listen offline
- Get personalized recommendations
- Listen to radio
- Search for music
- Create playlists
- See what your friends are listening to
- Use Siri to play music
- Change the way music sounds
- Get started with News
- Use News widgets
- See news stories chosen just for you
- Read stories
- Follow your favorite teams with My Sports
- Listen to Apple News Today
- Subscribe to Apple News+
- Browse and read Apple News+ stories and issues
- Use Offline Mode to read downloaded News content
- Manually download Apple News+ issues
- Listen to audio stories
- Solve puzzles in Apple News
- Solve crossword and crossword mini puzzles
- Solve Quartiles puzzles
- Search for news stories
- Save stories in News for later
- Subscribe to individual news channels
- Get started with Notes
- Add or remove accounts
- Create and format notes
- Draw or write
- Add photos, videos, and more
- Scan text and documents
- Work with PDFs
- Create Quick Notes
- Search notes
- Organize in folders
- Organize with tags
- Use Smart Folders
- Export or print notes
- Change Notes settings
- Make a call
- View and delete the call history
- Answer or decline incoming calls
- While on a call
- Have a conference or three-way call on iPhone
- Set up voicemail
- Check voicemail
- Change voicemail greeting and settings
- Select ringtones and vibrations
- Make calls using Wi-Fi
- Set up call forwarding
- Set up call waiting
- Block or avoid unwanted calls
- View photos and videos
- Play videos and slideshows
- Delete or hide photos and videos
- Edit photos and videos
- Trim video length and adjust slow motion
- Edit Cinematic mode videos
- Edit Live Photos
- Edit portraits
- Use photo albums
- Edit, share, and organize albums
- Filter and sort photos and videos in albums
- Make stickers from your photos
- Duplicate and copy photos and videos
- Merge duplicate photos and videos
- Search for photos
- Identify people and pets
- Browse photos by location
- Share photos and videos
- Share long videos
- View photos and videos shared with you
- Watch memories
- Personalize your memories
- Manage memories and featured photos
- Use iCloud Photos
- Create shared albums
- Add and remove people in a shared album
- Add and delete photos and videos in a shared album
- Set up or join an iCloud Shared Photo Library
- Add content to an iCloud Shared Photo Library
- Use iCloud Shared Photo Library
- Import and export photos and videos
- Print photos
- Find podcasts
- Listen to podcasts
- Follow your favorite podcasts
- Use the Podcasts widget
- Organize your podcast library
- Download, save, or share podcasts
- Subscribe to podcasts
- Listen to subscriber-only content
- Change download settings
- Make a grocery list
- Add items to a list
- Edit and manage a list
- Search and organize lists
- Work with templates
- Use Smart Lists
- Print reminders
- Use the Reminders widget
- Change Reminders settings
- Browse the web
- Search for websites
- Customize your Safari settings
- Change the layout
- Use Safari profiles
- Open and close tabs
- Organize your tabs
- View your Safari tabs from another Apple device
- Share Tab Groups
- Use Siri to listen to a webpage
- Bookmark favorite webpages
- Save pages to a Reading List
- Find links shared with you
- Annotate and save a webpage as a PDF
- Automatically fill in forms
- Get extensions
- Hide ads and distractions
- Clear your cache and cookies
- Browse the web privately
- Use passkeys in Safari
- Check stocks
- Manage multiple watchlists
- Read business news
- Add earnings reports to your calendar
- Use a Stocks widget
- Translate text, voice, and conversations
- Translate text in apps
- Translate with the camera view
- Subscribe to Apple TV+, MLS Season Pass, or an Apple TV channel
- Add your TV provider
- Get shows, movies, and more
- Watch sports
- Watch Major League Soccer with MLS Season Pass
- Control playback
- Manage your library
- Change the settings
- Make a recording
- Play it back
- Edit or delete a recording
- Keep recordings up to date
- Organize recordings
- Search for or rename a recording
- Share a recording
- Duplicate a recording
- Keep cards and passes in Wallet
- Set up Apple Pay
- Use Apple Pay for contactless payments
- Use Apple Pay in apps and on the web
- Track your orders
- Use Apple Cash
- Use Apple Card
- Use Savings
- Pay for transit
- Access your home, hotel room, and vehicle
- Add identity cards
- Use COVID-19 vaccination cards
- Check your Apple Account balance
- Use Express Mode
- Organize your Wallet
- Remove cards or passes
- Check the weather
- Check the weather in other locations
- View weather maps
- Manage weather notifications
- Use Weather widgets
- Learn the weather icons
- Find out what Siri can do
- Tell Siri about yourself
- Have Siri announce calls and notifications
- Add Siri Shortcuts
- About Siri Suggestions
- Use Siri in your car
- Change Siri settings
- Contact emergency services
- Use Emergency SOS via satellite
- Request Roadside Assistance via satellite
- Set up and view your Medical ID
- Use Check In
- Manage Crash Detection
- Reset privacy and security settings in an emergency
- Set up Family Sharing
- Add Family Sharing members
- Remove Family Sharing members
- Share subscriptions
- Share purchases
- Share locations with family and locate lost devices
- Set up Apple Cash Family and Apple Card Family
- Set up parental controls
- Set up a child’s device
- Get started with Screen Time
- Protect your vision health with Screen Distance
- Set up Screen Time
- Set communication and safety limits and block inappropriate content
- Set up Screen Time for a family member
- Charging cable
- Power adapters
- MagSafe chargers and battery packs
- MagSafe cases and sleeves
- Qi-certified wireless chargers
- Use AirPods
- Use EarPods
- Apple Watch
- Wirelessly stream videos and photos to Apple TV or a smart TV
- Connect to a display with a cable
- HomePod and other wireless speakers
- Pair Magic Keyboard
- Enter characters with diacritical marks
- Switch between keyboards
- Use shortcuts
- Choose an alternative keyboard layout
- Change typing assistance options
- External storage devices
- Bluetooth accessories
- Share your internet connection
- Allow phone calls on your iPad and Mac
- Use iPhone as a webcam
- Hand off tasks between devices
- Cut, copy, and paste between iPhone and other devices
- Stream video or mirror the screen of your iPhone
- Start SharePlay instantly
- Use AirDrop to send items
- Connect iPhone and your computer with a cable
- Transfer files between devices
- Transfer files with email, messages, or AirDrop
- Transfer files or sync content with the Finder or iTunes
- Automatically keep files up to date with iCloud
- Intro to CarPlay
- Connect to CarPlay
- Use your vehicle’s built-in controls
- Get turn-by-turn directions
- Change the map view
- Make phone calls
- View your calendar
- Send and receive text messages
- Announce incoming text messages
- Play podcasts
- Play audiobooks
- Listen to news stories
- Control your home
- Use other apps with CarPlay
- Rearrange icons on CarPlay Home
- Change settings in CarPlay
- Get started with accessibility features
- Turn on accessibility features for setup
- Change Siri accessibility settings
- Open features with Accessibility Shortcut
- Change color and brightness
- Make text easier to read
- Reduce onscreen motion
- Customize per-app visual settings
- Hear what’s on the screen or typed
- Hear audio descriptions
- Turn on and practice VoiceOver
- Change your VoiceOver settings
- Use VoiceOver gestures
- Operate iPhone when VoiceOver is on
- Control VoiceOver using the rotor
- Use the onscreen keyboard
- Write with your finger
- Keep the screen off
- Use VoiceOver with an Apple external keyboard
- Use a braille display
- Type braille on the screen
- Customize gestures and keyboard shortcuts
- Use VoiceOver with a pointer device
- Use VoiceOver for images and videos
- Use VoiceOver in apps
- Use AssistiveTouch
- Adjust how iPhone responds to your touch
- Use Reachability
- Auto-answer calls
- Turn off vibration
- Change Face ID and attention settings
- Use Voice Control
- Adjust the side or Home button
- Use Apple TV Remote buttons
- Adjust pointer settings
- Adjust keyboard settings
- Control iPhone with an external keyboard
- Adjust AirPods settings
- Turn on Apple Watch Mirroring
- Control a nearby Apple device
- Intro to Switch Control
- Set up and turn on Switch Control
- Select items, perform actions, and more
- Control several devices with one switch
- Use hearing devices
- Use Live Listen
- Use sound recognition
- Set up and use RTT and TTY
- Flash the indicator light for notifications
- Adjust audio settings
- Play background sounds
- Display subtitles and captions
- Show transcriptions for Intercom messages
- Get live captions of spoken audio
- Type to speak
- Record a Personal Voice
- Lock iPhone to one app with Guided Access
- Use built-in privacy and security protections
- Set a passcode
- Set up Face ID
- Set up Touch ID
- Control access to information on the Lock Screen
- Keep your Apple ID secure
- Use passkeys to sign in to apps and websites
- Sign in with Apple
- Share passwords
- Automatically fill in strong passwords
- Change weak or compromised passwords
- View your passwords and related information
- Share passkeys and passwords securely with AirDrop
- Make your passkeys and passwords available on all your devices
- Automatically fill in verification codes
- Automatically fill in SMS passcodes
- Sign in with fewer CAPTCHA challenges
- Use two-factor authentication
- Use security keys
- Manage information sharing with Safety Check
- Control app tracking permissions
- Control the location information you share
- Control access to information in apps
- Control how Apple delivers advertising to you
- Control access to hardware features
- Create and manage Hide My Email addresses
- Protect your web browsing with iCloud Private Relay
- Use a private network address
- Use Advanced Data Protection
- Use Lockdown Mode
- Use Stolen Device Protection
- Receive warnings about sensitive content
- Use Contact Key Verification
- Turn iPhone on or off
- Force restart iPhone
- Back up iPhone
- Reset iPhone settings
- Restore all content from a backup
- Restore purchased and deleted items
- Sell, give away, or trade in your iPhone
- Erase iPhone
- Install or remove configuration profiles
- Important safety information
- Important handling information
- Find more resources for software and service
- FCC compliance statement
- ISED Canada compliance statement
- Ultra Wideband information
- Class 1 Laser information
- Apple and the environment
- Disposal and recycling information
- Unauthorized modification of iOS
Clear your cache and cookies on iPhone
Note: Clearing your browsing history in Safari doesn’t clear any browsing histories kept independently by websites you visited, or your browsing history in other apps.

Below Clear Timeframe, choose how much of your browsing history to clear.
Note: If you have Safari profiles set up, select a profile to clear only the history of that profile, or select All Profiles.
Tap Clear History.

IMAGES
VIDEO
COMMENTS
Here's how to do it. First, open the Safari application on your Mac. In any Safari window, look to the right of the address bar for an icon that looks like a downward-pointing arrow in a circle. If you see it, click it or press Option+Command+L. (If you don't see the arrow icon, Safari does not have any download history to display.)
Another way to quickly see your downloads is to click directly on the downwards arrow in the top right corner of Safari browser menu.; The Download page will appear with all the downloads sorted by date.; How to find a specific item you've downloaded. To find an item you've downloaded, go to Downloads and click the magnifying glass next to a file in your downloads list and type the possible ...
Open Safari. It's the blue compass icon with a red and white dial inside. You'll usually find it on the home screen. 2. Tap the sidebar icon in the top left. This will open a sidebar with a number of options. 3. Tap the History button. The History option has a blue clock icon next to it.
Delete a website from your history. Open the Safari app. Tap the Show Bookmarks button, then tap the History button. ... Download a content blocking app from the App Store. Tap Settings > Safari > Extensions. Tap to turn on a listed content blocker. You can use more than one content blocker.
To perform these actions, open the Downloads menu in Safari itself. Here's what you can do: Here's what you can do: Pause Downloads: If you're currently downloading, click the stop button beside the file name to pause the download, then click the resume button to resume it again.
With iOS 13, Apple has brought a similar feature to the mobile version of its Safari browser in the form of the Download Manager. Now, when you choose to download a file, such as an image or ...
Here is a command that you can simply copy and paste into your Terminal to view your Mac download history: ... This isn't just Safari downloads. Any app that lets you download files will show up ...
Pause a download: Click the Stop button to the right of the filename in the downloads list. To resume, click the Resume button . Find a downloaded item on your Mac: Click the magnifying glass next to the filename in the downloads list. If you move a file or change the download location after downloading it, Safari can't find the file.
To do so, tap the download icon or AA icon from the status bar → select download → tap the search icon next to the downloaded file. By default, Safari download manager on iPhone stores the ...
Open Safari for me. In the Safari app on your Mac, choose History > Clear History, then click the pop-up menu. Choose how far back you want your browsing history cleared. When you clear your history, Safari removes data it saves as a result of your browsing, including: History of webpages you visited. The back and forward list for open webpages.
In Safari, tap the Bookmarks button. Select the History icon in the upper right corner. Tap Clear and select how much history you'd like to clear: the last hour, the last day, 48 hours' worth, or all recorded history. To clear History, tap the Bookmarks button, then choose the History icon.
In Safari, the download history serves as a record of all the files you've acquired from the web, providing a comprehensive overview of your past downloads. While this feature offers convenience and insight into your browsing activities, there are instances where you may want to clear your download history. Whether you're aiming to declutter ...
Here's how to manage Safari's history on a Mac: Open the Safari browser and select History in the menu bar located at the top of the screen. You'll see a drop-down menu with the titles of the web pages you visited recently. Select a website to load the respective page or select one of the previous days at the bottom of the menu to see more options.
If you're going about your day, browsing the web, you probably won't be aware of the feature. Instead, it comes up when you tap on a download link. Go to a web page and find the link for a file you want to download. When you select it, you'll see a popup with the filename asking if you want to download it. Tap on the "Download" button.
Tap "History" then "Show All History" to reveal the list of websites you have visited. To find a particular website, search for it in the search bar at the top of the screen. Click on it ...
Here's how: Open the "Settings" app on your iPhone. Scroll down and tap on "Safari" (for clearing Safari download history) or tap on the app name (for clearing app-specific download history). Look for an option called "Clear History and Website Data" or a similar setting. Tap on the option and configure it to clear history and ...
Select "Show History". You can also press ⌘ Command +⌥ Option + 2 to open the Show History window. 3. Find the entry that you want to delete. You can use the search bar in the upper-right corner, or expand the dates to browse through all your entries. 4. Right-click on the entry you want to remove and select "Delete".
4. Safari history is stored in an SQLite database located at. You can copy this file elsewhere to save it, then restore it by copying it over the top of the existing file (while Safari is quit). I has thinking to write a script to archive all the data Safari has, just in case.
Stack Exchange Network. Stack Exchange network consists of 183 Q&A communities including Stack Overflow, the largest, most trusted online community for developers to learn, share their knowledge, and build their careers.. Visit Stack Exchange
If you just downloaded a file from Safari. Next to the search field in Safari, tap the Page Settings button. Tap the Downloads button. Published Date: October 13, 2023. If you download a file onto your iPhone or iPad from the internet, you can find it in your Downloads folder in the Files app.
Step 1: Download iMyFone D-Port and launch it on your computer. Click Back Up & Export from Device to get process work and then select your Export Data. Step 2: Then select the file types you need to export. Here you should click Safari History, or other types of files you want to export.
Follow the steps below to recover deleted safari history on your iPhone without backup: Step 1. Connect iPhone to Computer. To start with, install the program on your Windows PC or Mac and launch it. Choose Recover Data from iOS Devices and then connect your iPhone to the computer using a USB cable. Step 2.
at the bottom (beside the tab switcher button). On iPad, tap. the. 'Show Sidebar' button. at the top left corner. The first screenshot shows the Safari app with the History tab open and red arrows ...
Go to Settings and select Safari. Tap on the toggle next to Block All Cookies . There are also third-party extensions that help you block cookies and trackers in Google Chrome, like Ghostery and ...
Safari 1.0 was released in 2003 to replace Internet Explorer on the Mac. It was lacking some features compared to other web browsers, but it was fast and minimalist. Safari 1.0 is not compatible with most modern websites. Safari was introduced in 2003 as Apple's replacement for Internet Explorer on the Mac, and it has continued to evolve since ...
The most up-to-date version of Safari is included with the latest version of the operating system for your Apple device. To update Safari on Mac, update macOS. To update Safari on iPhone or iPad, update iOS or iPadOS. To update Safari on Apple Vision Pro, update visionOS .
Time needed: 2 minutes. Open Safari and go to Settings in the top-hand toolbar. Select Websites. Tap Downloads when you see the toolbar on the left. Look for microsoft.com, Outlook, and anything ...
Follow the steps below to see how to convert YouTube videos into MP4: Step 1. Open the YouTube video and copy the video's URL. Then, open VLC Media Player on your Macbook Air/Macbook Pro. Step 2 ...
Open the Safari app on your iPhone. Tap , tap , then tap Clear. Below Clear Timeframe, choose how much of your browsing history to clear. Note: If you have Safari profiles set up, select a profile to clear only the history of that profile, or select All Profiles. Tap Clear History. Learn how to erase your browsing history to clear the cache in ...