- Trek Manuals
- DOMANE SL 2023
- Service manual

Trek DOMANE SL 2023 Service Manual
- page of 20 Go / 20
Advertisement
Quick Links
Related manuals for trek domane sl 2023.

Summary of Contents for Trek DOMANE SL 2023
- Page 1 2023 DOMANE SL/SLR SERVICE MANUAL Rev 1 December 2022...
- Page 2 If threadlocker is not applied, the fasteners may loosen which could damage the bicycle and result in injury to the rider. Copyright 2022 Trek Bicycle Corporation All Rights Reserved...
- Page 3 2023 Domane SL/SLR Routing — mechanical 6.5Nm 0.7Nm Cable housing grommet — W329119 Front derailleur cable Housing grommets — W330578 Rear derailleur cable W531901 Front derailleur hanger — Rear brake hose Front derailleur hanger bolt (M5x16mm) — W543903 Front brake hose Cable guide bolts (M4x9mm) —...
- Page 4 2023 Domane SL/SLR Routing — mechanical: instructions Route the brake hoses. Insert the shift housings and rear brake hose into the cable guide. Route the shift housings.
- Page 5 2023 Domane SL/SLR Routing — Di2 6.5Nm 0.7Nm W330578 Housing grommets — Rear Di2 wire EW-SD300-I Front derailleur hanger — W531901 Front Di2 wire Front derailleur hanger bolt (M5x16mm) — W543903 Rear brake hose Cable guide bolts (M4x9mm) — W546731 Front brake hose Cable guide —...
- Page 6 2023 Domane SL/SLR Routing — Di2: instructions Route the brake hoses. Insert the rear brake hose into the cable guide Route the Di2 wires through the frame and connect them to the battery. Install the battery assembly.
- Page 7 2023 Domane SL/SLR Routing — eTap 6.5Nm 0.7Nm Front derailleur hanger — W531901 Rear brake hose W543903 Front derailleur hanger bolt (M5x16mm) — Front brake hose Cable guide bolts (M4x9mm) — W546731 Rear derailleur hanger — W524188 Cable guide — W588188 Rear derailleur hanger bolts (M3x12mm) —...
- Page 8 2023 Domane SL/SLR Routing — eTap: instructions Route the brake hoses. Insert the rear brake hose into the cable guide.
Page 9: Fork And Headset
- Page 10 2023 Domane SL/SLR Fork and headset: max spacers WARNING WARNING Below the stem Above the stem Do not exceed 40mm of headset spacers below the Do not exceed 40mm of headset spacers above the stem. If there are more than 40mm of spacers, the stem.
- Page 11 2023 Domane SL/SLR Install the fork Install the compression plug in the fork. Grease the fork crown race, both headset bearing bores, and both bearings (13). 9-10Nm Insert the fork into the head tube. TIP: Use a sprint stand to hold the fork in place.
- Page 12 2023 Domane SL/SLR Install the headset Route the headset parts down the housings. Loosely attach the stem (6). Install the top cap (3) and tighten the top cap bolt (1). eTap/Di2 Mechanical Tighten the stem bolts (4) — alternating between them —...
- Page 13 2023 Domane SL/SLR Fork and headset — standard stem Top cap bolt Top cap W547432 Compression plug 5.2Nm Spacers (5mm) — 5253930 Spacers (10mm) — 5253931 5.2Nm Stem bolts (M5x18.5mm) 5276082 D-nuts (M5) Bearing cover (standard stem) — W5274615 Split ring — W5274269 Headset bearings —...
- Page 14 2023 Domane SL/SLR Seatpost MINIMUM INSER T 8-10Nm If the seatpost is continually slipping, add carbon friction paste at the location shown above. Seatpost (280mmx5mm) — W5285077 Bolt insert Barrels 272628 Saddle clamp ears (7mmx7mm) — 421564 Bolt (M6x16mm)
Page 15: Iso Speed
- Page 16 2023 Domane SL/SLR IsoSpeed: remove parts NOTICE: Do not perform routine maintenance on the IsoSpeed. Only service IsoSpeed hardware if you are replacing parts. Remove the assembly cover (9). Remove the pivot bolt (5), washers (2, 3), and the nut (6).
- Page 17 2023 Domane SL/SLR IsoSpeed: install parts NOTICE: Do not perform routine maintenance on the IsoSpeed. Only service IsoSpeed hardware if you are replacing parts. IMPORTANT: Clean all parts before reinstalling them using 50/50 isopropyl/water mix. Grease the wedge assembly as shown below. Place the wave washer (2) on the pivot bolt (5) and apply grease as shown below.
- Page 18 2023 Domane SL/SLR Chainkeeper Bolt (M4x22mm) Chainkeeper 5305773 Flat washer (M5x10mm) Bolt (M5x16mm) Adjust the chainkeeper Shift to the lowest gear (largest rear cassette cog) and inner chainring. Loosen the bolt (1) on the chainkeeper. Rotate the loose piece (shown in red below) so there is 1mm of horizontal clearance to the chain. Tighten the bolt (1) to 1Nm.
- Page 19 2023 Domane SL/SLR Storage door 1.2Nm 1.2Nm Mount screws — W547053 Storage door kit* W596821 Bolts (M5x16mm) — Door frame — W580769 *This is a color-matched part — search trekbikes.com find the right color for your bike.
Page 20: Specifications
This manual is also suitable for:, rename the bookmark, delete bookmark, delete from my manuals, upload manual.

- Forum Listing
- Marketplace
- Advanced Search
- Classic Forums
- Components, Wrenching
IsoSpeed Decoupler Maintenance?
- Add to quote
I've put about 6000 miles on my Domane 5.2. Does anyone know if the isospeed decoupler ever needs maintenance? Not that mine is acting up, but I've wondered how it will hold up over time.
Perhaps you need a recalibration of your flux capacitor? In other words, what the heck is an "isospeed decoupler"? Oh, that's right - something of a marketing gimmick. If it does need maintenance it would be to clean and relube. Does it come apart with tools?
Kerry Irons said: Perhaps you need a recalibration of your flux capacitor? In other words, what the heck is an "isospeed decoupler"? Oh, that's right - something of a marketing gimmick. Click to expand...

It's a shaft with two cartridge bearings. Since they only rotate a few degrees at most, IDK what the symptom acting up would have. If the balls/races got trashed maybe there'd be some perceptible play in trying to force the seat tube fore and aft. Maybe they seize? Anyway, the cover pries off and the shaft is removable via hex headed screws.
I'm still trying to figure out how this thing works. Is there an exploded view?
I have about 10,000 miles on mine still works just fine.

You need to get the dilithium crystal replenished. Unless you have or upgraded to the newer one with the Mr. Fusion option.
^^^ True.
OK, the reason I started the thread is that my Domane has been making clicking noises. I've been working through the checklist, and I'm to the point where I suspect either the brake cable where it routes inside the top tube or the iso decoupler joint. I wasn't able to change anything about the former (pulled it out, and yep, it's a cable), so I bit the bullet and opened up the decoupler. I'm not saying the cable is proven innocent, just that if it's guilty I don't know what to do about it. Kind of like the guy who lost something in the basement. When his wife asked, "Why are you looking in the kitchen?" he answered "Because the light is better up here." The decoupler dust cover is held in place with an Allen bolt. As the pictures from Ibericb show, there are sealed cartridge bearings underneath. I can rotate the inner part of each bearing with a finger, and they feel surprisingly bumpy, as if the bearings are little boulders instead of round. They don't feel gritty, though. Rotating involves putting a little side-load on the bearing, so maybe that's the cause of bumpy feel? Or is it likely the bearings are shot? If so, does anyone have experience with changing these out? They don't want to lift out of position so I wonder if they are press-fit. I'm real close to putting my LBS on the case. Incidentally, the cable clearance inside the top tube seems to be microscopic. If I squeeze my rear caliper even slightly I get a very audible click from the top tube, as if a tiny bit of slack allows the cable to hit it inside. The click is tantalizingly similar to the one that's driving me batty on the road. Thanks for the replies so far. I'm going back to the garage.
My wifes Domane 4.3 was making a clicking sound as well, it was the chain. I am sure you have changed yours by now but just in case. I could see the isocoupler causing issues as well, more so if you are somewhat bouncing on the saddle on bad bearings. And as said that system works, so much to the point of when I wanted to upgrade my wife into a Giant Avail Advanced Di2 she refuse saying she loves her bike and is not interested in anything else. Full carbon, 105 group and she has the Bontrager RXL wheels. Cant argue with her on that, means I can mod something else instead.

If the clicking is the coupler, it shouldn't make the noise riding out of the saddle. Try that as a test maybe?
Cartridge bearings should not feel lumpy. If they do, they're damaged, though the degree and consequence can vary over a wide range. Using ball bearings for the IS coupler is a questionable choice IMO as they don't rotate more than a degree or two so the ball always ride in the same place in the races and at the same point on the balls which can lead to lumpiness and notchiness, similar to can happen to headsets, though headsets often rotate much more than what what the IS coupler does. Any play between the shaft and the inner races can cause clicking, and if the bearings are very worn so as to be loose, they can click too. Replacement bearings should be cheap. The bearings are pressed in. Once the screws are removed from the end of the shaft, the shaft and drive side bearing is pressed out using an drift or (8mm screw works) and small hammer. The NDS bearing is driven out with a small punch working around the perimeter of bearing. In assembly, grease the outside of the races and use the bolts in the shaft ends to press the the bearings in. Bolts on each side are torqued to 8 NM. Using the bolts to press in the bearings via the inner race can itself damage the bearings, so this is kinda a bogus design/method, IMHO.
looigi said: Cartridge bearings should not feel lumpy. If they do, they're damaged, though the degree and consequence can vary over a wide range. Using ball bearings for the IS coupler is a questionable choice IMO as they don't rotate more than a degree or two so the ball always ride in the same place in the races and at the same point on the balls Click to expand...
So as suggested and I am assuming this is only happening while in the saddle under a decent amount of pedaling effort?
Oops, whoa. Sorry, but I’d rather not get into this. I meant the thread to be about the isospeed decoupler. It’s my fault it has drifted to where people want to try and solve my clicking noise. But please don’t. I know it's well-meant, so thank you, but I don’t want a noise solution thread. See my “down that rabbit hole” comment from earlier. The thing is, I can see a solution thread turning into a deal where a committee of advice-givers dreams up things to check while I spend a buncha time pursuing their suggestions or justifying why I ignore them. It would be a big internet game of WDYYB. Not going to go there. Would not be prudent at this juncture. Besides, I already have the Irons list to work with. So thanks again, but I’ll be OK. I’m sure I’ll feel stupid when I find the answer, as in, “Why the **** didn’t I check that first??” For anyone who’s jonesing to track down a bike noise, you'll just have to come up with one of your own.
If you think it's your brake cable, merely remove the cable completely and go for a ride. It's not a death sentence. With a little common sense you'll survive and you might find the cable is the real cause.

Well then, that is it, all you have to do is de-gause the in-futuro-tron and your good to go!
Glad I came across this thread in my search for IsoSpeed Decoupler issues. I've been having a pretty consistent "click" coming from the Decoupler for a good time now. It's definitely the decoupler (I've been able to recreate the noise while off of the bike). I've also checked the bearings and have noticed that they are "notchy" which I'm thinking isn't normal, right? I don't have a problem swapping out the bearings, which might be the culprit. looigi did a nice explanation on how to do it earlier in the thread. I'm just wondering if anyone knows the specs for the decoupler bearings?
OK, I'll play the straight-man.... what's a henweigh? (you're welcome)

African or European?
Has Ceramic Speed come out with their Ceramic ISO Decoupler bearings that increases the torsional stiffness of your bike by 7% yet?
Not and exploded view, but a good pic from the new hardtail MTB version that is easier to see the basic parts. https://brimages.bikeboardmedia.netdna-cdn.com/wp-content/uploads/2015/06/S6O4224.jpg
If your frame in carbon fiber, you'll need to search on "assploded view".
I've had a Trek Boone for a couple of years now and have ridden it hard on a variety of surfaces. For the second time this year i've had to service the IsoSpeedDecoupler. I can tell that is it due for service as the plastic cover on one side (drive side) is pushed out slightly and is not flush with the frame. I can also tell I need to service it because there is play at the TT / ST juncture. One of the bearings feels rough when I spin it with a finger after the bolt is removed (the other is very smooth). Because of the short travel of the bearing I'm not too concerned with it. I usually pull the bolts - both sides, and lube the bolt shoulder (where it meets the bearing) and re-locktite the threads of each bolt. This small amount of maintenance is totally worth it however - this thing is like riding a naked Thai teen!

WormDevil said: I've had a Trek Boone for a couple of years now and have ridden it hard on a variety of surfaces. For the second time this year i've had to service the IsoSpeedDecoupler. I can tell that is it due for service as the plastic cover on one side (drive side) is pushed out slightly and is not flush with the frame. I can also tell I need to service it because there is play at the TT / ST juncture. One of the bearings feels rough when I spin it with a finger after the bolt is removed (the other is very smooth). Because of the short travel of the bearing I'm not too concerned with it. I usually pull the bolts - both sides, and lube the bolt shoulder (where it meets the bearing) and re-locktite the threads of each bolt. This small amount of maintenance is totally worth it however - this thing is like riding a naked Thai teen! Click to expand...
- ?
- 205.4K members
Top Contributors this Month

Madone SLR seatpost / ISOspeed HELP
Hey TR community,
I put my Madone on the the trainer for the first time yesterday and I noticed it has quite a bit of sway side to side In the seatpost (not vertically like the isospeed is supposed to move). There is also a clicking. I can replicate this movement with my hands with the bike off the trainer.
I’m wondering if anyone had experience with this?? Is this normal?
Clicking is not normal. There may be a small amount of movement sideways, but it should not be very noticeable.
I’d suggest taking it in to your Trek dealer to be reviewed by a tech.
My mate had the exact same issue had two replacement frames from Trek (LBS) before it was solved.
Damn, really? I’ve ridden mine around 6000km so far. Did it take a bit to develop? They replaced it no problem? @robcumine
The first bike, the LBS tried shims which didn’t work, replacing the frame, exact same problem, not even into 1 ride, next frame had zero issues. Go back to your LBS Trek Dealer, and present the problem. Based on Scotts issue and the help he received I hope your local Trek dealer has the same confidence.
Did you check your seat post torques?
Just recently experienced the same thing and it could just be a loose bolt at the bottom of the seat mast. My LBS slipped off the cap that covers the top tube/seat mast junction, revealing the bolt (large Allen size) and tightened. Problem solved.
Just came across this forum I am on my second frame set from trek due to this problem and now it’s happening again. Every couple of ride we got to keep retightening to get rid of the excess side movement from the seat post. Still waiting to hear back from trek on this issue!!
Have you put loctite on the bolt when you retightend it?
No I didn’t, because I remember on the first frame we put blue locking compound on the bolt and it didn’t help but I may give a go again.
Hey all, i know this is late, but removing the cap and tightening the bolt where the top tube and the seat tube converge completely fixed this. You can see the bolt in this video (6/8mm keys) https://www.youtube.com/watch?v=RS0npyIRCEk
Hi all, I just ran into this thread. I have a 2020 Madone SLR that has been having the same problems. I was out on a ride one day the Iso-speed bolt worked loose and my seat mast was swaying side to side really badly. I stopped and thought I had a flat tire but soon realized it was the seat mast. I’ve taken it back to the shop twice now and the problem keeps coming back. This is extremely frustrating as it is now in my head, and racing season is about to begin for me.
I’m curious what will trigger my shop to contact Trek and possibly replace my frame. I can tighten the bolt at home but it should not be that way for such an expensive bike. I feel like the bolt is just ratcheting loose inside with every micro bump on the road.
Hi, I also bought a 2019 Madone slr6, i have had the problem of the slider moving back towards the seatpost after about 30km. I have had it at the bike shop, they tightened the seat post bolt but it still doing it. Firmed up the bolt and now that has put a pimple in the frame and i did not even cranked on it. It would be interesting to here from Trek on their so called team riders bikes if they have any problems
I have had the same issue. What began as movement in the ISOspeed seatpost eventually became a frame crack on 2 different SLRs. I am on my 3rd replacement frame in as many years.
In every case where the frame cracked, it was an audible, very loud crack while I was riding. The most recent crack is on the underside of the top tube in a spot that is not visible without removing the ISOspeed entirely.
The previous crack was in the ISOspeed bolt hole. The bolt had backed out and caused a big piece of carbon to “chip” off. Prior to the first crack, I was plagued with creaking and the bolt would not stay tight under any circumstances.
I will add that Trek has been very responsive to every warranty claim. Everytime Trek replaces the frame, I request compensation in product.
I have a 2019 Trek Madone SLR and having the same problem. The seatmast moves side to side. I’ve tightened the isospeed bolt which only temporarily solved the problem. It got to the point where I was pulling to the side of the road every 10 miles to retighten. I’ve used loctite and it helps a lot but still need to retighten about every 150 miles. You’d think a $7K bike wouldn’t have problems like this.
Also with the same problem. The seatpost started to move sideways. Have taken the bike to the LBS, but afterwards with riding the seatpost makes a lot of noise. After a ride I found out that there was something was loose rolling in my frame. The repair shop probably didn’t see the above movie, because he drop the rubber damper in to my frame (very sloppy). Now I repair it myself, by replacing bolt and nut in the iso-system by a new one and sealt it with a little bit of Loctite 243. I could not find how tight the bolt must be, so I tightened it with 10NM Now after a 2K Kilometer’s the seatpost starts to wiggle again! After inspection found a crack in my frame. Tomorrow to the LBS

Guess i’m in the same boat, is yours making this noise aswell?
That might be the problem then, i’m about the same size. guess we are too heavy for this isospeed toy
Same boat as those above. I have a 9 month-old 2019 Trek Madone SLR6. I ride only on tarmac 100-150 miles a week (but took a few months off during the lockdown) and twice in the past few weeks I’ve noticed that the seatmast is moving side to side. I stop on the side of the road and tighten the isospeed bolt which seems to solve the problem. Then I take it to the LBS for an inspection, just to be safe, ASAP. It’s frustrating, but so far nothing serious. Like some of the posters above I’m on the big end, 212 LBS, but well within Trek’s stated weight limits. Like them I’m wondering if the Madone isospeed isn’t clydesdale-friendly. My wife wants me under 200 LBS; now that the bike agrees with her it might be time for a diet. Anyway advice and info on how Trek responds to the issue welcome!
Need help finding the right e-bike? Take the quiz
FREE in-store pickup & assembly at 200+ locations! Shop E-Bikes
- Become A Dealer
- Dealer Login
- Find A Store
- Parts & Gear
- Support & FAQ
- E-Bikes On Sale
- Gear & Accessories On Sale
- Bundle & Save
- Military & First Responders
- Shipping & Returns
- Manuals & Assembly Videos
- Register Your Magnum E-Bike
- Rider Stories
- E-Bikes 101
- Where To Ride
Get in touch!
(323) 375-2666
Chat With Us
Connect with an expert
Submit a support ticket
How To Remove And Reinstall The Rear Wheel On Your E-Bike
- basic e-bike care
Team Magnum
Receive exclusive updates, offers, tips & guides from Magnum HQ.
Stay connected
When it comes to rear hub motor e-bikes such as our Magnum models, you might find the idea of removing your rear wheel a bit intimidating. How do you navigate around the chain? The brakes? The motor cable? And while there is a lot to consider, we bet it’s a lot simpler than you think.
In this post, we’ll explain the steps for removing your rear wheel so you can confidently do it at home. That said, don't be a hero — if you’re ever in doubt or confused about your wheel or any other maintenance on your bike, just take it to your local e-bike dealer or repair shop.
Safety Warning: If you are unclear about any of the information described in your e-bike manual, this article, or the video linked at the end of this article, please make an appointment with a Magnum dealer to service your bike. Improper wheel installation can result in serious injury or death.
If you'd like, you can skip ahead to the video .
When Should I Remove My Rear Wheel?
The main reason to remove your e-bike’s rear wheel is to replace the tube or tire. You would usually do that as a result of damage, but you can also change out your e-bike tire to suit your terrain. A change in tires can help riders transition from urban and light trail riding to adventurous or rugged off-roading. Make sure to only use quality tires designed for your e-bike’s wheel size and model!
To change your tire, simply:
- Turn your battery power off or remove the battery entirely from your e-bike
- Disconnect the motor cable quick connector
- Change the flat tire as you would a regular bike
- Reconnect the motor plug, matching up the arrows on the cable connectors
You might also find yourself needing to replace the whole wheel. This would only be due to irreparable damage, which could be caused by impact or by incorrect maintenance or installation (improper truing, bolt/nut tightening, or spoke tension ).
Is The Rear Wheel Removal Process The Same On All E-Bikes?
Not a Magnum E-Bike owner? Not a problem. The steps we outline here should work for any rear hub motor e-bike, so if that describes your bike, this guide should be helpful for you. When in doubt, though, consult your manual or take your bike to your local e-bike dealer or repair shop.
Equipment You Will Need
- Bolt and axle nut sizes will vary across models. Be sure to choose the tools that match your unique bike.
- Allen wrench(es) that match your retainer bolt and derailleur guard bolt size (ex. 4mm wrench)
- Adjustable open-end wrench, or open-end wrench(es) that match your axle nut size (ex. 18mm and 19mm)
- Small cable clippers
Removing Your E-Bike’s Rear Wheel
There are many steps to removing the rear wheel, but don’t be intimidated. We’ll walk through it step by step.
Step 1: Shift Into Highest Gear
Before we get started, take your e-bike on a quick ride and shift it into your highest gear. You can be sure you’re there when you look at the freewheel: your chain will be on the smallest physical gear.
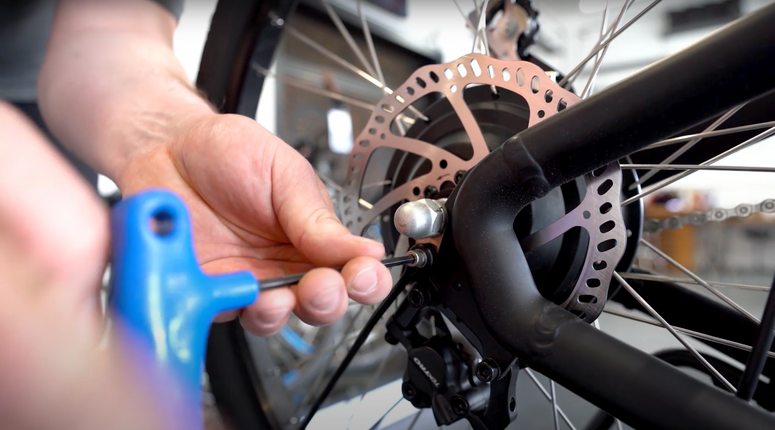
Step 2: Remove Retainer Bolt
Once you’ve shifted your e-bike into its highest gear, flip it over — or place it on a bike stand, if you have one.
Next, make sure you’re looking at the rotor side of your rear wheel, not the chain side.
Now find your retainer bolt. Loosen that bolt with your Allen wrench. This will loosen the fender wire too, but that’s okay. Remove the bolt and set it aside.

Step 3: Remove Rear Derailleur Guard
Step to the other side of your bike, so you’re now facing the chain, rear derailleur, etc. Double-check again that you’re in that high gear: the smallest physical gear.
Locate the 2 bolts holding your rear derailleur onto your frame; remove both of them and set them aside. Now you can remove the rear derailleur guard; keep that with the bolts.

Step 4: Unplug Motor Cable
Find the motor cable, which runs from your rear wheel axle up to a plug near the rim of your wheel. Then locate the zip tie that’s holding the motor cable in place.

Step 5: Remove Axle Nuts
Remove the motor cable hub from the wheel axle and make sure all your cables are out of the way. Now grab your open-end wrench(es).
Start by loosening the axle nut on the side of the bike that you’re already on (the gear side). You may need to turn it quite a few times, so once it begins to loosen, speed things up by using your hands instead of the wrench. Once removed, set the axle nut aside.

Then, go back to the side of the bike where you started (facing your rotor) and do the same. Note that the nuts may each be different sizes, so you may need 2 different sized wrenches, or that adjustable wrench.
Step 6: Remove The Wheel
Once your axle nuts are removed, press the cage of the derailleur forward (toward the bike frame). As you’re pressing and holding the derailleur with your thumb, use your other hand to guide the wheel off of the frame. Take your time, being careful of the cables and chain.

Locating And Understanding Your Anti-Turn Washer s
As you prepare to reinstall your wheel, make a special note of the washers holding your freewheel and disc brake in place on either side of the wheel’s axle. Those are called anti-turn washers, and they’re the only washers that sit inside the frame when your wheel is in place. You want them to be as close to the motor as possible.

If you have any hesitation about how to properly reinstall your Magnum e-bike wheel, please consult your local Magnum dealer or repair shop.
Reinstalling Your E-Bike’s Rear Wheel
Good news — now things get a little easier! Removing your rear wheel is the hard part. Reinstalling is a bit finicky, but overall simpler. Just take your time.
As you guide your wheel into the frame, tuck your motor cable and wheel axle in through the center of your chain loop. Lift your rear derailleur. Hook the chain back onto the freewheel. On the other side, check that your rotor is where it should be as you move things into place.
Now is a good time to check on those anti-turn washers as well — and make sure they’re sitting inside the frame.
As you check the mechanisms, spin the wheel gently backward (clockwise if you’re facing the chain side; counterclockwise if you’re facing the rotor). You’ll both see and feel the wheel lock into place.
Now replace and tighten the axle nuts. Start with your hands again, and just use the open-end wrench for the final few turns.
Then replace the retainer bolt that holds the fender wire to the wheel. Next, reattach the derailleur guard and tighten those 2 bolts holding it in place.
We’re almost there! Now reconnect the motor cable by reinserting the plug; make sure the arrows on the motor cable line up. You can then install a new zip tie to secure the motor cable to the frame, and you’re done.
What About My Front Wheel?
Removing the front wheel can make it easier to transport your e-bike in a personal vehicle. You may also need to remove it if you need to replace a tube, tire, or the wheel itself.
Since your rear wheel is the one hooked up to the motor and chain, removing your front wheel is much simpler!
Magnum Pathfinder models as well as the Peak T5 and Peak T7 necessitate the use of an Allen wrench, but all other Magnums feature a quick release, making front-wheel removal a breeze. Just unfasten the quick-release lever and pull the wheel out!

To replace it, it’s helpful to have a partner to provide an extra set of hands. This ensures that the wheel sits properly in the fork and that the disc rotor slides up between the brake pads. If you’re by yourself, just move slowly and keep an eye on both sides of the wheel and axle as you guide the front wheel and disc rotor back in.
Top Tips To Care For Your E-Bike Wheels And Tires
With proper care, your wheels will take you far! While you should check every part of your bike regularly (see your manual for more info), here are the wheel and tire maintenance habits you need for e-bike safety.
Check tire pressure along with tire and rim condition. Check this before every ride; from debris to rough terrain, many things can change the condition of your tires or rims on any given ride.
Inspect wheel quick releases. Make sure all quick releases are tightened and secure. These hold your wheel securely to the frame, so they’re essential for a safe ride.
Check spoke tension. Broken spokes compromise the balance and integrity of your wheel, which can lead to major accidents. Grab each spoke pair (the 2 spokes that cross each other diagonally along the radius of your wheel) on each side of both wheels. If any spokes feel tighter or looser than the rest, don’t ride — take your bike in for service.
Check for wheel trueness. Grab one end of your frame and lift your e-bike off the ground. Look at your wheel from the top down and spin it. If you see any wobbling from side to side, your wheel might be out of true, making it unsafe to ride. Take your bike in for service.
Watch The Video
STAY CONNECTED
- Search forums
- General Ebike Forums
- Discussion by Brand & User Reviews
Known Issues & Problems with NCM Products + Help, Solutions & Fixes
- Thread starter troehrkasse
- Start date Mar 21, 2020

troehrkasse
Ebr webmaster.
- Mar 21, 2020
No Ebike is perfect, this is a thread dedicated to sharing known issues or problems with electric bikes from NCM as well as any help and solutions you know of. Sometimes that means a DIY fix and other times it can mean a recall, software update or part replacement by a dealer. Please be respectful and constructive with feedback, this is not a space for hate speech. In many cases, representatives from the company will see feedback and use it to improve their product. In the end, the goal is to enjoy riding and help each other go further and be safer.

FullyCharged
Active member.
- Mar 27, 2020
john peck said: *I've fashioned an adapter that allows me to use the 2 shorter Juiced 21Ah & 8Ah batts. Click to expand...

Well-Known Member
FullyCharged said: Can you make a thread on this please. Would like to see what you did. Click to expand...
john peck said: THat was pretty simple. Sprayed wd40 on bottom receiver & the bottom of the battery. Mixed a gob of Instamold* moldable, non-toxic plastic, mashed into the receiver, pushed the battery down into it 'til it snapped into the connecter, & clamped it into place with a hose clamp 'til the plastic set, (after trimming the excess). You could just use a hose clamp with a folded piece of 60 grit sandpaper to hold it in place. The mounting system is the same as Juiced, but for a longer battery. *see ebay Click to expand...
FullyCharged said: Got a pic of this setup? You have peaked my interest. Can you remove the Instamold easy to switch back to the stock batteries? Click to expand...

- May 4, 2020
Having tried changing the wheel size and deciding it made no difference, today I noticed that the speed reading is WAY off! Mine is 7-8kmh fast- vs iPhone GPS - so the pedal assist switches off well before it should. I changed the wheel size to 20 and it’s still off but by my admittedly poor maths I should now at least continue to get assistance closer to 25kmh and maybe a little bit beyond?!
Sounds aggravating, I'm glad mine arrived preset for 29ers & mph
- May 11, 2020
- After owning for 3 weeks power cut off mid ride due to loose contact on one of the cables that connects to display. I had to take it back to bike store & after diagnosis they had to resolder.
- Water leaked into PCB board located on battery on/off button due to riding in rain. Had to get replacement PCB board installed. Mechanic covered top of battery with electrical tape to prevent happening in the future. He said this is a common issue.
- Rear derailleur cable broke & had to be replaced.
- Rear wheel spokes have broken 3 times. I’ve now organised for a new rear wheel which will hopefully fix issue. Mechanic at shop said that broken spokes is a common issue with rear wheel hub drive bikes due to weight.
U, I'm at 1400 mi. Taping over the switch was something I did as prevention on my CCS, so perhaps I should on the NCM. I popped one spoke on a pothole, my fault, tire not properly inflated. With the warmer weather & use, my cables stretched a bit I had to tune 'em some. The spoke thing is an issue, I think any motor 500 watts or more should have #11 spokes, THe replacement wheel I bought for the CCS has them. That wheel is fine, but the CCS is now a parts bike, I have the 29er Moscow which is holding up well. largely because of lessons learned on the CCS. I think a 29er is less prone to the spoke issues because it spans over bumps & ruts better. I do think the discs are too thin, more so than the CCS. There's an ever-so-slight warp in front I can feel at very low speed but not noticeable otherwise. The biggest plus for this bike is how well it climbs. Not as fast as the CCS was, but there's a lot of steep going here & the moscow climbs so well. There is good advice on shifting in the manual that might have prevented U's broken derailleur cable. Take off in too high a gear is ill advised as is with too low because this motor is very goosy with instant torque, For that reason. when starting off, I tap the throttle a tad before stomping the pedal. When shifting you have to ease off pedal pressure for a blink. If you are bearing down hard if may be too much for the cable. My advice would be to read the manual carefully & follow it to the letter. P.S. ya gotta keep an eye on tire pressure; too little & the rim will bottom out on bumps or holes & pop spokes. This is important if you're a big rider like me.You might even want to go to a bigger tire, 2.5" to 2.8" in the rear.
- May 18, 2020
john peck said: Thousand mile evaluation of the NCM Moscow: No problem with the bike, but I did have a flat when a wire broke loose from the tire bead & punctured the tube. The more i understand the German engineering, the better the performance becomes. I'm a big guy & have put back some of the 100 pds I lost as muscle. This bike inspires one to put more self into pedaling. Having a triple chainring is a real plus. There are lots of ups & downs here, but this bike will climb a tree. One local hill ascends 115 ft up from the beach in a little more than a 1/4 mile, & the bike climbs it with ease on the middle chainring. The owners manual is very useful for getting the most out of this modestly priced, rugged bike. It's still quite rideable without power on the small chainring, & I often take shorter rides without installing the battery. It's basically a hardtail Mtn. bike with power & 4 3/8" fork travel compared to 3" travel on my CCS, It's not as fast as my CCS 'was'. Changing a tire was so much easier, The symmetrical stays will handle a 3" tire, but the 2.25"s are just fine on the beach except for loose dry sand.. It comes fairly bare bones, but cheaply enough with wiggle room to personalize. I got mine at $1300 the day after order from Leoncycle-us in Seattle, but their latest email yesterday has it at $1059 That is a really good bargain if you are not put off by the name, Moscow. I think that was meant to sell this German bike in Russia. The fat tire version is called Aspen,( trite). I'd have called it Cheyenne. All NCMs are named for cities. I've seen a bunch sold to other outfits with different paint & single chainrings going for $1500. It's a bit noisy on take off, very torquey & a tad goosy. The motor has tempered metal gears, not plastic.. For $200 more you can get a Moscow+ with a 16Ah battery, 8 spd. & 2 motor cutoff levers, but I'm getting better mileage with the single cutoff, 7 spd, 13Ah than I did with my 21Ah CCS.* If you ease off pedal pressure upon shifting, it's very smooth with the 7 spd. Gearing is just fine with the old standard mtn. 48 38 28/ 14-28. There's really no reason to mess with it, & it would void warranty any way. The Schwalbe Smart Sams are surprisingly fast rolling, comfortable, & handle well on all surfaces, but after the flat I put a more rugged Bontrager on the back. There's a simple trick to dropping the rear wheel. After loosening the nuts just use a cone wrench to align the flat surfaces of the axle with the sides of the dropout. When tightened, the axle locks into the dropout. There's no need to remove a retainer clip & the derailleur as with my CCS . After adding a 5" riser bars, I had to move the thumb throttle to the left, Mounting points are a bit strange. but I managed to reconfigure a rear rack with a space for a 2nd battery yet would still take panniers & tie- down space on top. It was something of a challenge creating a mount for my single wheel Aesom trailer which converts to a plow, harrow or rake, My personal conclusion is the this is the best, most versatile bike you can buy for the price, including many costing twice as much or more. *I've fashioned an adapter that allows me to use the 2 shorter Juiced 21Ah & 8Ah batts. PS.Mine's a 29er, also comes 27.5" Click to expand...

stevieray611
- May 19, 2020
I've used my Moscow 5 days a week for a year daily 24 mile round trip . The problems I've had so far are mostly ware and tear . New tyres , 6 new rear wheel spokes, new gear mech hanger after spoke took it out , new chain , new saddle . The roads in uk are in a pretty poor state so I'm not blaming the build at all . I'm pretty happy with the moscow . Only this wk the battery has decided not to take a charge .due to the times NCM aren't easy to contact so I'm gonna try a new charger first see if it's a charger or battery issue . I'll update when I find out
- May 20, 2020
Update it's def the battery so now the dilemma , brand new battery or get the old one re celled to a higher speck either way it's gonna cost lol .
- May 21, 2020
Just an FYI: If you take off the rear wheel for any reason,(tube,tire,spoke) Do not squeeze the rear brake lever without the wheel in place. The brake self adjusts; you will either be unable to replace wheel or have signifigant brake drag. Read the manual on brake adjustment. If this has happened there's a simple fix. Loosen the upper & lower alignment bolts, (do not remove, these are not the bolts that mount to frame ) Rotate the wheel & check pad clearance, ( should return to normal when self-adjust releases) Outside pad should be a bit closer to the disc but not touching. With wheel rotating freely, tighten bolts & adjust the barrel adjust on the lever. The manual & illustration is more helpful if you've got one. P.S. I can't believe my rear derailleur is still in perfect tune after 1500 miles without being touched
stevieray611 said: Update it's def the battery so now the dilemma , brand new battery or get the old one re celled to a higher speck either way it's gonna cost lol . Click to expand...
- May 24, 2020

john peck said: Just another tip; IF you have a flat in the middle of nowhere it's a long walk home if you not prepared to deal with it. I removed the stock kickstand & replaced it with a dbl leg '&' a rear mount single stand. The dbl comes with an upper clamp you won't need. Just run the the bolt thru the frame into the lower portion of the dbl. It will lock securely into the frame. (much simpler with wheel off) Why am I doing this? To make tire repair in the field less of a nightmare! The dbl stand let's you drop out & replace the wheel without turning the bike upside down & crushing your display, mirror, or whatever while making the process ' somewhat' easier.... but there's a trick to it! A) Manually slack chain off the chainring. B) After disconnecting the power cable, ( at this point I tape a sharpie cap over the end to protect the connector prongs), C) Remove all washers & nuts from the axle,(you can leave the right side hanging on the power cable) If you simply loosen them, the nut will snag on the derailleur when you drop out the wheel. When tightened the axle twists & locks into the drop out. To drop the wheel, carefully use a crescent on the flat sides to align the axle to drop out, avoiding damage to the threads. (!) D) Slip chain off freewheel & slide out wheel. Replacement: A) lift the stays, ( the frame will now rock forward on the dbl leg.) roll in wheel, loop chain onto freewheel, & lower dropouts onto the axle being careful to align the flat sides of the axle with the dropout slots,( this is just easier without nuts & washers) B) The washers with the tab insert with the tab "under the axle from the outside" first!, then lock washer, nut. Reconnect power cable being 'very' care to align the arrows!! IF this sounds complicated, try doing it with the bike upside down in the field. There's just no simple way to deal with a rear motor wheel, & it's easy to screw up if you don't get it 'exactly' right! This is the main plus for a mid-drive. The plus for a rear motor is that it will get you home on throttle if you are injured or have broken a pedal or chain. Being able to rock the bike on a dbl leg kickstand also makes doing the front easier too, as well as tuning, since your can turn the pedals without hitting the kickstand with the wheel off the ground. (Things not mentioned in the manual ) Click to expand...
jkvt said: Any thoughts on a bottle of slime for use in the field? I've never used it but was thinking of getting some to keep on me for any flats in the field. Click to expand...

- May 25, 2020
I use slime and a liner as I was constantly getting punctures, now touch wood maybe once in a blue moon , tyres wear out before I get a flat these days
Thanks for the info. I'll grab a bottle and hang on to it in case I need it in the field. I think the odds of a flat are pretty slim as I'm using the bike as a commuter and to run errands. It will be almost totally used on the road, then again we have our share of potholes here in Vermont, and I sure have hit some, so maybe that's not as big of a plus as I think it is. Stevieray611, what do you mean by you use it as a liner? Do you pump it as preventive or have a tube that comes with it?
Similar threads
- May 3, 2023
- Maxfoot Forum
- Apr 18, 2023
- Alizeti Forum
- Tempo Forum
- Wildsyde Forum
- We use cookies to ensure that we give you the best experience on our website. Accept Learn More…
Trek Bicycle Rouse Hill | Trek Bicycle Rouse Hill
- Shop address
- Shop GRO73/10-14 Market Ln
- Rouse Hill, New South Wales, 2155 Australia
- Get directions
Google reviews
Ask us about, shop online. pick up in store..
We want to help you shop safely! Purchase or reserve your items online, and you can collect them at the store with as little contact as possible.
Expert e-bike advice
We’re the e-bike experts, so stop in to learn more about electric bikes and see what an extra boost can do for you.
Service on bikes of any brand
Our skilled technicians provide fast and friendly service on all makes and models.
Electra bikes
We’re proud to carry fast, fun and fabulous bikes from the Electra line-up. Stop in today to take a test ride!
Our service packages
Want to learn more about what a bike tune-up includes? Explore our different service packages below.
Love it or we’ll take it back
If you’re not 100% happy with your purchase, bring it back within 30 days for a refund or exchange.
Low Price Guarantee
We’ll match any price for products we carry in-store or on trekbikes.com.
24-hour service for all makes and models
Our skilled technicians will service your bike within 24 hours, or we’ll give you a loaner for free.
Your new favourite bike shop
From first-time riders of every age to the seriously addicted, we’re here to help!
IMAGES
VIDEO
COMMENTS
What is IsoSpeed? http://bit.ly/37mgAC0Did you know? On select bike models with rear IsoSpeed technology, you can adjust IsoSpeed to tune the compliance jus...
I just found out about this isospeed system that some Trek bikes have. I own a Domane SL5 2021, and I didn't know the front and rear needed to be regularly maintenance. I came across it on a YouTube video where the rider said he had to take the front handlebar off in order to remove the decoupler and lubricate the bearing due to creaking sound.
Recently got a 2022 Trek Domane SL 5 Very happy with it, but the rear Isospeed has developed a creak every time it flexes. Which is a bit annoying/disconcerting as I ride. I searched reddit, and google for a 'how to', on how to open up the rear Isospeed, and where to grease it - but no luck.
Resilience on the roughest rides. Performance under pressure shouldn't come at the cost of your comfort. That's why we created IsoSpeed — a fatigue-diminishing comfort technology that lets your bike flex with the road, so that you don't have to. It's engineered to soak up chatter from rough rides while maintaining responsive handling ...
Grease :-) Use carbon grease for the seat post and 'normal' for the isospeed. I've spent weeks trying to find where the crackling noises came from on my Emonda SL7 & Checkpoint, turned out to be the stem on my Checkpoint and the saddle itself on my Emonda. Simple disassembly, cleaning and greasing did the trick! 1. Reply.
Place the washers on the bolt. Tighten the nut to 10Nm while securing the bolt with a wrench as shown below. Page 13 2022 Checkpoint SL/SLR IsoSpeed — SLR 15Nm Seatmast sub-assembly Service the IsoSpeed Seatmast Carefully remove the IsoSpeed covers (2) with a IsoSpeed covers* paint-safe plastic pry bar. Remove the bolt (8), nut (7), and washers.
Trek's IsoSpeed technology smoothes even the roughest roads, delivering an efficient and comfortable ride for increased performance and speed. Learn how to f...
At-home bicycle maintenance. In order to keep your bike running at its absolute best, we recommend a regular maintenance schedule. While your local Trek store has the expertise, training, and equipment to take care of all of your service needs, there are a few easy things that you can do at home to keep the ride smooth and prevent further ...
1. IsoSpeed seat decoupler and seat mast 3 How it works 3 Installing the seat mast 4 Installing the Adjustable Seatmast Slider and securing the seat mast. 6 Adjusting the ride 7 2. Front IsoSpeed 8 Installing the front IsoSpeed system 8 3. Installing the fork 11 4. Installing the Di2 12 5. Installing the shift cables 13 Securing the rear ...
2020 Domane Service Manual Table of Contents 1. Install common components A. Install and adjust the seatpost B. Install the front derailleur C. Install the rear derailleur D. Install the chain keeper 2. Route and install brakes A. Install rear brake in frame B.
A. Install the front isospeed 17 B. Install the rear IsoSpeed 20 C. Assemble and install the DT storage door 22 D. Install the T47 bottom bracket 24 E. Install fenders 25 26 Install front fender Rear fender chart. 2 3 1 Install common components 8.To adjust the seat height, loosen the seatpost
View and Download Trek DOMANE SL 2023 service manual online. DOMANE SL 2023 bicycle pdf manual download. Also for: Domane slr 2023. ... Page 15: Iso Speed 2023 Domane SL/SLR IsoSpeed NOTICE: Do not perform routine maintenance on the IsoSpeed. Only service IsoSpeed hardware if you are replacing parts or torquing the pivot bolt (5). 10.5Nm 6.8Nm ...
2023 Bike manuals and guides. Service manual - 2023 Allant+ 5 / 6. Service manual - 2023 Domane SL / SLR Gen. 4. Service manual - 2023 Domane+ AL. Service manual - 2023 Domane+ SLR. Service manual - 2023 Emonda ALR. Service manual - 2023 Farley Alloy. Service manual - 2023 Farley Carbon. Service manual - 2023 Fetch+ 2.
InBlack. 11 posts · Joined 2012. #20 · Aug 4, 2015. Glad I came across this thread in my search for IsoSpeed Decoupler issues. I've been having a pretty consistent "click" coming from the Decoupler for a good time now. It's definitely the decoupler (I've been able to recreate the noise while off of the bike).
Trek ISO speed : How to Adjust Some rear ISO Speed Systems like this one are adjustable for a smoother or firmer ride depending on your preference. In this video, we're going to walk through how to make that adjustment.
I have a 2019 Trek Madone SLR and having the same problem. The seatmast moves side to side. I've tightened the isospeed bolt which only temporarily solved the problem. It got to the point where I was pulling to the side of the road every 10 miles to retighten. I've used loctite and it helps a lot but still need to retighten about every 150 ...
My conclusion is the latest generations of ISO speed can be dealt with during usual maintenance (carbon grease). I've also read in this Reddit thread and/or the Domane Crew that Trek is changing the ISO speed bolt used to tighten the ISO speed to a Rev2.1 as no one called it a Rev3 per printing on the screw. I have a Rev2.0 on my Domane.
Step 3: Remove Rear Derailleur Guard. Step to the other side of your bike, so you're now facing the chain, rear derailleur, etc. Double-check again that you're in that high gear: the smallest physical gear. Locate the 2 bolts holding your rear derailleur onto your frame; remove both of them and set them aside.
Bike repair and service made simple. We offer 24-hour service turnaround on bikes of any brand* — no appointment needed. Stop by one of our bike service centers today, and our expert in-store technicians will have your ride rolling like new in no time at all. *Excludes certain e-bike models. Call or visit your local retailer for more information.
B) The washers with the tab insert with the tab "under the axle from the outside" first!, then lock washer, nut. Reconnect power cable. being 'very' care to align the arrows!! IF this sounds complicated, try doing it with the bike upside down in the field. There's just no simple way to deal with a rear motor.
Trek and Electra bike shops are your destination for the latest Trek bikes, Electra bikes and accessories, Bontrager cycling gear, service and tune-ups for bikes of any brand, and professional bike fit services through Trek Precision Fit. Whether you visit a Trek-owned store or one of our awesome independent partners, you'll find amazing ...
Trek Bicycle Rouse Hill is your destination for the latest products from Trek and Bontrager, service and tune-ups for bikes of any brand and local advice on the best riding in the Sydney metro area. ... • Fork seal and rear air can service Replacement parts not included in service package price. build Level 3 Service Package. From $399 ...