- You are here:
- Home »
- Blog »
- » How to Repair RV Siding (Bubbles, Delamination, Bulging)


How to Repair RV Siding (Bubbles, Delamination, Bulging)
- July 14, 2019 /
- RV Siding /
- By Shelly P. /
It is not just dents t ha t cause your RV to look bad and have water leaks. When owning an RV, you have to keep your eye on so many different parts to make sure you are not ruining it as you drive. Non-motor parts can hurt your RV just as much as an engine failure.
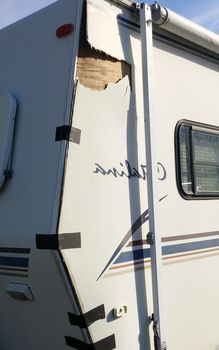
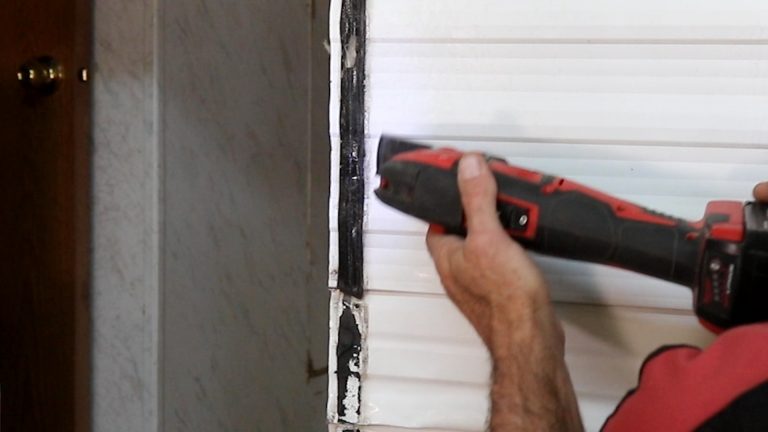
How to Repair RV Siding: When de-lamination takes place, it can be a very difficult fix to make. To repair this problem you usually have to remove the whole side of your RV and replace the bad fiberglass with a complete fiberglass section.
To know how to fix this and other RV issues like bubbling and bulging, just continue to read our article. We do the exploring of each topic so you have your answers quickly. Getting the right advice is important if you want to protect your RV.
How to Fix Damaged RV Siding
The solution to this problem is to determine or know what kind of siding you have on your RV. The repair work for fiberglass is a lot different than the repair work needed for aluminum.
For aluminum, you can easy remove just one damaged section and replace it with a new one. Repairs are simple and often can be done with only one extra pair of hands. But fiberglass is different.
While you can make small repairs, you usually have to replace the whole side panel of fiberglass to get the problem solved. Small repairs can be done by using a sharp knife and cutting away the damaged fiberglass and repairing the insulation underneath.
Then you just have to use a little auto body filler to repair the hole. Add a little fiberglass over the filler and sand til it is all smooth. After that just paint.
How Thick is RV Siding
The overall answer is that most RV siding sections are not that thick. Aluminum can range between .045 and .056 of an inch thick. Some can go as thin as .030 of an inch thick. It all depend son the type of aluminum siding you want and how it is made.
For fiberglass siding, again depending on who makes it and the style, can be about .045 of an inch thick. That seems to be the industry standard thickness.
How to Fix a Hole in RV Aluminum Siding
Corrosion can cause little holes to appear on your RV. If you delay in patching them, these holes can get bigger and become a real problem. Fixing them is not the difficult. Start with a little sanding to get the rust and corrosion off. Then use a clean, damp cloth and a little liquid soap to clean the edges. Next, apply some metal primer to the exposed edges and let it dry. When it is dry, fill the holes with waterproof caulk. Smooth out the caulk so it looks good and wait for it to dry.
Using a paint brush, put a little acrylic paint on the dried caulk and again, let the paint dry.
RV Aluminum Siding Bulging
Bulging aluminum siding could indicate that the staples, adhesive or screws lost their grip on the frame and have allowed the aluminum siding to loosen up. You may not see the bulge when your RV is parked but it will show up as you drive. Just keep your eye out.
T he best way to fix this issue is to go inside your RV and start locating the suds to that section of aluminum . Stud finders usually do not work through aluminum which is why you have to go inside to find those studs.
When you find the correct studs, screw in some stainless steel screws and then pull them out. Fill those holes with silicone and then put the screws back in . This should give you a great water tight seal.
RV Siding Coming Loose
This issue can arise if a seal has cracked or broken. Water has found its way inside to your studs and have worked the staples or screws loose. Whether you have fiberglass or aluminum siding, you are going to have to remove the siding and see if the luan plywood or wood studs are ruined. If so, you will have to replace the wood.
If you are lucky, you won't damage the fiberglass and can reuse it. That will save you a lot of money. If the staples used by the manufacturer comes loose then all you need to do is replace them with good screws. The key to these repairs is of course the condition of the wood underneath.
RV Siding Dent Repair
If you can live with the dents or small hail dimples, then you can postpone fixing this issue. But if you can’t or the integrity of the aluminum panel is compromised then you will need to repair the problem.
The only hindrance to this is that it may not be possible to bang out the dents on RV siding. Aluminum is an extremely difficult metal to bang out dents. It is just to easy to re-dent it in the opposite direction.
The only cure for this problem is that you would have to replace the aluminum panel with a new one .
RV Fiberglass Siding Bubbles
The repair of this problem may take a little skill. Once you start getting bubbles in your fiberglass you need to work carefully and sand down the bubble till you get to solid fiberglass.
Next, you have to use fiberglass cloth and resin putty (gel coat or epoxy) until you get the spot back to level. Then paint to match. But if the bubbles are caused by de-lamination, then you may have a more difficult repair to make.
You will have to cut out all the fiberglass, then remove the damaged foam. After that, you need to check the integrity of the plywood backing. If it is fine, then you just put new foam inside, using epoxy putty to secure it in place. Then add a little filler before putting new fiberglass on.
A little sanding and painting should cover the problem.
RV Fiberglass Siding Maintenance
To maintain your fiberglass siding on your RV you may only have to worry about looking after the gel coat layer. Over time gel coating can become old, it yellows, becomes cloudy or foggy and it is all due to oxidation.
To ix your gel coat issue, you will need to get some gel coat restoration products. Most likely you will see the words marine use on these products you can use them on your RV. Some will say both marine and RV use. Either way, you can maintain your RV fiberglass siding.
To remove the yellowing gel coat, all you have to do is a little buffing. Then you add the new coating and work it in while it is still wet . All of this is done by hand. After you have worked it in, polish the area and then wipe off any excess.
Or you can use a power buffer and save energy and strain on your hands.
RV Filon Siding Repair
Dealers may want to charge a lot to fix your damaged filon siding. One RV user was faced with a $2000 charge for a small hole. You can fix it yourself and save a lot of money. Filon fiberglass usually comes in rolls and can be cut to different sizes from 1 to 40 feet in length.
The rolls are usually a standard 8 1/2 feet wide. Once you get the amount of filon you need, you just cut it to size and glue it over the hole. Adding a nice picture will cover the bad spots and keep the repair hidden.
Your fix may be a bit different but other than stripping off all the siding and replacing it with new, you are left with few repair options.
RV Siding Delamination Repair
Simply put de-lamination occurs when the bonding agent holding the fiberglass siding to its backing is damaged and it lets go of its hold. This damage can occur through water leaks or hard impacts. This situation may not be noticeable right away.
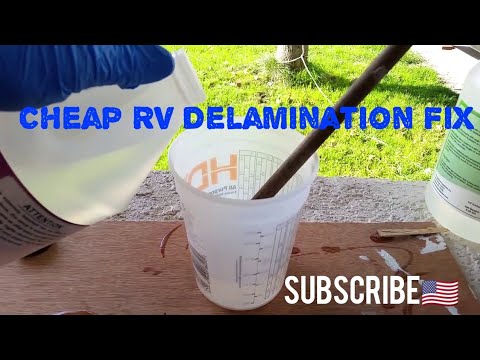
One method of fixing this damage can be through using a de-lamination kit. These kits can cost between $200 and $300 . The syringes inside can put new bonding agent inside and help the fiberglass to re-adhere to the backing.
You will have to check for cracked or lost sealant , then repair that before you are finished with your repair. This is not a situation that you can let go and wait to fix. De-lamination does a lot of damage to your frame and your RV in general.
If the problem can’t be solved with a kit, you may have to do extensive repairs to the backing and frame. Read more about RV delamination repair cost .
Best Adhesive for RV Siding
Making repairs to your RV siding depends a lot on the type of adhesive you use. For fiberglass one adhesive would be Polyurathame. It can be found in the caulking section of your favorite box store or hardware outlet.
The best adhesive to use are those that do not have any petroleum or solvent ingredient sin them . These ingredients eat away at the foam insulation and backing behind your fiberglass siding.
When this happens you are opening yourself and your RV up to de-lamination issues. Take the time to read the ingredients on the label before purchasing. Don’t assume or take just anyone’s word for it. Avoid those adhesive with those ingredients that harm your foam insulation.
RV Siding Repair Tape
For most people duct tape is their go to problem solver if something breaks or there is a leak. It does a good job on RVs temporarily. Of course, duct tape does not always look good on the side of your RV.
There are special sealing tapes made just for RVs. These tapes can seal up water leaks, cracks and they are a permanent fix. The tape is called Eternabond and you can find a variety of lengths and styles at this website .
There are double and single sided varieties to help you fix just about any problem quickly. Plus, these tapes do not take up a lot of storage room. They are lightweight and can easily be placed in a corner or drawer until it is needed.
There are other tapes, like putty and leak repair tape but their price may be a bit high for some RV users. Check with your local RV parts store to find some good tape alternatives to these options.
RV Siding Patch
Generally, when you need a patch to your your RV siding, it is easier to just replace that damaged section if your siding is aluminum. There is probably less work in replacing the damaged section than there is trying to repair it.
There is one way to repair a dent in your aluminum before replacing the damaged panel. All you need to do is drill a small 1/8 inch hole and then place a washer over a self tapping screw.
Insert the screw but not all the way. When the screw has a good hold on the aluminum, grab the washer with a pair of pliers and pull. The dent should pop out. Just do not apply too much pressure. If you do, you run the risk of pulling the aluminum out further than you want it to be and you are left with another problem.
Some Final Comments
Repairing your RV siding has a lot of twists and turns. A lot of repairs will depend on the size of the damage, where it is and what material your siding is made of. The important issue to remember is that most of the damage done to your RV cannot wait for very long.
The longer you wait the more damage you may cause. It is best that you address these issues as quickly as you can as you could be hurting your RV’s frame and other important parts.
Spot checks, preventive maintenance are two ways to ensure that the damage does not go unnoticed. Sometimes you may have to look closely as the damage may not appear when you are parked.
Related Posts
DIY Homemade Camper Siding: What Can You Use For RV Siding?
Poli Glow Problems and Complaints (Helpful Review)
Luan for RV Guide (Finding 1/8 Inch RV Plywood Paneling)
Leave a Comment:
- Skip to primary navigation
- Skip to main content
- Skip to primary sidebar
- Skip to footer
Journey With Confidence
The Ins And Outs Of RV Delamination Disasters

- Maintenance, Modifications and Repairs
Don’t worry, this isn’t your eyes playing tricks on you. This is a real RVer with serious RV delamination problems.

Photo courtesy of iRV2 Forums
What is RV delamination?
Aluminum siding used to be the de facto choice for RV manufacturers, but most have switched to fiberglass siding because of its durability, lightweight properties, and lower overall cost. RV walls are also easier to produce and install.
They’re built like a sandwich; the exterior fiberglass and interior decorative walls are the “bread,” and in-between contains the “meat,” which is two layers of wood and Styrofoam. These materials are vacuum bonded to each other, then the “bread” in order to serve as backing reinforcements.
Fiberglass is extremely flexible, durable, and unlike aluminum, can bounce back from common hazards like road debris and hail. Unfortunately, the “meat” underneath the fiberglass isn’t quite as durable. If something impacts the RV roof or wall it might not puncture the fiberglass, but it can hit it hard enough to permanently dent the underlying Styrofoam and wood substrates.

This RV delamination problem is obvious.
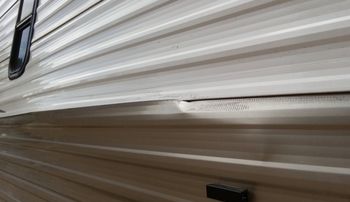
The result is a convex air pocket that causes bonding agent failure and separation. A bubble forms over the unglued pocket, which will grow in size over time as the fiberglass-walled RV flexes with normal use. The bubble will gradually crack and trap moisture inside, causing further damage.
Bonding agent separation can also happen when water seeps in through a roof, window, or vent seam with inadequate or deteriorated lap sealant. The separation creates a river of moisture and the result is a soggy RV “sandwich” eventually consisting of unsightly blisters, bulges, and waves on the outside and irreparable wood rot on the inside.
Most owners don’t recognize the signs of RV delamination until it’s too late. Fiberglass RV walls can look smooth on the outside while real damage is unseen. When the problem becomes obvious, repair is usually expensive and often impossible to fix.
Recognizing and repairing RV delamination
Whether you own a fiberglass RV now or you’re shopping for a used one, it’s important to know the signs of an RV with delamination . First, do a thorough walk-around in direct sunlight and closely inspect the side, front and rear RV walls as well as the areas around windows and roof vents.
The fiberglass should be flat and smooth. If you notice any waves, bubbles, or creases, press them with your finger. If the area feels spongy, you have probably spotted RV sidewall delamination. Double check by tapping it lightly with a plastic utility serving spoon or other implement.
A hollow sound indicates delamination. When the RV is parked in shade, notice how the waves and bubbles react. If they get smaller and flatter, that’s another indicator of RV sidewall delamination.
If you’re just browsing the market for a used fiberglass RV, now’s your chance to run. You do not want to own a RV with delaminated sidewalls, even if the owner is giving it away for free.
The repair costs rarely justify the effort and expense of repair (however there are exceptions, so keep reading). If water has permeated RV sidewalls, it may have already weakened the RV’s structural integrity. Mold spores can fester on the damp inner wood layer and cause health problems for the owner. You won’t know any of this is occurring without peeling away the outer layer.

Pressing the substrates back together during the delamination repair.
My RV has delaminated. Now what?
The most common cause of the delamination problem is an owner failing to periodically re-seal seams with lap sealant . As a consequence, RV insurance companies and extended warranties don’t usually cover RV delamination repairs.
If you’re in this unfortunate situation but the damage is relatively minor, you can try a delamination repair kit . These kits cost $200 to $300 and include a heavy-duty, marine-grade bonding system that can be used to re-glue the fiberglass to the underlying layers. They come with syringes and tubing for injecting the sealant into tight spots. However this solution only works if the inner layer is free from water damage.
If the problem is big but you have a never-say-die attitude, a DIY approach to RV delamination repair is possible. Notice how this hearty iRV2 Forums member documented his entire repair job for anyone brave enough to try it themselves.
Have you experienced sidewall delamination on your rig? If so, what did you do about it? Let us know, because there are many fiberglass RV owners who would appreciate reading about your experience.
[…] draw backs. “Laminate” construction has a drawback called “de-lamination”. De-lamination is caused by water intrusion that has occurred to the sidewall, causing the plywood/luan backer […]
Leave a Reply Cancel reply
Your email address will not be published. Required fields are marked *
Save my name, email, and website in this browser for the next time I comment.
Welcome! Please follow these guidelines:
- Be kind and respectful.
- Keep comments relevant to the article.
- Avoid insults, threats, profanity, and offensive remarks.
- Refrain from discussing gun rights, politics, or religion.
- Do not post misleading information, personal details, or spam.
We may hide or remove comments at our discretion.
I have read and accepted the Comment Guidelines and Privacy Policy *
An RV Safe GPS Built By RVers For RVers.

Get the RV LIFE App Today
SHOPPING CART
No Products in the Cart
- What is RV Siding Delamination? How to Fix Bubbled RV Walls and Roofs
Delamination Repair FAQ
What is delamination? Delamination happens when the bond between one or more layers fails. This can happen in isolated areas, or throughout the entire wall panel.
Why does delamination occur in an RV? In many cases a leak path opens allowing water to enter the wall. Typically this happens adjacent to windows, vents, lights, roof lines, etc. Age, quality of the original workmanship and materials, vibration, and exposure to the elements are factors related to water intrusion. We typically see a situation where water breaks down the glue that bonds the layers of the Luann plywood.
How can you spot wall delamination? Look at the wall from an angle and check for bulges or bubbles. Most sidewalls are not perfectly flat, so this can be tricky, however, the bubble can be worse when the wall is in direct sunlight due to the de-bonded material expanding at different rates. Next, tap lightly on the wall with a plastic screwdriver handle, solid areas and delaminated areas sound different.
Please login and you will add product to your wishlist
RV With Tito
DIY tips, upgrades, and gear for a self-reliant RV lifestyle. Learn about RV solar power and boondocking while learning to perform your own RV maintenance and upgrades to save money.
DIY RV Delamination Repair
Here is a step-by-step guide showing how I repaired the sidewall delamination on my RV. I learned many things during this project that I believe will help you get an acceptable result.
Before we get into it, I’ll caution you to have realistic expectations. Don’t expect like-new results . Removing and repairing the entire sidewall is the only way you’ll restore your RV sidewall back to new condition. The best you can hope for is to achieve an acceptable looking result and stop any further damage.
Before Repair
Two years ago I noticed the side wall on the back corner of our 2007 RV starting to bubble up. Several areas on the left rear of the motorhome were bulging. Some worse than others. When I pressed on the wall panel it would move in an out. This was a classic sign of sidewall delamination.
Once the bulging started, the affected area grew as the sidewall got pulled away. I watched as the bubbling got worse each year. A large area near the roof line rain gutter was the most affected.

After months of planning I dedicated a warm summer week of my life to repairing the delamination. The final outcome was better that I expected.
After Repair
With the amount of effort involved I was happy with the result. In addition to what you can see though, several repairs and improvements were also made to reseal and secure all seams.

Some bubbling may remain in areas that were difficult to fill and clamp. I still have some areas that I couldn’t treat or that simply look uneven when the sun hits it a certain way. It’s a result I’m satisfied with for now. If you’re ok with an imperfect result, then continue reading.
Let me walk you through my process to repair the sidewall. I’ll also share my top delamination repair tips and tricks that really helped make my outcome a successful one.
Let me start by answering a few questions you may have:
Can you repair the delamination yourself?
YES. If you have the desire, patience and basic DIY skills to do so.
Is this a difficult project?
YES. You shouldn’t underestimate the complexity of this project. Once I was ready to start, it took me 7 full days to complete.
Tips for a successful delamination repair
I developed several tips and processes while repairing the delamination on my RV that I’ll explain and demonstrate in this video.

How much does it cost to fix the delamination?
The basic cost of materials came to around $200, but I was able to buy just about everything I needed on Amazon. What is not included in that cost are the scrap pieces of wood I used, my tools (clamps, etc.) that I already had, plus countless hours of my time.
What do I need to fix the delamination?
For the delamination repair portion of the project you’ll need:
- Epoxy Resin and Hardener
- Plastic Syringes
- Plastic Tubing
- Mixing Cups
I put together a delamination repair kit to help you get started.
You may already have some of these other items. If not, you can pick them up at your local hardware store.
- Clamps (lots of clamps)
- Scrap wood for bracing
- Rubber gloves
- Wedges and shims
- Plastic Sheeting
- Basic tools

Additional materials needed to reinstall and reseal trim, compartment doors, windows are not included here. The need for these other materials will vary from project to project based the location and extent of delamination on your RV. I had most of the materials I needed on hand like Butyl tape and various sealants.
I am only going to address the delamination repair itself in this article. Additional removal and reinstallation of windows, compartment doors, and trim will certainly be required for most repairs.
Delamination Repair Process
There’s a lot of planning that needs to take place prior to starting a project like this. I would say that the planning is the most important part of this project. It’s important to get it right the first time. After injecting the resin, you’re unlikely to get a second chance.
Here are some things to consider carefully:
- Where will you park your RV during the repair?
- Can you cover your RV (if it rains)?
- How and where will you inject resin?
- How many areas will you treat?
- How will you brace each area?
- When will you do the repair? (you’ll need a string of warm days)
- Do you have everything you need?
Develop a Bracing System
You’ll have to develop your own method for bracing your repair area. I used 2x4s and smaller pieces of scrap wood secured with wooden wedges (which I made out of scrap).

Developing a bracing system was the part of the project that required the most thought. I did not have a nearby structure like a tree or wall to use. Instead I had to use elements of the RV itself to create a brace.

Create an Epoxy Injector
I taped a length of plastic tubing to a skinny pole that I had laying around. Then I taped the end of the tube to the syringe with aluminum tape (which seemed to work the best).

For a pole you could also use a wooden dowell, broken golf club shaft or something similar that will allow you to guide the injector tube deep into the delaminated area.
Here are the general steps I followed to repair each delaminated area. You’re process may be slightly different depending on the location and extent of your delamination.
Identify the delaminated areas
Identify the dealamitate areas and assess the extent of the damage. You may have to treat separate areas in multiple applications. Don’t bite off more than you can chew. It’s better to treat smaller areas and let it cure before moving on.
Mark the areas with painter’s tape
Mark the areas with painter’s tape so you know where to inject. It will be difficult to tell which areas are delaminated when you are close.

Gain access the area behind the delaminated panel(s)
Remove edging, trim, compartment doors and windows necessary to get behind delaminated surfaces.

There may be areas where multiple layers are delaminated. Test each area and layer to determine where you can insert your injector.
Mix epoxy with hardener in a small batch (4-6 ounces)

Load the injector
Load the injector with epoxy by placing the end of the tube in the mixing container and pulling epoxy into the syringe.

Inject epoxy into the delaminated area
Press the syringe to release the epoxy while slowly pulling the injector out.

Press down on surface immediately
Press down on the treated area immediately after injecting to spread and bond epoxy to sides.
Apply a temporary clamp
Secure the treated area with a temporary clamp until the final clamp can be placed.
Repeat for entire section
Repeat the previous steps until the entire section is treated.
Clamp the section securely
Clamp the entire treated area and let it stand until cured (15 to 24 hours).
Repeat for all areas
Apply the same process for other areas of sidewall delamination around the RV (may take several days).
Reinstall and reseal all trim, windows, doors
Reinstall any panels, trim, windows and doors removed prior to treatment. Reseal them after install.
Tips for a successful outcome
Throughout this process I applied a few tips and tricks that helped make my repair successful. So I’ll share them with you.
- Work from the bottom up clamping as you go
- Mark the area to be treated with blue painter’s tape
- Cover the area with plastic and painter’s tape to protect the surface from dripping epoxy or spill over
- Inject above the area to be treated so the epoxy drips down into the area you’re treating
- Apply pressure after each injection to spread the epoxy before it has a chance to collect near the bottom
- Use the pumps designed for your epoxy system to ensure you’re getting the perfect ratio of resin to hardener
- Mix small batches of epoxy (enough for about 2 injectors) to prevent premature hardening in the mixing container
- Do not reuse injector across multiple days to avoid clogging. Assemble a new injector each day.
- Have plenty of wedges ready while clamping (you’ll always wish you had more)
- Perform a dry run of the injecting and clamping prior to injecting the resin in each section to validate your clamping method and make sure you have all of the materials you need. It may seem tedious but you’ll be glad you did.
Since publishing this article and video, several others have emailed me sharing their successful results. So, as you can see, it is possible to repair areas of sidewall delamination.
Don’t wait too long. If you notice delamination starting on your RV, it’s best to get on it as soon as possible. The longer you wait the worse it will get.
Best of luck with your project. I hope these tips help you get started.
Share this:
- Click to share on X (Opens in new window)
- Click to share on Facebook (Opens in new window)
- Click to share on Pinterest (Opens in new window)
Related Articles

- Resource Library
Special until May 31st: 30% off Solvent & Cleaner for the month of May. Use Code MAY24 at checkout. *restrictions apply
Free ground shipping in the Continental US for any orders over $150!
RV Delamination Repair Guide...
Rv delamination repair guide.

Much of your RV’s exterior is laminated , or built with multiple layers. When it becomes delaminated, it means that these layers lose much of their integrity—which can be a long-term threat to your RV’s infrastructure. In this guide, we’ll examine how to spot delamination, and walk you through the RV delamination repair process so you can continue to enjoy a fully-functional RV. Here’s what you’ll need to know.
How To Spot RV Delamination
You’ll never get to work if you don’t know how to spot delamination in the first place. Here are the signs you need to watch out for:
- Bubbling. This is perhaps the most obvious sign of delamination—you’ll notice that part of your wall appears to be “bubbling.” This bubbling is often caused by the separation of individual layers as they delaminate.
- Differences in wall structure between panels. Delamination doesn’t necessarily cause obvious bubbling at first—but if one wall of the same material apparently has a different texture than the next panel, you know it’s worth investigating.
How To Approach Delamination Repairs
The separation of the layers of your RV structure can cause some potential problems, which is why your goal should be to arrive at an RV structure in which the layers once again sit on each other comfortably. You’ll face a critical choice here: can you handle the repair yourself using the equipment you have on standby, or do you need to consult a professional? If you run into problems such as corner molding that makes the panel too hard to attack, it’s probably time to call in a professional.
Before you take apart the entire RV to handle these repairs, you’ll want to do some reconnaissance. In other words, investigate the problem by taking apart some of the trim and getting a closer look at the structural integrity of the materials themselves. In a Delamrepair.com guide , you’ll notice that one of their first steps is to remove the trim and corner molding to get a closer look at the delamination in the walls. In their process, you’ll notice that they also found that the corner molding gave them too much trouble to bother removing.
Repairing RV Delamination Yourself
What about handling it yourself? It’s a complicated process of shooting an epoxy mixture into the layering to promote adhesion— To Wander Freely has a clear and comprehensive guide for this specific process.
But that doesn’t mean you should skip over some basic fiberglass knowledge here. You might recall a previous article of ours in which we mentioned some key ways to prevent delamination:
- Inspect your fiberglass regularly and check for the “bubbling” or “blistering” as mentioned above.
- Maintain a clean and dry atmosphere inside the RV as much as possible. Use our RV restoration products to maintain the quality of your wood and prevent delamination.
Blistering on your RV is more than just unsightly. It means that there are fundamental structure problems within the paneling itself. Know what it is—and how to prevent it—and you can maintain a stronger RV that looks as good as new.
Share this:
- Click to share on Twitter (Opens in new window)
- Click to share on Facebook (Opens in new window)
Related Blogs
Thanksgiving trivia.
Thanksgiving is one of America’s oldest and most loved holidays. Even though the story is steeped in a dark history […]
Rv’ing With Your Pets
Today, more than ever, people are traveling with their pets and including them in activities, such as vacations. Pet Travel […]
The Ultimate Camping Bucket List
When you think campgrounds, KOA probably comes to mind as you can find KOA’s all over the United States. Well, […]
All products proudly made in the usa

How to identify and repair delamination on camper

- BEGINNERS GUIDE
G. Yoganand
RV camping is fun and adventurous for people who enjoy camping. But, as you prepare for your next camping adventure on an RV, it’s important to know that campers are susceptible to various challenges.
Siding delamination is one of these problems that you should know.
At some point in your camping adventures, you may notice a tiny bulge on the siding of your recreational vehicle. The bulge will gradually grow for several months and result in the destruction on your RV walls if not fixed. If you notice this form of damage on your camper, you may be dealing with delamination.
You should be wary of delamination since it is a symptom that your recreational vehicle needs repair.
In this guide, you’ll learn how to spot, prevent and fix it.
What is Delamination in Camper?
When your camper experiences delamination, its gelcoat or fiberglass outer layer will start pulling away from the plywood or luan (also known as the substrate).
Your RV’s siding will develop small cracks, which spread outward with time. Water intrusion in the siding will likely accelerate the development of the cracks. You’ll find it expensive to repair the entire wall once water penetrates through the substrate lying under the fiberglass.
In past, RV models used to have aluminum as the material of choice for the siding. However, manufacturers opted for fiberglass siding because of its lower overall costs, lightweight properties and durability.
Today, campers feature sidings with interior decorative walls and exterior fiberglass vacuum bonded together to form a durable wall.
Though fiberglass is more flexible and durable than aluminum, the bonding substance between RV walls made of fiberglass is susceptible to water and heat damage.
The damage, known as delamination in this case, can also affect the RV roof. It usually takes the form of a convex air pocket that makes the bonding agent detach from the fiberglass and interior plywood.
Delamination may result in further damage of your travel trailer walls when bubbles that form in the air pocket trap crack and trap moisture in between the walls.
It can occur when water seeps into the walls through a vent seam, window or roof if your camper’s sealant is insufficient or deteriorated. The long term impact of delamination on the siding is wood rot.
What Causes Delamination on a Camper?
One of the main major causes of delamination on a RV is negligence. As a camper owner, it’s your duty to maintain the bonding agents and prevent them from accumulating moisture.
The moisture buildup inside your RV’s walls makes the adhesive less effective. Once the walls lack a strong bonding agent to keep them together, they will peel away from each other and form an ugly bulge.
Water from your bathroom and kitchen areas may trigger delamination on your RV’s siding.
You’ll also notice the bulge in parts of your camper with a sink installed. If one of the pipes running through your walls is leaking, you’re likely to have delaminated walls. Water leaks are common in used RV models.
RV delamination is caused by moisture that penetrates between the outer layer and the substrate resulting in weakening the bonded layers. Stress cracks on the RV body due to flexing can facilitate such water penetration. Therefore, always look out for such cracks and repair from time to time.
Excessive heat in your camper can also result in delamination of the walls. In this case, heat sources such as the heater may weaken the bonding agent in between the walls.
Your camper may also be susceptible to delamination if you’re camping in an area with desert-like temperatures.
How Can You Spot it?
It’s important to know how to spot the signs of delamination whether you’re buying a used RV or you own one made of fiberglass.
The earlier you find these signs, the simpler it will be to fix them and prevent further damage.
Consider walking around the camper (when parked in direct sunlight) and thoroughly inspect the rear, front and side walls. You should also look for abnormalities around the roof vents and windows.
Unless its a very minor issue is always better to avoid RV’s that have delamination because such an RV may also have related issues like water damage, leaks and mold.
Here are other ways to spot delamination in your camper:
Creases, bubbles or waves on the fiberglass
In its undamaged form, fiberglass is usually smooth and flat. If the fiberglass has creases, bubbles or waves that feel spongy when pressed with a finger, it’s a sign of delamination.
Tap it lightly with an object made of plastic (such as a pen) to double check your observations. If the fiberglass produces a hollow sound, it’s still a sign of delamination.
Parking your camper in a shade can help you tell whether it features delaminated sidewalls. If the bubbles and waves inside the walls get flatter and smaller, it’s a possible delamination sign.
The bubbles and waves tend to reduce in size when you park your travel trailer in a shade because the bonding agent holding the walls together shrinks in cool temperatures.
Growth of mold on the inner wood layer
In severe instances, you’ll notice the growth of mold on the inner wood layer once you peel away the outer layer. Mold spores tend to accumulate on damp wood once water penetrates through your camper’s sidewalls.
At this point, the water damage will weaken your RV’s structural design and make it more expensive to repair or replace the affected parts.
Leaks on RV accessories
If you spot leaks on TV accessories mounted or screwed into the sidewalls, they may suggest that delamination occurred. The accessories may include exterior mounting brackets, lights, electrical sockets, awnings, ladders and mirrors.
When this happens, consider removing and reinstalling the affected accessory with new gaskets. You should also properly put the fasteners and screws back in place.
RV insurance companies normally do not cover delamination repair costs as it is considered to be issues resulting from lack of maintenance.
This gives another reason for you to be very careful in identifying for any signs of delamination and take preventive measures or fix it on time.
Repairing the RV delamination
To be honest, fixing or repairing delamination on a camper is not for everyone. Its a structural issue on the walls and fixing it to be as it was earlier may not always happen.
Having said this you can work hard to make it as best as possible but do not expect it to be 100% perfect.
Another important thing to know is, it will take lot of time and patience. How much time you need to spend will depend on the amount of damage.
Before we see the exact steps in fixing, lets address few important questions you may have.
How much will it cost to repair the delamination?
Considering you will have some basic tools to do the repairs, you will end up spending approximately $200 on doing the delamination repairs on the camper.
What all tools and items will be needed to carry out the repairs.?
Your RV delamination repair kit should include all of the below items apart from basic tools that are needed for repairs.
- Epoxy Resin
- Wood pieces for bracing system
- Injector and tube
- Cups for mixing the resin and hardener adhesive
- plastic to cover the affected area
- Paint tape for marking the area to be worked upon
- Other basic tools for making the bracing
What things should you keep in mind before starting the repairs.
Here are the steps in repairing the RV delamination.
1. Step first involves identifying the damage that you want to fix
Remember, you don’t have to fix everything in a single go. If the damage is huge target some spots first. Inspect the walls for exact damage. Looking at it from closer distance may not be great idea as you may not see the damage properly. Inspect from various angles as well as with different light conditions, this will give you proper idea on the damage.
Once you have proper idea on the delamination area go on with next planning.
If the delamination is on slide out make sure you check in thoroughly by expanding and closing the slide.
2. Mark the area with paint tape
Planning is one of the key steps in this whole repair process. And for that, you need to have visible markings so that you don’t mix up the process. Make use of blue paint tape to mark the area to be repaired.
This will help you in setting up the bracing support system which is the next step in this repair process.
3. Create bracing support
This is the most important step as otherwise you will end up creating issues with the whole repair. Use clamps to support and provide strength to the repair you will do.
Make use of wooden pieces and clamps to create the bracing support. Get as many pieces as needed and have this ready before going to the actual repair using epoxy resin and hardener solution.
4. Make injecting tube
You need an injection tube assembly that will be used to inject the resin/hardener solution into the delaminated area. For this, you can use syringe and tube connected together.
Buy number of syringes as you will need new one for new days of work. With resin hardening over time the syringe wont work easily and therefore I suggest getting multiple syringes in first place.
5. Remove all items that block access to the delaminate area
Remove trims, windows or lights that can make it hard for you to access the area or make it difficult to create clamps or bracing system.
This will largely depend on the area of the camper. This means you may have to remover windows or rain gutter and so on. Whatever the case, plan for this beforehand and make it supper easy for you to attach clamps and wooden pieces.
6. Prepare epoxy resin and harder solution
Remember to have everything else ready before going for this step. The mixture will become hard if you make it and keep as it is in the cup.
Therefore, be ready with everything and then go for this step.
The idea is to create a mixture as per recommendation by the resin brand. Mostly it is 1 by 5 wherein 5 quantity of resin and 1 quantity of harder is to be used.
7. Inject the resin and hardener solution into the laminations.
Slowly inject the solution into the delaminated area and once done press hard temporarily before applying the bracing system and clamps to support it. Infecting resin adhesive should be done slightly above the area where you want to fix it. This will help in applying it uniformly as it would run down as you apply.
8. Clamp the region
Once the epoxy resin and hardener is injected make sure you clamp the whole section for good number of hours to around 15-20.
This is a very important step as otherwise the solution will not spread uniformly and hold the lamination properly.
Using hands, support and press the lamination. Then clamp it thoroughly using clamps and wooden pieces as required. Make sure the camper is parked at a proper location because you need to keep it untouched for 10-20 hours or even more.
You need to keep this in mind even before starting the repair.
If the area to be repaired is big then make sure you do this process step by step choosing small portions preferably starting from the bottom up to the top.
Here are some important tips from my experience to make your whole repair process easy and smooth.
- Make sure you start the repair process from bottom to top. If the section of the exterior to be repaired is big then it will take time. Therefore it is always better to target small sections starting from the bottom.
- Prepare the resin and hardener mixture solution in small quantities instead of a whole lot. This is because, the mixture gets hard faster and if you don’t inject and keep it inside the cup it will become hard and stick.
- Cover the section adjacent to the repairs with plastic or other cover to protect it from resin mixture that can stick very easily.
- Give sufficient time for the injected solution to harden.
- Repair results may not be as you wanted but you can always try your best.
- It will need sufficient time which can be days to weeks based on the amount of damage.
- Do a dry run before starting the repair as it involves fixing which is time dependent. This will help you in avoiding mistakes.
- Take help from a family member or friend as some things like creating bracing assembly for support need to be done as quickly as possible.
If you own an RV with delamination and want to sell it then better repair it before selling. RV inspection will easily find it out and you will lose the money.
What to Do to Prevent it?
The good thing about spotting early signs of delamination is that you get a chance to fix them before they result in further damage. You can also prevent these signs from occurring and save big on repair or replacement costs.
The two preventive measures for RV delamination include inspection and early repairs as discussed below:
Regular inspections
Routine care and maintenance should always form part of your inspection procedures if you want to prevent your camper from delamination and keep it in perfect shape. You can carry out the inspections by yourself or rely on expert help.
Either way, the procedure should focus on identifying the early signs of RV delamination. It is achievable by checking the roof, sidewalls, windows and vents for hollow sounds, creases, ripples, bubbles, water damage, sponginess, tears and cracks.
Schedule the inspections at least once a month depending on how frequent you use the camper. Consider inspecting for delamination your RV when there are extreme weather conditions to know whether.
The reason behind this is that hot and cold weather conditions increase the risks of your RV parts getting delaminated. Plan for repairs or replacement if you notice any signs of damage.
Early repairs
It’s cost effective to repair the delaminated parts of your RV before they get worse. For instance, repairing the cracks or creases on the sidewalls (by applying new sealants) will be cheaper than replacing the entire sidewalls. Early repairs allow you to prevent delamination from causing further damage to your camper.
When conducted with the appropriate tools, they can help keep your RV in good shape and make it less susceptible to delamination.
The Process and Costs of Fixing Delaminated Parts
You’ll need a repair kit to fix the delaminated parts of your recreational vehicle. The kit usually comes with a heavy-duty, marine-grade sealant that you can use to reattach the fiberglass to the inner wood layer.
Repairs may be costly if you fail to routinely inspect and re-seal the seams of your camper. The extended warranties and insurance companies may also not cover repairs necessitated by delamination.
It will cost you $200 to $300 to purchase a delamination repair kit if you prefer fixing the problem by yourself. The kit comes equipped with a sealant, tubing and syringes for channeling the sealant into the walls. You can only use it when there’s no water damage visible on the inner wood layer.
Hiring a repair technician for the job
If you prefer having a repair technician fix the delaminated parts of your RV, it’s important to have a budget for the endeavor. Prepare the budget depending on the average fees technicians in your area of residence charge.
The costs will largely depend on the amount of damage on your camper. You’ll spend $400 to $800 hiring a professional to do the work.
Though it may seem costly, the professional service may help solve the problem in the long-term and give you peace of mind.
Most camper delamination repair technicians consider factors such as labor, profit, the type of camper under repair, miscellaneous supplies and RV parts in their pricing. Before hiring one, get a detailed breakdown of the entire service.
Will the Insurance Company Pay for the Repair Costs?
Insurance companies usually have strict policies governing RV repair costs. Most of them don’t cover delamination in the list of repairs since it’s an issue that stems from natural causes.
Insurance companies also consider delamination as a problem caused by negligence. If you want to avoid going back and forth with your insurer, consider re-sealing your camper’s sides and roof.
In Conclusion
When properly inspected and maintained, your camper will give you the luxury of traveling to different places without booking hotel rooms or renting cars.
You wouldn’t want to compromise the comfort that comes with camping by allowing challenges such as delamination to get into your way. As a RV owner, you should always be on the lookout for signs of delamination and know how to fix them before they make your camping experiences less enjoyable.

You Might Also Like

What to Expect in a Travel Trailer living

Hitching and Unhitching a 5th Wheel Trailer – Helpful Guide

How To Determine RV Worth – Helpful Guide

16 tips for using travel trailer in winter
How to Fix RV Delamination
- Description
- Discussions
RV delamination is a problem that can affect all sizes of vehicles, but is most common in coaches. We received a question from a Club member who was experiencing delamination on the sidewall of his Coachmen Class C. He wondered what could be do to fix this issue and how he should go about preventing it from happening again. So in this lesson, RV expert Dave Solberg explains the ins and outs of RV delamination.
If you’ve ever had trouble with delamination on your rig, you probably know that it’s not an inexpensive issue. Patch repairs on delaminated areas can be fairly pricey, so Dave recommends upfront that you take proper precaution to avoid having to navigate this situation. First and foremost, delamination is caused by moisture that seeps between a vehicle’s wall layers, which leads to bubbling and corrosion. Dave talks about the difference between cosmetic RV delamination and the kind that warrants patch repair. However, once you understand the basics of correct sealing protocol, you shouldn’t have any trouble steering clear of delamination!
Share tips, start a discussion or ask one of our experts or other students a question.
Already a member? Sign in
7 Responses to “How to Fix RV Delamination”
I've read that older Alfa See Ya Class A's had that issue. I am considering buying one, anything I should know or just good maintenance and looking for leaks?
How does one see these videos? When I push the arrow all that comes up is play with a bunch of videos in the background scrolling. Never see the video!
The title was "How to fix RV Delamination" I still don't know how to fix my delamination. What kind of adhesive do you use? How is it squirted in? How is pressure applied? What is recommended to fill the hole you drilled? How far from the hole will the adhesive spread? Does the adhesive expand?
LAMINATE REPLACEMENT
This video told me nothing about "How to fix RV Delamination" many be how to prevent it. Poor title ! I joined to get better at fixing (DYI) my older RV. Waste of my time.
If this was caused by window seal. would re caulking around the outside of the window fix the problem?
Explore videos by Dave Solberg

You may be interested in
Premium Membership
Unlock exclusive member content from our industry experts.
- 24/7 Access to Premium RV Maintenance Videos, Travel Inspiration, and Lifestyle Tips
- Step-by-Step Instructional Demos, Projects, and Guides
- 50% Off Video Downloads Purchased in the RV Lifestyle & Repair Shop
- Access to Ask the Expert Program
- 2 Full-Length Video Downloads to Watch Offline
Gold Membership
Get everything included in Premium plus exclusive Gold Membership benefits.
- 9 Full-Length Video Downloads to Watch Offline
- 2 Full-Length RV Repair Classes to Keep for Life
- Discounts on Purchase-to-Own Content in the RV Lifestyle & Repair Shop
- Exclusive GOLD LIVE Streaming Events
Username or email *
Remember me
Lost your password?
Privacy Policy
RV Delamination – What You Need to Know
By: Author The Drivin' & Vibin' Team
Posted on July 13, 2021
RV Delamination – What You Need to Know
RV delamination is surprisingly common, and routine maintenance is essential. By the time you notice an issue, the problem could already have progressed significantly.
Today we want to help you be more aware of delamination in RVs and give you tips to prevent and fix it.
Let’s get started!
What Is RV Delamination?
Delamination is when the fiberglass or gel coat layer on an RV separates from the backing material. The backing layer used in RVs is typically a lightweight plywood or luan material. This damage can start as a tiny blemish and develop into larger and larger cracks.
Moisture or water can seep in and speed up the process.
What Causes RV Delamination?
RV delamination often occurs due to one or more exterior seals failing, perhaps from lack of maintenance. These seals protect your RV from water leaking into your RV and causing expensive damage.
RV seals usually wear down from exposure to extreme weather. Over time the seals become brittle or flaky and peel away from the RV.
How to Spot Delamination on Your RV
One of the first signs of delamination is bubbling in your walls. You might also spot small cracks on your exterior that appear to be stress fractures in the material. These cracks can signal that moisture has entered your RV, and the delamination process has started. If you don’t spot this and repair it quickly, the problem will continue to grow.
The walls of your RV may start to bulge, and the small cracks will become much more prominent. These spots will typically become soft bubbles in the outer layer of your fiberglass.
How Much Does It Cost to Fix RV Delamination?
If left untreated, the cost of RV delamination grows exponentially as the damage worsens. Your best bet is to treat the problem at the first sign of symptoms. There are some DIY kits for $100-$300. These can be an excellent option for minimal repairs.
However, you may need to call in professionals, and even minor repairs can cost well over $1,000 and require exterior wall replacement. Depending on how extensive the damage is, your RV could be a total loss.
Many RV insurances and warranties don’t cover delamination as it often results from a lack of owner maintenance. Not only will your RV be severely damaged, but you’ll likely be on the hook for the entire repair bill.

How Do You Stop Delamination?
The best way to stop delamination is to prevent it from starting in the first place. Prevention means being on top of the maintenance. Inspect your RV’s seals frequently while using your vehicle.
If your RV spends most of its time in extremely hot or wet conditions, inspect every few months. However, if you’re in a more moderate climate, an inspection at the start and end of each camping season should suffice.
Inspecting your seals isn’t enough to prevent RV delamination though. You must also fix any issues you find. Cracks or broken seals provide opportunities for moisture to enter your RV. Addressing them is essential to preventing and stopping delamination.
What to Do If You Spot Delamination on Your RV
Putting off a delamination repair is one of the worst things you can do for your RV and wallet. Let’s look at a few things you should do as soon as possible after spotting RV delamination.
Find and Seal the Leak
The first step is to find and seal the leak. Moisture will continue entering your RV until you resolve the leak. Clean all of your seals before resealing them properly. Ensure the materials have an excellent surface to stick to and that you’re able to provide the best possible protection for your RV.
Check for Additional Damage and Mold
Delamination may be the first visible sign of a major problem hidden within the walls and under the carpet of your RV. It’s likely something’s been going on for a while now.
Inspect the area for any additional damage or mold. You may have to replace the carpet, furniture, or even subfloors. Mold and other damage from moisture can be hazardous and cause health issues.
Get a Professional Repair Estimate
Know when a problem is beyond your skill or expertise. Make sure you correctly address the situation and prevent it from worsening. A professional can tell you whether you can repair this yourself or should seek assistance.
Can You Fix RV Delamination Yourself?
There are DIY RV delamination kits available. These kits usually address smaller fiberglass issues resulting from delamination. However, even though they’re for a small project, they’re not necessarily cheap. They can range from $100-$300, and larger jobs will require more expertise.
Don’t bite off more than you can chew when it comes to repairing delamination. Attempting to do a professional repair without training or the correct tools and materials will likely result in a much more expensive future repair.
Act Fast with RV Delamination
While we hope you never experience the dreaded feeling of discovering RV delamination, we hope now you’re better prepared. Delamination isn’t an issue that will heal itself, and you shouldn’t wait on doing repairs. Take action immediately to prevent further damage to your RV. If you’ve ever discovered delamination on an RV, what was the repair process like for you?
Discover the Best Free Camping Across the USA
To be honest with you, we hate paying for camping . There are so many free campsites in America (with complete privacy).
You should give it a try!
As a matter of fact, these free campsites are yours. Every time you pay federal taxes, you’re contributing to these lands.
Become a FREE CAMPING INSIDER and join the 100,000 campers who love to score the best site!
We’ll send you the 50 Best Free Campsites in the USA (one per state). Access the list by submitting your email below:
I’m glad I found this blog post. I was having the same issue with my RV.
- The Composet SLV® based kits use a resin injection process for when the wall is "closed". In closed-wall applications the outer fiberglass has not pulled completely away from the backing. The delaminated layers are still captured inside the wall. The resin is very thin.
- The inside of the wall must be dry and in reasonable with the delaminated layers present.
- This process requires good carpentry, fabrication, and repair skills. Clamping is required.
- 5 Quart Kit


- Types Of RVs
- Tow Vehicles
- Maintenance & Repairs
- RV Power & Electrical Supplies
- RV Appliances
- Living In An RV
- Travel & Destinations
- RV Gear Buyer’s Guides

RV Siding Materials: Which Type is Best For Camper Exterior Walls?
- Last Updated: March 17, 2024
- 16 minutes read
Are you in the market for a camper? If so, you’re probably neck-deep into RV research, including their basic construction and the various types of camper siding options.
If you’re just beginning your search, however, you might be wondering: What is RV siding made out of?
RV siding is typically made out of either aluminum or fiberglass; and while these are the most common materials used, not every RV is made the same. Fiberglass RVs are made from both laminated and molded fiberglass, while aluminum RVs can be made from corrugated or smooth aluminum.
RV siding material is an important aspect of your search, but it’s not the only element to consider.
So before choosing RV siding, it pays to do a little research on the different types of materials used to construct the exterior walls of your camper and learn about their costs and benefits, and ultimately – which RV siding is best.
Choosing The Correct Siding For Your RV
Welcome to the amazing journey of RV construction; hold on tight, there’s a lot to know!
This is mainly because there are SO many RVs out there to choose from. Lucky for us, there truly is an RV for everyone with many different options for floor plans, features, and of course – siding construction.
As mentioned above, the two main types of camper siding materials are aluminum and fiberglass.
And yes, you can side your RV with just about any material out there: wood, vinyl, steel, etc.. however, you won’t really find those siding materials at a traditional RV dealer.
Indeed, there is a reason why aluminum and fiberglass are so popular: they are both lightweight and durable.
Nevertheless, not all aluminum-sided and fiberglass-sided RVs are similar.
Some RVs have corrugated aluminum (think: wavy siding) while others have smooth aluminum (yep, you guessed it: Airstreams). Likewise, fiberglass RVs are made with either laminated fiberglass or molded fiberglass.
These include most motorhomes, as well as Scamps, Casitas , and other similar trailers. And of course, each option comes with its own list of advantages and disadvantages.
Next, we’ll dive into the four most common types of RV siding construction: corrugated aluminum, smooth aluminum, laminated fiberglass, and molded fiberglass.
Let’s get started!
Different Types of RV Siding Options to Consider
Below are the four different types of siding that are typically used in RVs. While each one has its pros and cons, it’s important to remember that they are used for a reason.
Whether you choose an aluminum-sided RV or a fiberglass one, you can rest easy knowing that they are tried-and-true materials trusted by RV manufacturers throughout the years.
1. Corrugated Aluminum

RVs with corrugated aluminum siding are extremely common, and chances are, someone you know probably has one.
They are typically cheaper than fiberglass RVs because they’re less expensive to make. Even so, it takes more man-hours to build one of these rigs because of their construction.
In fact, RVs with corrugated aluminum siding are referred to as “sticks and tin” campers because they’re built similar to a house.
They typically have a wood frame, fiberglass or foam insulation, and aluminum panels lining the exterior.
Unfortunately, these rigs come with a reputation of being made with lesser quality materials; however, RVs with corrugated aluminum siding have many benefits.
Let’s take a look at the pros and cons.
- Lightweight : Aluminum is actually lighter than fiberglass, and therefore RVs with aluminum siding are generally more lightweight – thus, saving you money at the gas pump.
- Less Expensive : Due to the cost of construction, RVs with corrugated aluminum siding are typically cheaper than those with fiberglass siding. This allows more people to afford RVs and enjoy everything that RV life has to offer.
- Easier to Repair : Because the exterior of the RVs are made with aluminum paneling, they are much easier to repair – especially if you plan on doing the work yourself. If the side of your RV becomes damaged, you can replace individual panels instead of having to remove an entire wall.
- Decent Insulation : We all know that RVs aren’t the best structures for keeping out the cold, but the wood and padding behind the aluminum provide a decent amount of insulation. Some say, better than fiberglass-sided RVs.
- Prone to Dents : Yes, aluminum is lightweight, but that also means it dents very easily. If you find yourself caught in a hail storm or you accidentally drive under low-hanging trees, your RV may not look as nice as it once did.
- Lower Resale Value : Like I said before, RVs with corrugated aluminum siding have a reputation for being built poorly, and in some cases, this is true. Unfortunately, whether this is accurate or not, resale value is affected.
- They Age Poorly : To expand on the last point, these RVs’ susceptibility to dents and dings doesn’t help their resale value either. One mishap or scratch and your RV may suddenly look much older and more beat-up than it actually is.
- More Wood = More Chances for Rot : Lastly, because the frame is made of wood, any kind of water damage is bad news. It’s also harder to spot any water damage from the outside, as the aluminum siding conceals it very well. You may not even discover it until the interior damage is noticeable – and by that time, an entire wall might need replacing.
Example of an RV with Corrugated Aluminum Siding: The Forest River Cherokee Grey Wolf 26DBH Travel Trailer
2. Smooth Aluminum

What’s the first thing that comes to mind when you think of smooth aluminum siding? Airstreams, of course! And Wally Byam knew exactly what he was doing when he founded the iconic company in 1931.
Airstreams are made from a riveted aluminum shell, an aluminum frame, and spray-on insulation.
This allows them to be both light AND indestructible. The body of an Airstream will not rot if left sitting for years in your backyard – there’s no wood in the structure! (Okay, there is wood in the subfloor, but that’s to be expected).
While Airstreams are the most emblematic of the smooth-sided aluminum RVs, they are definitely not the only ones ever made.
In fact, you can find Airstream alternatives such as Living Vehicle Trailers and Bowlus Road Chief Trailers – both excellent companies that make top-quality rigs.
You also may recall seeing different vintage trailers with smooth aluminum siding, as they were very popular at one point.
- Built to Last : Because these RVs are literally a shell of riveted metal, they won’t leak and fall apart like more traditional RVs. How many times have you seen a vintage airstream sitting in someone’s yard looking like it hasn’t aged a day?!
- Lightweight : As we discussed before, aluminum is very lightweight – and when it comes to Airstreams, their outer shell, frame, AND interior shell are all aluminum. Talk about weightlessness!
- High Resale Value : At this point, investing in an Airstream or another comparable RV is almost like investing in a house. And if you buy and restore a vintage trailer like these, you’ll probably find yourself making money on the resale. This is because everyone knows: they last forever.
- You Will Look Oh, So Cool : This factor doesn’t hurt the resale value, either! If you’re into RV life at all, you’ve probably seen those picturesque scenes of a vintage aluminum trailer with amazing views in the back. Yeah, Airstreams definitely have that cool factor, and it doesn’t seem to be going away any time soon.
- Expensive to Buy : As you might guess, riveted aluminum RVs are quite laborious to construct. In fact, Airstreams take two people (one inside, one outside) to insert each rivet. Couple this with their top quality materials and “cool-factor”, and you have one expensive RV (specifically, $188,100 for the 2023 Airstream Classic).
- Expensive to Repair : If you find yourself needing to repair an Airstream, Road Chief, or a similar rig, prepare to pay a pretty penny. Replacing just one segment of an Airstream’s outer shell will cost $2,000 or more, and if you want to DIY it, the parts alone are in the hundreds.
- Dents Easily : As we already mentioned, aluminum dents very easily, and if your RV’s exterior is shiny and smooth, just imagine how it will look after a hail storm!
- Lower R-value : Because metal conducts temperature very easily, these aluminum-built RVs aren’t the best at keeping the heat in or the cold out (or vise versa!). Yes, there is a layer of insulation between the inner and outer aluminum shells, but they aren’t as energy efficient as other RVs.
Example of an RV with Smooth Aluminum Siding: The Airstream Classic Travel Trailer
3. Laminated Fiberglass

Laminated fiberglass is one of the most common types of RV siding; especially in modern RVs.
In fact, if you see a camper or motorhome going down the road with smooth sides, it probably has fiberglass walls.
RVs with fiberglass walls have grown in popularity – mainly because they look so good.
They don’t dent as easily as aluminum and they hold up well as they age. Yes, you may see some cracked decals, but the structure behind it remains solid unless heavy damage occurs.
These RVs are usually made with an aluminum frame, and the walls are constructed with laminated fiberglass, luan wood, foam insulation, and another layer of luan for the inside wall.
If made well, this construction is very durable and lightweight. Moreover, because the frame is aluminum instead of wood, it will withstand water damage better than corrugated aluminum RVs.
In fact, you’ll probably be able to spot water damage pretty quickly. A sure sign that moisture has made its way into your walls is delamination, which happens when the layers of your RV wall separates, creating that wavy or warped look.
- More Resistant to Water Damage: Again, because the frame is aluminum and the insulation is foam, there is less opportunity for mold and rot to make its home in your RV compared to “sticks and tin” RVs.
- Water Tanks are in Located an Enclosed Underbelly : This is a fantastic perk of fiberglass RVs; the water tanks are usually enclosed underneath the RV (where the heat ducts are!). This makes RVing in cold weather a little more enjoyable, as your tanks and pipes won’t freeze as easily.
- Higher Resale Value : Fiberglass RVs are known for being better quality than those with corrugated aluminum sides, and whether or not that is true, the resell value is generally higher for fiberglass RVs.
- Doesn’t Dent as Easily : If you have an RV with laminated fiberglass sides: good news! A hail storm won’t damage your rig nearly as bad as it would an aluminum RV. This also goes for low-hanging branches, excited pets, and other small mishaps.
- They’re Pretty : While aesthetics are purely subjective, most RVers seem to like the smooth, sleek look of fiberglass RVs (as opposed to corrugated aluminum), and this is probably why they have a much better resale value.
Cons:
- Heavier than Aluminum : While fiberglass is a durable, lightweight material, it’s not as lightweight as aluminum. Thus, laminated fiberglass RVs are usually a bit heavier than aluminum ones (and require more powerful tow vehicles).
- Lower R-value than Corrugated Aluminum Competitors : While this point is definitely up for debate, laminated fiberglass walls won’t typically have the same energy efficiency as “sticks and tin” RVs. This is because the aluminum frame, fiberglass, and foam insulation conduct temperature better than the wood and traditional insulation in corrugated aluminum walls.
- More Expensive : As you might expect, fiberglass RVs are usually more expensive than their aluminum counterparts. This is because of the aesthetics, manufacturing costs, and durability of these rigs.
- Unable to DIY Wall Repairs: Unfortunately, if major damage occurs to one of the sidewalls, you won’t be able to repair it yourself. Because the RV walls are created and laminated in a factory, you’ll have to turn to professional help for these projects (and it probably won’t be cheap!).
Example of a Laminated Fiberglass RV: Jayco Eagle HT Fifth Wheel
4. Molded Fiberglass

Molded Fiberglass RVs are in a class of their own. In fact, only six companies manufacture molded fiberglass RVS: Escape, Scamp, Oliver, Casita, Big Foot, and The EggCamper.
These RVs are very recognizable and are made by molding fiberglass into two sections and then sealing them together to create the outer shell.
The interior is then lined with insulation (a space-age “bubble” insulation or foam), and then an interior wall material such as cloth or another layer of fiberglass.
Molded Fiberglass RVs are unique because they don’t need a frame; the molded shell is sturdy enough to hold itself up (with some supports).
This construction provides both advantages and disadvantages when it comes to weight, durability, and size.
- Resistant to Water Damage and Moisture Build-up: Because of the molded design, there are almost no seams – and thus fewer chances for water to seep in. The campers themselves are built with very little wood as well, so you won’t have to worry as much about the integrity of the structure.
- Holds Up with Age : Like Airstreams, molded fiberglass RVs barely seem to age, and there are many older fiberglass campers on the road today. No doubt, buying a molded fiberglass RV like a Scamp or Oliver is a true investment because they last forever.
- High Resale Value : To expand on the last point – since molded fiberglass RVs don’t seem to age, they keep their value! Therefore, you won’t have to worry about the depreciation that a typical RV experiences.
- Lightweight : Because of the ingenious design of molded fiberglass RVs, there is no need for a frame! This cuts down on weight dramatically, as the entire shell is made of lightweight fiberglass.
Cons :
- Less Space Because of the Rounded Edges: This is a common complaint from Scamp, Escape, Oliver, Big Foot, EggCamper, and Casita owners. Because of the molded form, they have almost an egg-like shape (hence the name “The EggCamper”). This can impede both living and storage space.
- Limited by Size : For one reason or another (possibly the rigid nature of fiberglass), molded fiberglass RVs max out at only 25 feet in length. In fact, most of these campers are between 17 and 19 feet, automatically excluding families who need more room.
- Expensive : Considering the size of these RVs, they are considered rather expensive. For example, a 17 foot Casita starts at $25,000, while an 18 foot Oliver starts at $57,000. Yes, they are made to last, but you could save thousands of dollars if you decide to buy a corrugated aluminum rig of the same size.
Example of a Molded Fiberglass RV: Oliver Legacy Elite
So, Which Camper Sliding Material is Better?
It’s tempting to say one material is better than the rest (and I definitely have my own opinions).
However, the best camper outer wall construction is going to differ for everyone.
For example, someone who doesn’t want to blow their budget on a rig they will only use occasionally may opt for a corrugated aluminum RV, while a full-timing family may opt for a large rig with laminated fiberglass sides.
Likewise, a retired couple may enjoy the durability and low maintenance nature of molded fiberglass campers.
Another point worth mentioning is: It’s all how they’re made!
If you search long enough, you’ll find laminated fiberglass RVs that are poorly made and corrugated aluminum RVs that are extremely well built.
Therefore, comparing one material to the other is just one aspect to consider when deciding which RV is best for you – and usually, you get what you pay for!
Now we want to hear from you! Which type of RV do YOU think is best?

About Author / Aaron Richardson
Aaron Richardson is an expert RVer and the co-founder of RVing Know How. Aaron, along with his wife Evelyn, has been living and traveling in their Keystone Fuzion RV since 2017. Their adventures span across the country and beyond, including memorable RVing experiences in Mexico. Aaron's passion for the outdoors and RVing shines through in his writings, where he shares a blend of travel stories, practical tips, and insights to enhance the RV lifestyle.

Complete RV Floor Replacement Guide Including Cost Estimate
8 insane off-road camper vans with 4×4 drive for overland adventure.

Robin D Shelton
We are in the market for a travel trailer and this has helped me understand so much about the camper exterior. My husband is against a corrugated one but those seem to have the best indoor features. It’s good to know that there are some bad fiberglass campers and some good aluminum ones. Thanks for this article.

Eddie olson
Leave a comment cancel reply.
Your email address will not be published.
Save my name, email, and website in this browser for the next time I comment.
You Might Also Like

How To Lubricate RV Slide outs

How To Find The Best RV Kitchen And Bathroom Faucet Replacement and Upgrades

RV Black Tank Flush System: Everything You Need to Know About
Start typing and press Enter to search
IMAGES
VIDEO
COMMENTS
RV Siding Delamination Repair. Simply put de-lamination occurs when the bonding agent holding the fiberglass siding to its backing is damaged and it lets go of its hold. This damage can occur through water leaks or hard impacts. This situation may not be noticeable right away. One method of fixing this damage can be through using a de ...
The first option is a delamination repair kit. These cost about $80-150 and come with a high-strength bonding agent. This can be used to reseal the fiberglass to the underlying layers of the RV. The new bonding material is marine-grade, so it will hold up well if it's exposed to water.
When the siding on the RV begins to look bubbled or wavy, the vehicle might have some RV delamination. ... If you notice your travel trailer showing signs of delamination, it's best to start tending to the problem right away. In minor cases where the travel trailer front cap lamination is just starting to pull away, you can attempt to reseal ...
Most delamination repair kit tend to cost between $75 to $300. Though you still need to find and properly address the initial cause of the water leak, which will likely be an additional cost. This might include things like: Replacing an RV window gasket: $75 to $150. Replacing RV weatherstripping $50 to $200.
The facts on repairing delaminated RV walls and roofs. Delaminated walls on RV's, campers, Class A Motorhomes, Class C Motorhomes, Toy Haulers, and Fifth Whe...
Rv Fiberglass Wall delamination is a problem for many RV owners. How and why delamination occurs is fairly straightforward. In this video on RV siding delami...
The most common cause of the delamination problem is an owner failing to periodically re-seal seams with lap sealant. As a consequence, RV insurance companies and extended warranties don't usually cover RV delamination repairs. If you're in this unfortunate situation but the damage is relatively minor, you can try a delamination repair kit ...
We demonstrate how-to fix mild to moderate delaminated RV walls on campers, motorhomes, 5th wheels off all types.Once water gets into the RV roof or wall, th...
In many cases a leak path opens allowing water to enter the wall. Typically this happens adjacent to windows, vents, lights, roof lines, etc. Age, quality of the original workmanship and materials, vibration, and exposure to the elements are factors related to water intrusion. We typically see a situation where water breaks down the glue that ...
Gain access the area behind the delaminated panel (s) Remove edging, trim, compartment doors and windows necessary to get behind delaminated surfaces. Affected Layers to be treated. There may be areas where multiple layers are delaminated. Test each area and layer to determine where you can insert your injector.
What Is RV Delamination Caused By? Delamination is one of the most noticeable symptoms of RV water damage. If your motorhome was flooded, you could expect and prepare for the appearance of bubbles or ripples on the RV's exterior. Another great enemy of your RV walls, besides water, changes in the weather. The more your RV is exposed to ...
How to Fix Delamination. To get your RV walls back to normal, begin by purchasing a good quality epoxy resin and hardener, such as the West System's 105 Epoxy Resin and 206 Slow Hardener. Once you have this, you'll need a long plastic or wooden dowel, an injector and tube, a clamp, and plenty of wood for bracing and pressing.
Inspect your fiberglass regularly and check for the "bubbling" or "blistering" as mentioned above. Maintain a clean and dry atmosphere inside the RV as much as possible. Use our RV restoration products to maintain the quality of your wood and prevent delamination. Blistering on your RV is more than just unsightly.
5. Remove all items that block access to the delaminate area. Remove trims, windows or lights that can make it hard for you to access the area or make it difficult to create clamps or bracing system. This will largely depend on the area of the camper. This means you may have to remover windows or rain gutter and so on.
Delamination can and should be repaired as soon as possible to stop the process from becoming a runaway train and overwhelming the integrity of your RV. Repair costs vary based on the extent of the damage, running anywhere from several hundred to thousands of dollars. If part or all of an external wall needs to be removed and rebuilt, the costs ...
Patch repairs on delaminated areas can be fairly pricey, so Dave recommends upfront that you take proper precaution to avoid having to navigate this situation. First and foremost, delamination is caused by moisture that seeps between a vehicle's wall layers, which leads to bubbling and corrosion. Dave talks about the difference between ...
Sign up for the free RVLR newsletter to find the latest RV tips and techniques right in your inbox! https://bit.ly/3SAgaP4 RV delamination is a problem that...
RV sidewall delamination repair patch kits are available, but they are band-aids at best and unless you're an expert at RV body repairs, the patch work will show and cracks will soon reappear. The good news is that RV sidewall delamination repair experts might be able to help. But be prepared for sticker shock: the cost of repairing RV ...
If delamination occurs and the area of the damage is small compared to the size of that section, a good body expert can repair the damage with a patch. In your case of delamination on the front of an RV, I would recommend replacing the entire front, as it is a relatively small area and the cost to replace versus repair (if the damaged area is ...
Delamination is a structural flaw in an RV's exterior fiberglass or gel coating. It entails separating laminated layers, which could be the finishing coat on a substrate or multiple layers laminated together to form a thick panel. Delamination can happen on the sidewalls, roof, and floor - essentially, any panel alongside a seam.
Delamination is when the fiberglass or gel coat layer on an RV separates from the backing material. The backing layer used in RVs is typically a lightweight plywood or luan material. This damage can start as a tiny blemish and develop into larger and larger cracks. Moisture or water can seep in and speed up the process.
The kit uses the Composet SLV™ repair resin and wood dowels to help repair soft RV floors and does not damage stryofoam insulation. Included are detailed instructions, injection syringes, mix tools, dowels, drill bit and other tools. Estimated coverage 8-12 square feet & 1 or 2 applications.
Example of an RV with Smooth Aluminum Siding: The Airstream Classic Travel Trailer. 3. Laminated Fiberglass. Laminated fiberglass is one of the most common types of RV siding; especially in modern RVs. In fact, if you see a camper or motorhome going down the road with smooth sides, it probably has fiberglass walls.